chemfig
Advanced usage
9 Stacking
\chemabove[⟨dim⟩]{⟨code⟩}{⟨stuff⟩}
and
\chembelow[⟨dim⟩]{⟨code⟩}{⟨stuff⟩}
place the ⟨stuff⟩ above and below the ⟨code⟩ respectively at a vertical distance ⟨dim⟩, without changing the bounding box of ⟨code⟩. The optional argument allows, if written, to specify this dimension at each call. If the optional argument is not used, a default size will be taken: its value is ⟨1.5pt⟩ but it can be modified with the ⟨key⟩ stack sep = ⟨dim⟩.
These commands are independent of the macro \chemfig and can be used either inside or outside its argument.
They are especially useful in rings, if care is taken to put braces around the letters A, B, C and D in order to prevent chemfig from starting a new atom on these letters:
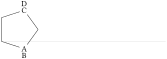
\chemfig{*5(-\chembelow{A}{B}--\chemabove{C}{D}--)}
The \Chemabove and \Chembelow commands work in the same way, except that the bounding box takes into account the ⟨stuff⟩ placed above or below.
What’s the difference between \chemabove and \charge for placing one item above or below another?

\chemfig{*5(----\chemabove{A}{\oplus}-)}

\chemfig{*5(----\charge{90[anchor=-90]=$\oplus$}{A}-)}
By default, the two macros give very similar results. However, there are differences in their use: the \charge macro requires TikZ, whereas \chemabove and \chemabelow use low-level TeX primitives and are therefore fast and independent of any package.