The nicematrix package
12 The \CodeAfter
The option code-after may be used to give some code that will be executed after the construction of the matrix.1
For the legibility of the code, an alternative syntax is provided: it’s possible to give the instructions of the code-after at the end of the environment, after the keyword \CodeAfter (the key code-after is of course mandatory in the \AutoNiceMatrix and the similar commands). Although \CodeAfter is a keyword, it takes in an optional argument (between square brackets).2
The experienced users may, for instance, use the PGF/TikZ nodes created by nicematrix in the \CodeAfter. These nodes are described further in the section 15.
The \CodeAfter provides several special commands: \line, \SubMatrix, \OverBrace, \UnderBrace and \TikzEveryCell. We will now present these commands.
Remark: Since version 7.11a of nicematrix, that \CodeAfter is composed in mathematical mode and, therefore, the spurious spaces are deleted after a command such as \SubMatrix.
12.1 The command \line in the \CodeAfter
The command \line draws directly dotted lines between cells or blocks. The mechanism for those dotted lines is the same as the mechanism used for the dotted leaders created by the commands \Cdots, \Ldots, etc. (cf. 10). The command \lines takes in two arguments for the cells or blocks to link. Both arguments may be:
a specification of cell of the form \(i\)-\(j\) where is the number of the row and \(j\) is the number of the column;
the name of a block (created by the command \Block with the key name of that command).
The options available for the customisation of the dotted lines created by \Cdots, \Vdots, etc. are also available for this command (cf. 10.5).
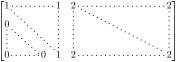
This command may be used, for example, to draw a dotted line between two adjacent cells.

It can also be used to draw a diagonal line not parallel to the other diagonal lines (by default, the dotted lines drawn by \Ddots are “parallelized”: cf. 17.1).
12.2 The command \SubMatrix in the \CodeAfter (and the \CodeBefore)
The command \SubMatrix provides a way to put delimiters on a portion of the array considered as a submatrix. The command \SubMatrix takes in five arguments:
the first argument is the left delimiter, which may be any extensible delimiter provided by LaTeX : (, [, \{, \langle, \lgroup, \lfloor, etc. but also the null delimiter .;
the second argument is the upper-left corner of the submatrix with the syntax \(i\)-\(j\) where \(i\) the number of row and \(j\) the number of column (the special word last is allowed);
the third argument is the lower-right corner with the same syntax;
the fourth argument is the right delimiter;
the last argument, which is optional, is a list of key=value pairs.3
One should remark that the command \SubMatrix draws the delimiters after the construction of the array: no space is inserted by the command \SubMatrix itself. That’s why, in the following example, we have used the key margin and you have added by hand some space between the third and fourth column with @{\hspace{1.5em}} in the preamble of the array.

$\begin{NiceArray}{ccc@{\hspace{1.5em}}c}[cell-space-limits += 2pt,\emph{margin}]

   1           & 1            & 1            & x \\

  \dfrac{1}{4} & \dfrac{1}{2} & \dfrac{1}{4} & y \\

   1           & 2            & 3            & z

\CodeAfter

  \SubMatrix({1-1}{3-3})

  \SubMatrix({1-4}{3-4})

\end{NiceArray}$
Eventually, in this example, it would probably have been easier to put the delimiters directly in the preamble of {NiceArray} (cf. 11) with the following construction.

$\begin{NiceArray}{(ccc)(c)}[cell-space-limits += 2pt]

   1          & 1           & 1           & x \\

  \dfrac{1}{4} & \dfrac{1}{2} & \dfrac{1}{4} & y \\

   1          & 2           & 3           & z

\end{NiceArray}$
In fact, the command \SubMatrix also takes in two optional arguments specified by the traditional symbols ^ and _ for material in superscript and subscript (but no space is reserved for that material and that’s why, in the following example, you have used the key right-margin).

$\begin{bNiceMatrix}[right-margin=1em]

  1 & 1 & 1 \\

  1 & a & b \\

  1 & c & d

\CodeAfter

  \SubMatrix[{2-2}{3-3}]^{T}

\end{bNiceMatrix}$
The options of the command \SubMatrix are as follows:
left-xshift and right-xshift shift horizontally the delimiters (there exists also the key xshift which fixes both parameters);
extra-height adds a quantity to the total height of the delimiters (height \ht + depth \dp);
delimiters/color fixes the color of the delimiters (also available in \NiceMatrixOptions, in the environments with delimiters and as option of the keyword \CodeAfter);
slim is a boolean key: when that key is in force, the horizontal position of the delimiters is computed by using only the contents of the cells of the submatrix whereas, in the general case, the position is computed by taking into account the cells of the whole columns implied in the submatrix (see example below). ;
vlines contents a list of numbers of vertical rules that will be drawn in the sub-matrix (if this key is used without value, all the vertical rules of the sub-matrix are drawn);
hlines is similar to vlines but for the horizontal rules;
hvlines, which must be used without value, draws all the vertical and horizontal rules;
code insert code, especially TikZ code, after the construction of the submatrix. That key is detailed below.
One should remark that the keys add their rules after the construction of the main matrix: no space is added between the rows and the columns of the array for these rules.
All these keys are also available in \NiceMatrixOptions, at the level of the environments of nicematrix or as option of the command \CodeAfter with the prefix sub-matrix which means that their names are therefore sub-matrix/left-xshift, sub-matrix/right-xshift, sub-matrix/xshift, etc.

$\begin{NiceArray}{cc@{\hspace{5mm}}l}[cell-space-limits=2pt]

    &   & \frac{1}{2} \\

    &   & \frac{1}{4} \\[1mm]

  a & b & \frac{1}{2}a+\frac{1}{4}b \\

  c & d & \frac{1}{2}c+\frac{1}{4}d \\

\CodeAfter

  \SubMatrix({1-3}{2-3})

  \SubMatrix({3-1}{4-2})

  \SubMatrix({3-3}{4-3})

\end{NiceArray}$
Here is the same example with the key slim used for one of the submatrices.

$\begin{NiceArray}{cc@{\hspace{5mm}}l}[cell-space-limits=2pt]

    &   & \frac{1}{2} \\

    &   & \frac{1}{4} \\[1mm]

  a & b & \frac{1}{2}a+\frac{1}{4}b \\

  c & d & \frac{1}{2}c+\frac{1}{4}d \\

\CodeAfter

  \SubMatrix({1-3}{2-3})[slim]

  \SubMatrix({3-1}{4-2})

  \SubMatrix({3-3}{4-3})

\end{NiceArray}$
There is also a key name which gives a name to the submatrix created by \SubMatrix. That name is used to create PGF/TikZ nodes: cf. 15.4.
Despite its name, the command \SubMatrix may also be used within a {NiceTabular}. Here is an example (which uses \bottomrule and \toprule of booktabs).
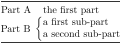
\begin{NiceTabular}{@{}ll@{}}

\toprule

  Part A              & the first part \\

  \Block{2-1}{Part B} & a first sub-part \\

                      & a second sub-part \\

\bottomrule

\CodeAfter

  \SubMatrix{\lbrace}{2-2}{3-2}{.}

\end{NiceTabular}
The command \SubMatrix is, in fact, also available in the \CodeBefore. By using \SubMatrix in the \CodeBefore, the delimiters drawn by those commands \SubMatrix are taken into account to limit the continuous dotted lines (drawn by \Cdots, \Vdots, etc.) which have an open extremity. For an example, see 18.11.
Caution : The following functionality is fragile and does not work with latex–dvips–ps2pdf.
The key code of the command \SubMatrix allows the insertion of code after the construction of the submatrix. It’s meant to be used to insert TikZ instructions because, in the TikZ instructions inserted by that code, the nodes of the form i-j.anchor or i-|j are interpreted with i and j as numbers of row and column relative to the submatrix.4
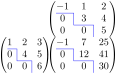
$\begin{NiceArray}{ccc@{}w{c}{5mm}@{}ccc}

    &   &   && -1 & 1  & 2  \\

    &   &   &&  0 & 3  & 4  \\

    &   &   &&  0 & 0  & 5  \\

  1 & 2 & 3 && -1 & 7  & 25 \\

  0 & 4 & 5 && 0  & 12 & 41 \\

  0 & 0 & 6 && 0  & 0  & 30

\CodeAfter

  \NewDocumentCommand{\MyDraw}{}{\tikz \draw [blue] (2-|1) -| (3-|2) -| (4-|3) ;}

  \SubMatrix({1-5}{3-7})[code = \MyDraw ]

  \SubMatrix({4-1}{6-3})[code = \MyDraw ]

  \SubMatrix({4-5}{6-7})[code = \MyDraw ]

\end{NiceArray}$
As we see, the drawing done by our command \MyDraw is relative to the submatrix to which it is applied.
12.3 The commands \OverBrace and \UnderBrace in the \CodeAfter
The commands \OverBrace and \UnderBrace provide a way to put horizontal braces on a part of the array. These commands take in three arguments:
the first argument is the upper-left corner of the submatrix with the syntax \(i\)-\(j\) where \(i\) the number of row and \(j\) the number of column;
the second argument is the lower-right corner with the same syntax;
the third argument is the label of the brace that will be put by nicematrix (with pgf) above the brace (for the command \OverBrace) or under the brace (for \UnderBrace).
It’s possible to use the command \\ in this third argument in order to format the label on several lines.
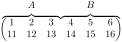
$\begin{pNiceMatrix}

  1  & 2  & 3  & 4  & 5  & 6  \\

  11 & 12 & 13 & 14 & 15 & 16 \\

\CodeAfter

  \OverBrace{1-1}{2-3}{A}

  \OverBrace{1-4}{2-6}{B}

\end{pNiceMatrix}$
Caution: There is no vertical space reserved for those braces and their labels.5
One may compare with the command \Hbrace (cf. 10.7) which must be used within a row of the tabular, row which has necessarily its own vertical space.
In fact, the commands \OverBrace and \UnderBrace take in an optional argument (in first position and between square brackets) for a list of key=value pairs. The available keys are:
left-shorten and right-shorten which do not take in value; when the key left-shorten is used, the abscissa of the left extremity of the brace is computed with the contents of the cells of the involved sub-array, otherwise, the position of the potential vertical rule is used (idem for right-shorten).
shorten, which is the conjunction of the keys left-shorten and right-shorten;
yshift, which shifts vertically the brace (and its label);
color, which sets the color of the brace (and its label).
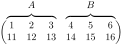
$\begin{pNiceMatrix}

  1  & 2  & 3  & 4  & 5  & 6  \\

  11 & 12 & 13 & 14 & 15 & 16 \\

\CodeAfter

  \OverBrace[shorten,yshift=3pt]{1-1}{2-3}{A}

  \OverBrace[shorten,yshift=3pt]{1-4}{2-6}{B}

\end{pNiceMatrix}$
\(\triangleright\) The commands \OverBrace and \UnderBrace use the standard braces of the mathematical mode of LaTeX on which they are based. However, nicematrix provides also a command \Hbrace which should be used directly in the tabular and which draws braces of TikZ (cf. 10.7).
12.4 The command \TikzEveryCell
The command \TikzEveryCell executes with TikZ the rectangular path corresponding to each cell of the tabular with parameters of TikZ the argument of \TikzEveryCell. That argument must be a list of key=value pairs which may be applied to a TikZ path. In fact, the command applies to each cell of the tabular, except those in the exterior rows and columns (cf. 9) and those in the empty corners (when the key corners is used: cf. 5.3.3). It applies in fact to each block (excepted those with the key transparent) and does not apply to the individual cells located within these blocks.
In fact, in the list of keys provided as argument of \TikzEveryCell, it’s possible to put a key offset. That key is not provided by TikZ but by nicematrix. It will narrow the rectangular frame corresponding to the block by a margin (horizontally and vertically) equal to the value (of that key offset). That new frame, a bit narrower, will be executed by TikZ with options which are the other keys in the argument of \TikzEveryCell.
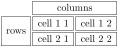
\renewcommand{\arraystretch}{1.3}

\begin{NiceTabular}{ccc}[corners]

  & \Block{1-2}{columns} \\

  \Block{2-1}{rows}

  & cell 1 1 & cell 1 2 \\

  & cell 2 1 & cell 2 2

\CodeAfter

  \TikzEveryCell{offset=1pt,draw}

\end{NiceTabular}
The command \TikzEveryCell is, in fact, also available in the \CodeBefore.
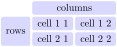
\renewcommand{\arraystretch}{1.3}

\begin{NiceTabular}{ccc}[corners]

\CodeBefore

  \TikzEveryCell

    {

      offset=1pt,

      fill=blue!15,

      rounded corners=2pt

    }

\Body

  & \Block{1-2}{columns} \\

  \Block{2-1}{rows}

  & cell 1 1 & cell 1 2 \\

  & cell 2 1 & cell 2 2

\end{NiceTabular}
The command \TikzEveryCell has two optional keys, available between square brackets.
with the key empty, the command only acts on the empty cells (the exact definition of an “empty cell” is given in part 17.2);
with the key not-empty, the command only acts on the not-empty cells.
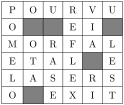
\renewcommand{\arraystretch}{1.4}

\begin{NiceTabular}{cccccc}[hvlines]

  P & O & U & R & V & U \\

  O &   &   & E & I &   \\

  M & O & R & F & A & L \\

  E & T & A & L &   & E \\

  L & A & S & E & R & S \\

  O &   & E & X & I & T

\CodeAfter

  \TikzEveryCell[empty]{fill=gray,draw}

\end{NiceTabular}

\begin{NiceTabular}{ccccc}

1 & 2 & 3 & 4 &   \\

1 &   &   & 4 & 5 \\

1 &   &   &   & 5 \\

1 & 2 &   & 4 & 5 \\

1 & 2 & 3 & 4 & 5 \\

\CodeAfter

  \TikzEveryCell[not-empty]{draw}

\end{NiceTabular}
1 There is also a key code-before described in the section 6.2.
2 Here are the keys accepted in that argument: delimiters/color, rules and its sub-keys, sub-matrix (linked to the command \SubMatrix) and its sub-keys and xdots (for the command \line) and its sub-keys.
3 There is no optional argument between square brackets in first position because a square bracket just after \SubMatrix must be interpreted as the first (mandatory) argument of the command \SubMatrix: that bracket is the left delimiter of the sub-matrix to construct (eg.: \SubMatrix[{2-2}{4-7}]).
4 Be careful: the syntax j|-i is not allowed.