The nicematrix package
10 Dotted leaders in the matrices
Inside the environments of the package nicematrix, new commands are defined: \Ldots, \Cdots, \Vdots, \Ddots and \Iddots. These commands are intended to be used in place of \dots, \cdots, \vdots, \ddots and \iddots.1
Each of them must be used alone in the cell of the array and it draws a dotted line as leader between the first non-empty cells2 on both sides of the current cell. Of course, for \Ldots and \Cdots, it’s an horizontal line; for \Vdots, it’s a vertical line and for \Ddots and \Iddots diagonal ones. It’s possible to change the color of these lines with the option color.3

In order to represent the null matrix, one can use the following code:

However, one may prefer a larger matrix. Usually, in such a case, the users of LaTeX add a new row and a new column. It’s possible to use the same method with nicematrix:

In the first column of this example, there are two instructions \Vdots but, of course, only one dotted line is drawn.
In fact, in this example, it would be possible to draw the same matrix more easily with the following code:

There are also other means to change the size of the matrix. Someone might want to use the optional argument of the command \\ for the vertical dimension and a command \hspace* in a cell for the horizontal dimension.4
However, a command \hspace* might interfere with the construction of the dotted lines. That’s why the package nicematrix provides a command \Hspace which is a variant of \hspace transparent for the dotted lines of nicematrix.

10.1 The option xdots/nullify
Consider the following matrix composed classicaly with the environment {pmatrix} of amsmath.
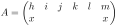
$A = \begin{pmatrix}

h & i & j & k & l & m \\

x &   &   &   &   & x

\end{pmatrix}$
If we add \ldots instructions in the second row, the geometry of the matrix is modified.

$B = \begin{pmatrix}

h & i & j & k & l & m \\

x & \ldots & \ldots  & \ldots & \ldots & x

\end{pmatrix}$
By default, with nicematrix, if we replace {pmatrix} by {pNiceMatrix} and \ldots by \Ldots, the geometry of the matrix is not changed.

However, one may prefer the geometry of the first matrix \(A\) and would like to have such a geometry with a dotted line in the second row. It’s possible by using the option xdots/nullify5 (and only one instruction \Ldots is necessary).
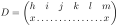
$D = \begin{pNiceMatrix}[xdots/nullify]

h & i & j & k & l & m \\

x & \Ldots & &  &  & x

\end{pNiceMatrix}$
The option xdots/nullify smashes the instructions \Ldots (and the variants) horizontally but also vertically.
Caution: the key xdots/nullify has a name that may be confusing; that key does not imply that the dotted rules won’t be drawn!
10.2 The commands \Hdotsfor and \Vdotsfor
Some people commonly use the command \hdotsfor of amsmath in order to draw horizontal dotted lines in a matrix. In the environments of nicematrix, one should use instead \Hdotsfor in order to draw dotted lines similar to the other dotted lines drawn by \Cdots, \Vdots, etc.
As with the other commands of nicematrix (like \Cdots, \Ldots, \Vdots, etc.), the dotted line drawn with \Hdotsfor extends until the contents of the cells on both sides.

$\begin{pNiceMatrix}

1 & 2 & 3 & 4 & 5 \\

1 & \Hdotsfor{3} & 5 \\

1 & 2 & 3 & 4 & 5 \\

1 & 2 & 3 & 4 & 5

\end{pNiceMatrix}$
However, if these cells are empty, the dotted line extends only in the cells specified by the argument of \Hdotsfor (by design).

$\begin{pNiceMatrix}

1 & 2 & 3 & 4 & 5 \\

  & \Hdotsfor{3} \\

1 & 2 & 3 & 4 & 5 \\

1 & 2 & 3 & 4 & 5

\end{pNiceMatrix}$
Remark: Unlike the command \hdotsfor of amsmath, the command \Hdotsfor may be used even when the package colortbl6 is loaded (however, with nicematrix, loading colortbl is rather point-less since nicematrix provides its own coloring tools: cf. 6.2).
The package nicematrix also provides a command \Vdotsfor similar to \Hdotsfor but for the vertical dotted lines.
The following example uses both \Hdotsfor and \Vdotsfor:
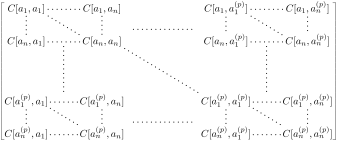
$\begin{bNiceMatrix}

C[a_1,a_1] & \Cdots & C[a_1,a_n]

  & \hspace*{20mm} & C[a_1,a_1^{(p)}] & \Cdots & C[a_1,a_n^{(p)}] \\

\Vdots & \Ddots & \Vdots

  & \Hdotsfor{1} & \Vdots & \Ddots & \Vdots \\

C[a_n,a_1] & \Cdots & C[a_n,a_n]

  & & C[a_n,a_1^{(p)}] & \Cdots & C[a_n,a_n^{(p)}] \\

\rule{0pt}{15mm}\NotEmpty  & \Vdotsfor{1} & & \Ddots & & \Vdotsfor{1} \\

C[a_1^{(p)},a_1] & \Cdots & C[a_1^{(p)},a_n]

  & & C[a_1^{(p)},a_1^{(p)}] & \Cdots & C[a_1^{(p)},a_n^{(p)}] \\

\Vdots & \Ddots & \Vdots

  & \Hdotsfor{1} & \Vdots & \Ddots & \Vdots \\

C[a_n^{(p)},a_1] & \Cdots & C[a_n^{(p)},a_n]

  & & C[a_n^{(p)},a_1^{(p)}] & \Cdots & C[a_n^{(p)},a_n^{(p)}]

\end{bNiceMatrix}$
10.3 How to generate the dotted leaders transparently
Imagine you have a document with a great number of mathematical matrices with ellipsis. You may wish to use the dotted lines of nicematrix without having to modify the code of each matrix. It’s possible with the keys. renew-dots and renew-matrix.7
The option renew-dots
With this option, the commands \ldots, \cdots, \vdots, \ddots, \iddots and \hdotsfor are redefined within the environments provided by nicematrix and behave like \Ldots, \Cdots, \Vdots, \Ddots, \Iddots and \Hdotsfor; the command \dots (“automatic dots” of amsmath) is also redefined to behave like \Ldots.
The option renew-matrix
With this option, the environment {matrix} is redefined and behave like {NiceMatrix}, and so on for the five variants with delimiters.
Therefore, with the keys renew-dots and renew-matrix, a classical code gives directly the output of nicematrix.

\NiceMatrixOptions{renew-dots,renew-matrix}

$\begin{pmatrix}

1      & \cdots & \cdots & 1      \\

0      & \ddots &        & \vdots \\

\vdots & \ddots & \ddots & \vdots \\

0      & \cdots & 0      & 1

\end{pmatrix}$
However, one should note that the environments of nicematrix can’t be nested, and, therefore, it’s not possible to use renew-matrix if we have, for example, an environment {pmatrix} nested within another environment {pmatrix}.
10.4 The labels of the dotted leaders
The commands \Ldots, \Cdots, \Vdots, \Ddots, \Iddots, \Hdotsfor and \Vdotsfor (and the command \line in the \CodeAfter which is described in the section 12.1) accept three optional arguments specified by the tokens _, ^ and : for labels positioned below, above or on the line. The arguments are composed in math mode with \scriptstyle.
The label specified by “:” is composed on a white background which is put on the line previously drawn (cf. example 18.9).

$\begin{bNiceMatrix}

1 & \hspace*{1cm}            & 0 \\[8mm]

  & \Ddots^{n \text{ times}} &   \\

0 &                          & 1

\end{bNiceMatrix}$
With the key horizontal-label, the label stays horizontal.

$\begin{bNiceMatrix}

1 & \hspace*{1cm}            & 0 \\[8mm]

  & \Ddots[horizontal-label]^{n \text{ times}} &   \\

0 &                          & 1

\end{bNiceMatrix}$
10.5 Customisation of the dotted leaders
The dotted lines drawn by \Ldots, \Cdots, \Vdots, \Ddots, \Iddots, \Hdotsfor and \Vdotsfor (and by the command \line in the \CodeAfter which is described in the section 12.1) may be customized by the following options (specified between square brackets after the command):
nullify;
horizontal-label(s);
color;
radius;
shorten-start\(^+\), shorten-end\(^+\) and shorten\(^+\);
inter;
line-style.
For an individual command, it’s possible to write horizontal-label (in the singular).
These options may also be fixed with \NiceMatrixOptions, as options of \CodeAfter or at the level of a given environment but, in those cases, they must be prefixed by xdots (xdots to remind that it works for \Cdots, \Ldots, \Vdots, etc.), and, thus have for names:
xdots/nullify;
xdots/horizontal-labels;
xdots/color;
xdots/radius;
xdots/shorten-start\(^+\), xdots/shorten-end\(^+\) and xdots/shorten\(^+\);
xdots/inter;
xdots/line-style.
For the clarity of the explanations, we will use those names.
The key xdots/nullify has yet been described in the part 10.1.
With the key xdots/horizontal-labels, the labels (introduced by _, ^ and :) stay horizontal.
The option xdots/color fixes the color of the dotted line. It’s possible to use a color defined “on the fly” (e.g.: xdots/color = { [RGB]{204,204,255} }). One should remark that the dotted lines drawn in the exterior rows and columns have a special treatment: cf. 9.
The option xdots/radius fixes the radius of the dots. The initial value is 0.53 pt.
The keys xdots/shorten-start\(^+\) and xdots/shorten-end\(^+\) fix the margin at the extremities of the line. The key xdots/shorten\(^+\) fixes both parameters. The initial value is 0.3 em.8
These keys have a normal syntax but also a “additive” syntax. That means that it’s possible to write, for example, xdots/shorten = 0.6em but also xdots/shorten += 3pt (ant we remind that the initial value is not zero!).
The option xdots/inter fixes the length between the dots. The initial value is 0.45 em (it is recommended to use a unit of length dependent of the current font).
The option xdots/line-style
It should be pointed that, by default, the lines drawn by TikZ with the parameter dotted are composed of square dots (and not rounded ones).9
\tikz \draw [dotted] (0,0) -- (5,0) ;
In order to provide lines with rounded dots in the style of those provided by \ldots (at least with the Computer Modern fonts), the package nicematrix embeds its own system to draw a dotted line (and this system uses pgf and not TikZ). This style is called standard and that’s the initial value of the parameter xdots/line-style.
However (when TikZ is loaded) it’s possible to use for xdots/line-style any style provided by TikZ, that is to say any sequence of options provided by TikZ for the TikZ paths (with the exception of “color”, “shorten >” and “shorten <”).
Here is for example a tridiagonal matrix with the style loosely dotted:

10.6 The dotted leaders and the rules
The dotted lines determine virtual blocks which have the same behaviour regarding the rules (the rules specified by the specifier | in the preamble, by the command \Hline, by the keys hlines, vlines, hvlines and hvlines-except-borders and by the tools created by custom-line are not drawn within the blocks).10

10.7 The commands \Hbrace and \Vbrace
Since, as said previously, it’s possible to use, with the commands \Cdots, \Ldots, \Vdots, etc. all the styles of lines provided by TikZ, one may wish to use those commands to draw braces with the decoration brace provided by the library decorations.pathreplacing of TikZ.
In order to facilitate that use, nicematrix provides two commands \Hbrace and \Vbrace. Those commands are available only if TikZ has been loaded with its library decorations.pathreplacing (before or after the loading of nicematrix). Otherwise, a (non-fatal) error will be raised.
\usepackage{tikz}

\usetikzlibrary{decorations.pathreplacing}
The commands \Hbrace and \Vbrace have the same syntax. Both commands take in three arguments:
an optional argument, between square brackets, which contains a list of key=value pairs: the keys allowed are color, horizontal-labels, shorten, shorten-start and shorten-end.
A key brace-shift\(^+\) is also provided to shift the brace (and its label) towards the exterior of the matrix. That key has a normal syntax but also an “additive” syntax, which means that it’s possible to write, for example, brace-shift = 3pt but also brace-shift += 1pt.
a mandatory argument which is the number of columns (for \Hbrace) or the number of rows (for \Vbrace) over which the command applies;
an mandatory argument which is the label of the curly brace.
As regards the ampersands (&), \Hbrace has the same behavior as the commands \multicolumn, \hdotsfor, \Hdotsfor (provided by nicematrix), etc.: only one ampersand must be inserted, even if the brace that will be drawn will extend on several columns.
\usepackage{tikz}                          % in the preamble

\usetikzlibrary{decorations.pathreplacing} % in the preamble
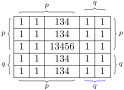
$\begin{NiceArray}{ccccc}%

  [ hvlines ,

    first-row ,

    last-row = 6,

    first-col ,

    last-col ,

    xdots/horizontal-labels ]

& \Hbrace{3}{p} & \Hbrace[brace-shift=1mm]{2}{q} \\

\Vbrace{3}{p} & 1 & 1 & 134 & 1 & 1 & \Vbrace{3}{p} \\

& 1 & 1 & 134 & 1 & 1 \\

& 1 & 1 & 13456 & 1 & 1 \\

\Vbrace{2}{q} & 1 & 1 & 134 & 1 & 1 & \Vbrace{2}{q}\\

& 1 & 1 & 134 & 1 & 1 \\

& \Hbrace{3}{p} & \Hbrace[color=blue]{2}{q} \\

\end{NiceArray}$
The TikZ style used by nicematrix to draw those braces is called nicematrix/brace. Here is the initial value of that style:
decoration = { brace , raise = -0.15 em } ,

decorate
The final user can change that TikZ style as he wishes (respecting the structure with the keys decorate and decoration).
For another example of use of \Hbrace and \Vbrace, see 18.8.
It’s also possible to draw braces of the mathematical mode of LaTeX by using the commands \OverBrace and \UnderBrace (cf. 12.3) and the command \SubMatrix (cf. 12.2) in the \CodeAfter.
1 The command \iddots, defined in nicematrix, is a variant of \ddots with dots going forward. If mathdots is loaded, the version of mathdots is used. It corresponds to the command \adots of unicode-math.
2 The precise definition of a “non-empty cell” is given below (cf. 17.2).
3 It’s also possible to change the color of all these dotted lines with the option xdots/color (xdots to remind that it works for \Cdots, \Ldots, \Vdots, etc.): cf. 10.5.
4 In nicematrix, one should use \hspace* and not \hspace for such an usage because nicematrix loads array. One may also remark that it’s possible to fix the width of a column by using the environment {NiceArray} (or one of its variants) with a column of type w or W: cf. 8
5 The key xdots/nullify has an alias, which is nullify-dots.
6 We recall that when xcolor is loaded with the option table, the package colortbl is loaded.
7 The options renew-dots, renew-matrix can be fixed with the command \NiceMatrixOptions like the other options. However, they can also be fixed as options of the command \usepackage.
8 In fact, when xdots/shorten, xdots/shorten-start and xdots/shorten-end are used in \NiceMatrixOptions or at the level of an environment (such as {pNiceMatrix}), those keys only apply to the extremeties of dotted lines corresponding to a non-empty content of a cell. When they are used for a command such as \Cdots (and, in that case, their names are shorten, shorten-start and shorten-end), they apply to all the extremities.
9 The first reason of this behaviour is that the pdf format includes a description for dashed lines. The lines specified with this descriptor are displayed very efficiently by the pdf readers. It’s easy, starting from these dashed lines, to create a line composed by square dots whereas a line of rounded dots needs a specification of each dot in the pdf file. Nevertheless, you can have a look at the following page to see how to have dotted rules with rounded dots in TikZ:
https://tex.stackexchange.com/questions/52848/tikz-line-with-large-dots
10 On the other side, the command \line in the \CodeAfter (cf. 12.1) does not create any block.