TikZ and PGF Manual
TikZ
16 Arrows
16.1 Overview
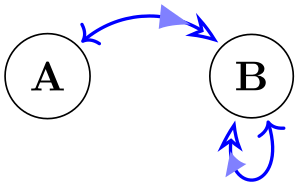
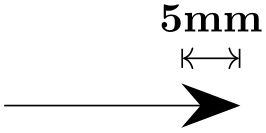
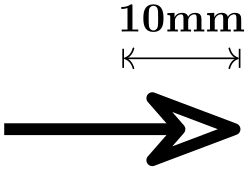
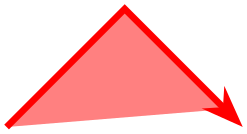
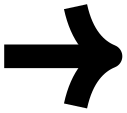
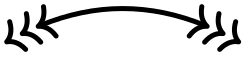
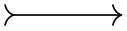
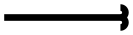
TikZ allows you to add (multiple) arrow tips to the end of lines as in
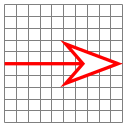
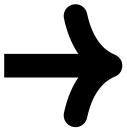
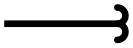
 or in
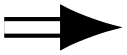
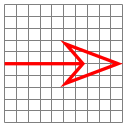
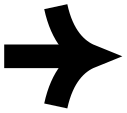
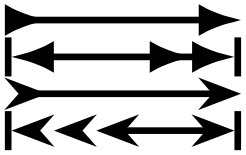
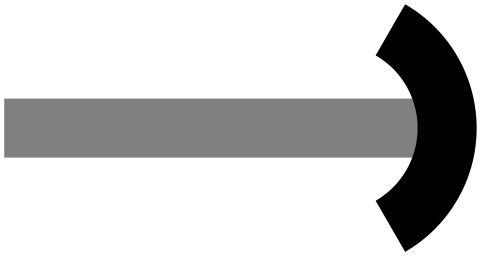
or in
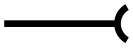
 . It is possible to change which arrow tips are used “on-the-fly”, you can have several arrow tips in a row, and
you can change the appearance of each of them individually using a special syntax. The following example is a perhaps slightly
“excessive” demonstration of what you can do (you need to load the arrows.meta library for
it to work):
. It is possible to change which arrow tips are used “on-the-fly”, you can have several arrow tips in a row, and
you can change the appearance of each of them individually using a special syntax. The following example is a perhaps slightly
“excessive” demonstration of what you can do (you need to load the arrows.meta library for
it to work):

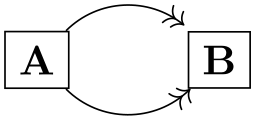
                \usetikzlibrary {arrows.meta,bending,positioning}

                \tikz {

                  \node [circle,draw] (A)              {A};

                  \node [circle,draw] (B) [right=of A] {B};


                  \draw [draw =
                blue, thick,

                         arrows={

                             Computer Modern Rightarrow [sep]

                           - Latex[blue!50,length=8pt,bend,line width=0pt]

                             Stealth[length=8pt,open,bend,sep]}]

                    (A) edge
                [bend left=45] (B)

                    (B) edge
                [in=-110, out=-70,looseness=8] (B);

                }
There are a number of predefined generic arrow tip kinds whose appearance you can modify in many ways using various options. It is also possible to define completely new arrow tip kinds, see Section 105, but doing this is somewhat harder than configuring an existing kind (it is like the difference between using a font at different sizes or faces like italics, compared to designing a new font yourself).
In the present section, we go over the various ways in which you can configure which particular arrow tips are used. The glorious details of how new arrow tips can be defined are explained in Section 105.
At the end of the present section, Section 16.5, you will find a description of the different predefined arrow tips from the arrows.meta library.
Remark: Almost all of the features described in the following were introduced in version 3.0 of TikZ. For compatibility reasons, the old arrow tips are still available. To differentiate between the old and new arrow tips, the following rule is used: The new, more powerful arrow tips start with an uppercase letter as in Latex, compared to the old arrow tip latex.
Remark: The libraries arrows and arrows.spaced are deprecated. Use arrows.meta instead/additionally, which allows you to do all that the old libraries offered, plus much more. However, the old libraries still work and you can even mix old and new arrow tips (only, the old arrow tips cannot be configured in the ways described in the rest of this section; saying scale=2 for a latex arrow has no effect for instance, while for Latex arrows it doubles their size as one would expect.)
16.2 Where and When Arrow Tips Are Placed
In order to add arrow tips to the lines you draw, the following conditions must be met:
-
1. You have specified that arrow tips should be added to lines, using the arrows key or its short form.
-
2. You set the tips key to some value that causes tips to be drawn (to be explained later).
-
3. You do not use the clip key (directly or indirectly) with the current path.
-
4. The path actually has two “end points” (it is not “closed”).
Let us start with an introduction to the basics of the arrows key:
-
/tikz/arrows=⟨start arrow specification⟩-⟨end arrow specification⟩(no default) 
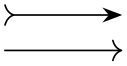
This option sets the arrow tip(s) to be used at the start and end of lines. An empty value as in -> for the start indicates that no arrow tip should be drawn at the start.
Note: Since the arrow option is so often used, you can leave out the text arrows=. What happens is that every (otherwise unknown) option that contains a - is interpreted as an arrow specification.
\usetikzlibrary {arrows.meta}
\begin{tikzpicture}
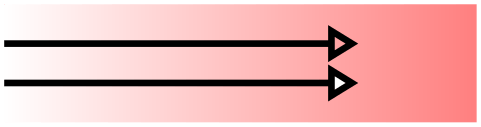
\draw[->] (0,0) --
(1,0);
\draw[>-Stealth] (0,0.3) --
(1,0.3);
\end{tikzpicture}
In the above example, the first start specification is empty and the second is >. The end specifications are > for the first line and Stealth for the second line. Note that it makes a difference whether > is used in a start specification or in an end specification: In an end specification it creates, as one would expect, a pointed tip at the end of the line. In the start specification, however, it creates a “reversed” version if this arrow – which happens to be what one would expect here.
The above specifications are very simple and only select a single arrow tip without any special configuration options, resulting in the “natural” versions of these arrow tips. It is also possible to “configure” arrow tips in many different ways, as explained in detail in Section 16.3 below by adding options in square brackets following the arrow tip kind:
                    \usetikzlibrary {arrows.meta}

                    \begin{tikzpicture}

                      \draw[-{Stealth[red]}] (0,0)   --
                    (1,0);

                    \end{tikzpicture}
Note that in the example I had to surround the end specification by braces. This is necessary so that TikZ does not mistake the closing square bracket of the Stealth arrow tip’s options for the end of the options of the \draw command. In general, you often need to add braces when specifying arrow tips except for simple case like -> or <<->, which are pretty frequent, though. When in doubt, say arrows={⟨start spec⟩-⟨end spec⟩}, that will always work.
It is also possible to specify multiple (different) arrow tips in a row inside a specification, see Section 16.4 below for details.
As was pointed out earlier, to add arrow tips to a path, the path must have “end points” and not be “closed” – otherwise adding arrow tips makes little sense, after all. However, a path can actually consist of several subpath, which may be open or not and may even consist of only a single point (a single move-to). In this case, it is not immediately obvious, where arrow heads should be placed. The actual rules that TikZ uses are governed by the setting of the key tips:
-
/pgf/tips=⟨value⟩ (default true, initially on draw) 
-
alias /tikz/tips
This key governs in what situations arrow tips are added to a path. The following ⟨values⟩ are permissible:
-
• true (the value used when no ⟨value⟩ is specified)
-
• proper
-
• on draw (the initial value, if the key has not yet been used at all)
-
• on proper draw
-
• never or false (same effect)
Firstly, there are a whole bunch of situations where the setting of these (or other) options causes no arrow tips to be shown:
-
• If no arrow tips have been specified (for instance, by having said arrows=-), no arrow tips are drawn.
-
• If the clip option is set, no arrow tips are drawn.
-
• If tips has been set to never or false, no arrow tips are drawn.
-
• If tips has been set to on draw or on proper draw, but the draw option is not set, no arrow tips are drawn.
-
• If the path is empty (as in \path ;), no arrow tips are drawn.
-
• If at least one of the subpaths of a path is closed (cycle is used somewhere or something like circle or rectangle), arrow tips are never drawn anywhere – even if there are open subpaths.
Now, if we pass all of the above tests, we must have a closer look at the path. All its subpaths must now be open and there must be at least one subpath. We consider the last one. Arrow tips will only be added to this last subpath.
-
1. If this last subpath not degenerate (all coordinates on the subpath are the same as in a single “move-to” \path (0,0); or in a “move-to” followed by a “line-to” to the same position as in \path (1,2) -- (1,2)), arrow tips are added to this last subpath now.
-
2. If the last subpath is degenerate, we add arrow tips pointing upward at the single coordinate mentioned in the path, but only for tips begin set to true or to on draw – and not for proper nor for on proper draw. In other words, “proper” suppresses arrow tips on degenerate paths.


-
One common pitfall when arrow tips are added to a path should be addressed right here at the beginning: When TikZ positions an arrow tip at the start, for all its computations it only takes into account the first segment of the subpath to which the arrow tip is added. This “first segment” is the first line-to or curve-to operation (or arc or parabola or a similar operation) of the path; but note that decorations like snake will add many small line segments to paths. The important point is that if this first segment is very small, namely smaller that the arrow tip itself, strange things may result. As will be explained in Section 16.3.8, TikZ will modify the path by shortening the first segment and shortening a segment below its length may result in strange effects. Similarly, for tips at the end of a subpath, only the last segment is considered.
The bottom line is that wherever an arrow tip is added to a path, the line segment where it is added should be “long enough”.
16.3 Arrow Keys: Configuring the Appearance of a Single Arrow Tip
For standard arrow tip kinds, like Stealth or Latex or Bar, you can easily change their size, aspect ratio, color, and other parameters. This is similar to selecting a font face from a font family: “This text” is not just typeset in the font “Computer Modern”, but rather in “Computer Modern, italic face, 11pt size, medium weight, black color, no underline, …” Similarly, an arrow tip is not just a “Stealth” arrow tip, but rather a “Stealth arrow tip at its natural size, flexing, but not bending along the path, miter line caps, draw and fill colors identical to the path draw color, …”
Just as most programs make it easy to “configure” which font should be used at a certain point in a text, TikZ tries to make it easy to specify which configuration of an arrow tip should be used. You use arrow keys, where a certain parameter like the length of an arrow is set to a given value using the standard key–value syntax. You can provide several arrow keys following an arrow tip kind in an arrow tip specification as in Stealth[length=4pt,width=2pt].
While selecting a font may be easy, designing a new font is a highly creative and difficult process and more often than not, not all faces of a font are available on any given system. The difficulties involved in designing a new arrow tip are somewhat similar to designing a new letter for a font and, thus, it may also happen that not all configuration options are actually implemented for a given arrow tip. Naturally, for the standard arrow tips, all configuration options are available – but for special-purpose arrow tips it may well happen that an arrow tip kind simply “ignores” some of the configurations given by you.
Some of the keys explained in the following are defined in the library arrows.meta, others are always available. This has to do with the question of whether the arrow key needs to be supported directly in the pgf core or not. In general, the following explanations assume that arrows.meta has been loaded.
16.3.1 Size
The most important configuration parameter of an arrow tip is undoubtedly its size. The following two keys are the main keys that are important in this context:
-
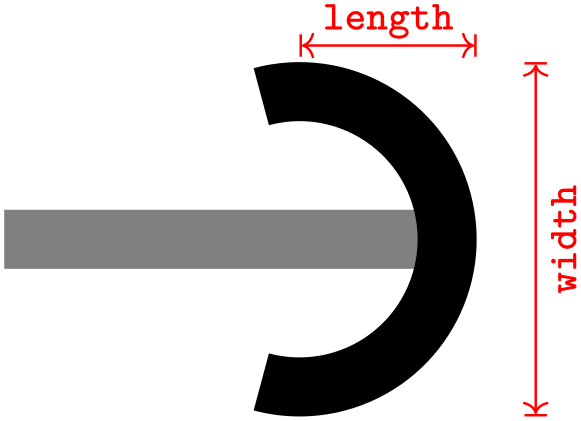
/pgf/arrow keys/length=⟨dimension⟩ ⟨line width factor⟩ ⟨outer factor⟩(no default) 
-
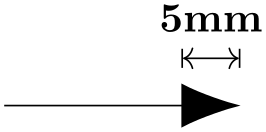
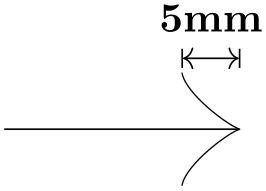
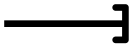
1. If the arrow tip consists of a closed path (like Stealth or Latex), imagine the arrow tip drawn from left to right using a miter line cap. Then the length should be the horizontal distance from the first drawn “pixel” to the last drawn “pixel”. Thus, the thickness of the stroked line and also the miter ends should be taken into account:

-
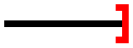
2. If, in the above case, the arrow is drawn using a round line join (see Section 16.3.7 for details on how to select this), the size of the arrow should still be the same as in the first case (that is, as if a miter join were used). This creates some “visual consistency” if the two modes are mixed or if you later want to change the mode.
As the above example shows, however, a rounded arrow will still exactly “tip” the point where the line should end (the point (2,0) in the above case). It is only the scaling of the arrow that is not affected.
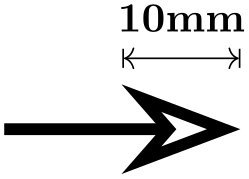
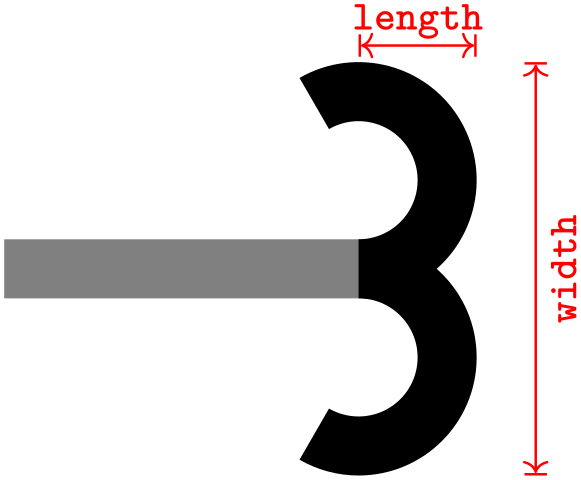
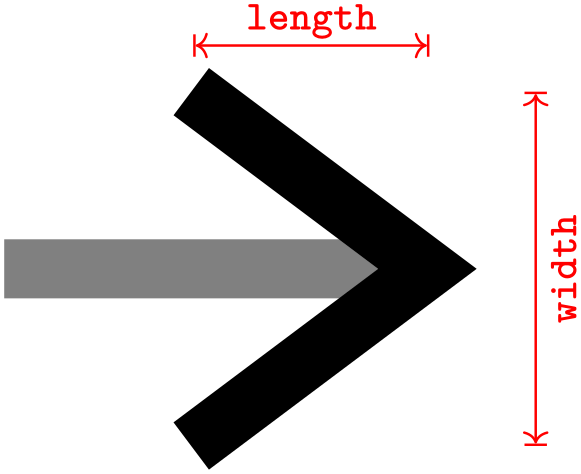
This parameter is usually the most important parameter that governs the size of an arrow tip: The ⟨dimension⟩ that you provide dictates the distance from the “very tip” of the arrow to its “back end” along the line:

The Line Width Factors. Following the ⟨dimension⟩, you may put a space followed by a ⟨line width factor⟩, which must be a plain number (no pt or cm following). When you provide such a number, the size of the arrow tip is not just ⟨dimension⟩, but rather ⟨dimension⟩ + ⟨line width factor⟩ \(\cdot w\) where \(w\) is the width of the to-be-drawn path. This makes it easy to vary the size of an arrow tip in accordance with the line width – usually a very good idea since thicker lines will need thicker arrow tips.
As an example, when you write length=0pt 5, the length of the arrow will be exactly five times the current line width. As another example, the default length of a Latex arrow is length=3pt 4.5 0.8. Let us ignore the 0.8 for a moment; the 3pt 4.5 then means that for the standard line width of 0.4pt, the length of a Latex arrow will be exactly 4.8pt (3pt plus 4.5 times 0.4pt).
Following the line width factor, you can additionally provide an ⟨outer factor⟩, again preceded by a space (the 0.8 in the above example). This factor is taken into consideration only when the double option is used, that is, when a so-called “inner line width”. For a double line, we can identify three different “line widths”, namely the inner line width \(w_i\), the line width \(w_o\) of the two outer lines, and the “total line width” \(w_t = w_i + 2w_o\). In the below examples, we have \(w_i = 3\mathrm {pt}\), \(w_o=1\mathrm {pt}\), and \(w_t = 5\mathrm {pt}\). It is not immediately clear which of these line widths should be considered as \(w\) in the above formula ⟨dimension⟩ + ⟨line width factor⟩ \(\cdot w\) for the computation of the length. One can argue both for \(w_t\) and also for \(w_o\). Because of this, you use the ⟨outer factor⟩ to decide on one of them or even mix them: TikZ sets \(w\) = ⟨outer factor⟩ \(w_o\) + (1 −⟨outer factor⟩)\(w_t\). Thus, when the outer factor is \(0\), as in the first of the following examples and as is the default when it is not specified, the computed \(w\) will be the total line width \(w_t = 5\mathrm {pt}\). Since \(w=5\mathrm {pt}\), we get a total length of \(15pt\) in the first example (because of the factor 3). In contrast, in the last example, the outer factor is 1 and, thus, \(w = w_o = \mathrm {1pt}\) and the resulting length is 3pt. Finally, for the middle case, the “middle” between 5pt and 1pt is 3pt, so the length is 9pt.
                    \usetikzlibrary {arrows.meta}

                    \tikz \draw [line width=1pt, double distance=3pt,

                                 arrows =
                    {-Latex[length=0pt 3 0]}] (0,0) --
                    (1,0);
                    \usetikzlibrary {arrows.meta}

                    \tikz \draw [line width=1pt, double distance=3pt,

                                 arrows =
                    {-Latex[length=0pt 3 .5]}] (0,0) --
                    (1,0);

                    \usetikzlibrary {arrows.meta}

                    \tikz \draw [line width=1pt, double distance=3pt,

                                 arrows =
                    {-Latex[length=0pt 3 1]} ] (0,0) --
                    (1,0);
The Exact Length. For an arrow tip kind that is just an outline that is filled with a color, the specified length should exactly equal the distance from the tip to the back end. However, when the arrow tip is drawn by stroking a line, it is no longer obvious whether the length should refer to the extend of the stroked lines’ path or of the resulting pixels (which will be wider because of the thickness of the stroking pen). The rules are as follows:
-
/pgf/arrow keys/width=⟨dimension⟩ ⟨line width factor⟩ ⟨outer factor⟩(no default) 
This key works like the length key, only it specifies the “width” of the arrow tip; so if width and length are identical, the arrow will just touch the borders of a square. (An exception to this rule are “halved” arrow tips, see Section 16.3.5.) The meaning of the two optional factor numbers following the ⟨dimension⟩ is the same as for the length key.

-
/pgf/arrow keys/width'=⟨dimension⟩ ⟨length factor⟩ ⟨line width factor⟩(no default) 
The key (note the prime) has a similar effect as the width key. The difference is that the second, still optional parameter ⟨length factor⟩ specifies the width of the key not as a multiple of the line width, but as a multiple of the arrow length.
The idea is that if you write, say, width'=0pt 0.5, the width of the arrow will be half its length. Indeed, for standard arrow tips like Stealth the default width is specified in this way so that if you change the length of an arrow tip, you also change the width in such a way that the aspect ratio of the arrow tip is kept. The other way round, if you modify the factor in width' without changing the length, you change the aspect ratio of the arrow tip.
Note that later changes of the length are taken into account for the computation. For instance, if you write
                    length
                    =
                    10pt, width'=5pt
                    2, length=7pt
the resulting width will be \(19\mathrm {pt} = 5\mathrm {pt} + 2\cdot 7\mathrm {pt}\).

The third, also optional, parameter allows you to add a multiple of the line width to the value computed in terms of the length.
-
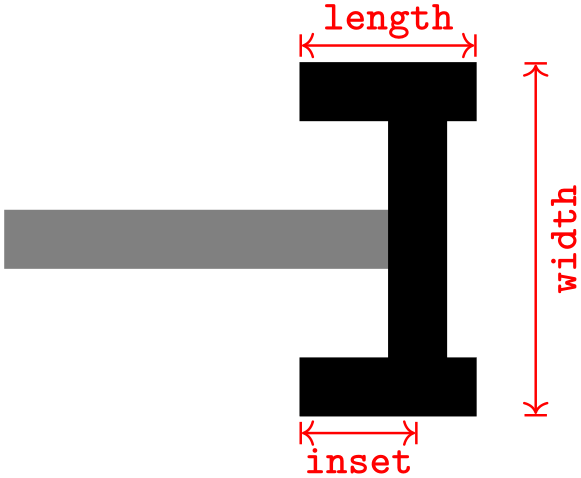
/pgf/arrow keys/inset=⟨dimension⟩ ⟨line width factor⟩ ⟨outer factor⟩(no default) 
The key is relevant only for some arrow tips such as the Stealth arrow tip. It specifies a distance by which something inside the arrow tip is set inwards; for the Stealth arrow tip it is the distance by which the back angle is moved inwards.
The computation of the distance works in the same way as for length and width: To the ⟨dimension⟩ we add ⟨line width factor⟩ times that line width, where the line width is computed based on the ⟨outer factor⟩ as described for the length key.


For most arrows for which there is no “natural inset” like, say, Latex, this key has no effect.
-
/pgf/arrow keys/inset'=⟨dimension⟩ ⟨length factor⟩ ⟨line width factor⟩(no default) 
This key works like inset, only like width' the second parameter is a factor of the arrow length rather than of the line width. For instance, the Stealth arrow sets inset' to 0pt 0.325 to ensure that the inset is always at \(13/40\)th of the arrow length if nothing else is specified.
-
/pgf/arrow keys/angle=⟨angle⟩:⟨dimension⟩ ⟨line width factor⟩ ⟨outer factor⟩(no default) 
This key sets the length and the width of an arrow tip at the same time. The length will be the cosine of ⟨angle⟩, while the width will be twice the sine of half the ⟨angle⟩ (this slightly awkward rule ensures that a Stealth arrow will have an opening angle of ⟨angle⟩ at its tip if this option is used). As for the length key, if the optional factors are given, they add a certain multiple of the line width to the ⟨dimension⟩ before the sine and cosines are computed.
-
/pgf/arrow keys/angle'=⟨angle⟩(no default) 
Sets the width of the arrow to twice the tangent of \(\meta {angle}/2\) times the arrow length. This results in an arrow tip with an opening angle of ⟨angle⟩ at its tip and with the specified length unchanged.

16.3.2 Scaling
In the previous section we saw that there are many options for getting “fine control” overt the length and width of arrow tips. However, in some cases, you do not really care whether the arrow tip is 4pt long or 4.2pt long, you “just want it to be a little bit larger than usual”. In such cases, the following keys are useful:
-
/pgf/arrow keys/scale=⟨factor⟩ (no default, initially 1) 
After all the other options listed in the previous (and also the following sections) have been processed, TikZ applies a scaling to the computed length, inset, and width of the arrow tip (and, possibly, to other size parameters defined by special-purpose arrow tip kinds). Everything is simply scaled by the given ⟨factor⟩.
Note that scaling has no effect on the line width (as usual) and also not on the arrow padding (the sep).
You can get even more fine-grained control over scaling using the following keys (the scale key is just a shorthand for setting both of the following keys simultaneously):
-
/pgf/arrow keys/scale length=⟨factor⟩ (no default, initially 1) 
This factor works like scale, only it is applied only to dimensions “along the axis of the arrow”, that is, to the length and to the inset, but not to the width.
                    \usetikzlibrary {arrows.meta}

                    \tikz {

                      \draw [arrows =
                    {-Stealth[]}]                 (0,1)   --
                    (1,1);

                      \draw [arrows =
                    {-Stealth[scale length=1.5]}] (0,0.5) --
                    (1,0.5);

                      \draw [arrows =
                    {-Stealth[scale length=2]}]   (0,0)   --
                    (1,0);

                    }
-
/pgf/arrow keys/scale width=⟨factor⟩ (no default, initially 1) 
Like scale length, but for dimensions related to the width.
                    \usetikzlibrary {arrows.meta}

                    \tikz {

                      \draw [arrows =
                    {-Stealth[]}]                 (0,1)   --
                    (1,1);

                      \draw [arrows =
                    {-Stealth[scale width=1.5]}] (0,0.5) --
                    (1,0.5);

                      \draw [arrows =
                    {-Stealth[scale width=2]}]   (0,0)   --
                    (1,0);

                    }
16.3.3 Arc Angles
A few arrow tips consist mainly of arcs, whose length can be specified. For these arrow tips, you use the following key:
-
/pgf/arrow keys/arc=⟨degrees⟩ (no default, initially 180) 
Sets the angle of arcs in arrows to ⟨degrees⟩. Note that this key is quite different from the angle key, which is “just a fancy way of setting the length and width”. In contrast, the arc key is used to set the degrees of arcs that are part of an arrow tip:
16.3.4 Slanting
You can “slant” arrow tips using the following key:
-
/pgf/arrow keys/slant=⟨factor⟩ (no default, initially 0) 
Slanting is used to create an “italics” effect for arrow tips: All arrow tips get “slanted” a little bit relative to the axis of the arrow:

There is one thing to note about slanting: Slanting is done using a so-called “canvas transformation” and has no effect on positioning of the arrow tip. In particular, if an arrow tip gets slanted so strongly that it starts to protrude over the arrow tip end, this does not change the positioning of the arrow tip.
Here is another example where slanting is used to match italic text:
16.3.5 Reversing, Halving, Swapping
-
/pgf/arrow keys/reversed(no value) 
Adding this key to an arrow tip will “reverse its direction” so that is points in the opposite direction (but is still at that end of the line where the non-reversed arrow tip would have been drawn; so only the tip is reversed). For most arrow tips, this just results in an internal flip of a coordinate system, but some arrow tips actually use a slightly different version of the tip for reversed arrow tips (namely when the joining of the tip with the line would look strange). All of this happens automatically, so you do not need to worry about this.
If you apply this key twice, the effect cancels, which is useful for the definition of shorthands (which will be discussed later).

                    \usetikzlibrary {arrows.meta}

                    \tikz [ultra thick] \draw [arrows =
                    {-Stealth[reversed]}] (0,0) --
                    (1,0);
-
/pgf/arrow keys/harpoon(no value) 
The key requests that only the “left half” of the arrow tip should drawn:

                    \usetikzlibrary {arrows.meta}

                    \tikz [ultra thick] \draw [arrows =
                    {-Stealth[harpoon]}] (0,0) --
                    (1,0);

Unlike the reversed key, which all arrows tip kinds support at least in a basic way, designers of arrow tips really need to take this key into account in their arrow tip code and often a lot of special attention needs to do be paid to this key in the implementation. For this reason, only some arrow tips will support it.
-
/pgf/arrow keys/swap(no value) 
This key flips that arrow tip along the axis of the line. It makes sense only for asymmetric arrow tips like the harpoons created using the harpoon option.

                    \usetikzlibrary {arrows.meta}

                    \tikz [ultra thick] \draw [arrows =
                    {-Stealth[harpoon]}] (0,0) --
                    (1,0);

Swapping is always possible, no special code is needed on behalf of an arrow tip implementer.
-
/pgf/arrow keys/left(no value) 
A shorthand for harpoon.


16.3.6 Coloring
Arrow tips are drawn using the same basic mechanisms as normal paths, so arrow tips can be stroked (drawn) and/or filled. However, we usually want the color of arrow tips to be identical to the color used to draw the path, even if a different color is used for filling the path. On the other hand, we may also sometimes wish to use a special color for the arrow tips that is different from both the line and fill colors of the main path.
The following options allow you to configure how arrow tips are colored:
-
/pgf/arrow keys/color=⟨color or empty⟩ (no default, initially empty) 
Normally, an arrow tip gets the same color as the path to which it is attached. More precisely, it will get the current “draw color”, also known as “stroke color”, which you can set using draw=⟨some color⟩. By adding the option color= to an arrow tip (note that an “empty” color is specified in this way), you ask that the arrow tip gets this default draw color of the path. Since this is the default behavior, you usually do not need to specify anything:

                    \usetikzlibrary {arrows.meta}

                    \tikz [ultra thick] \draw [red, arrows = {-Stealth}] (0,0) --
                    (1,0);

                    \usetikzlibrary {arrows.meta}

                    \tikz [ultra thick] \draw [blue, arrows = {-Stealth}] (0,0) --
                    (1,0);
Now, when you provide a ⟨color⟩ with this option, you request that the arrow tip should get this color instead of the color of the main path:

                    \usetikzlibrary {arrows.meta}

                    \tikz [ultra thick] \draw [red, arrows =
                    {-Stealth[color=blue]}] (0,0) --
                    (1,0);
                    \usetikzlibrary {arrows.meta}

                    \tikz [ultra thick] \draw [red, arrows =
                    {-Stealth[color=black]}] (0,0) --
                    (1,0);
Similar to the color option used in normal TikZ options, you may omit the color= part of the option. Whenever an ⟨arrow key⟩ is encountered that TikZ does not recognize, it will test whether the key is the name of a color and, if so, execute color=⟨arrow key⟩. So, the first of the above examples can be rewritten as follows:

                    \usetikzlibrary {arrows.meta}

                    \tikz [ultra thick] \draw [red, arrows =
                    {-Stealth[blue]}] (0,0) --
                    (1,0);
The ⟨color⟩ will apply both to any drawing and filling operations used to construct the path. For instance, even though the Stealth arrow tips looks like a filled quadrilateral, it is actually constructed by drawing a quadrilateral and then filling it in the same color as the drawing (see the fill option below to see the difference).
When color is set to an empty text, the drawing color is always used to fill the arrow tips, even if a different color is specified for filling the path:

As you can see in the above example, the filled area is not quite what you might have expected. The reason is that the path was actually internally shortened a bit so that the end of the “fat line” as inside the arrow tip and we get a “clear” arrow tip.
In general, it is a good idea not to add arrow tips to paths that are filled.
-
/pgf/arrow keys/fill=⟨color⟩ (default is scope’s color setting) 
-
/pgf/arrow keys/open(no value) 
Use this key to explicitly set the color used for filling the arrow tips. This color can be different from the color used to draw (stroke) the arrow tip:
You can also specify the special “color” none. In this case, the arrow tip is not filled at all (not even with white):
If the argument is left empty or omitted altogether, no explicit fill color will be set, meaning that the fill color will be determined by whatever was used last as a fill color in the current scope.
Note that such “open” arrow tips are a bit difficult to draw in some case: The problem is that the line must be shortened by just the right amount so that it ends exactly on the back end of the arrow tip. In some cases, especially when double lines are used, this will not be possible.
A shorthand for fill=none.
When you use both the color and fill options, the color option must come first since it will reset the filling to the color specified for drawing.
Note that by setting fill to the special color pgffillcolor, you can cause the arrow tips to be filled using the color used to fill the main path. (This special color is always available and always set to the current filling color of the graphic state.):
16.3.7 Line Styling
Arrow tips are created by drawing and possibly filling a path that makes up the arrow tip. When TikZ draws a path, there are different ways in which such a path can be drawn (such as dashing). Three particularly important parameters are the line join, the line cap, see Section 15.3.1 for an introduction, and the line width (thickness).
TikZ resets the line cap and line join each time it draws an arrow tip since you usually do not want their settings to “spill over” to the way the arrow tips are drawn. You can, however, change there values explicitly for an arrow tip:
-
/pgf/arrow keys/line cap=⟨round or butt⟩(no default) 
Sets the line cap of all lines that are drawn in the arrow to a round cap or a butt cap. (Unlike for normal lines, the rect cap is not allowed.) Naturally, this key has no effect for arrows whose paths are closed.
Each arrow tip has a default value for the line cap, which can be overruled using this option.
Changing the cap should have no effect on the size of the arrow. However, it will have an effect on where the exact “tip” of the arrow is since this will always be exactly at the end of the arrow:

                    \usetikzlibrary {arrows.meta}

                    \tikz [line width=2mm]

                      \draw [arrows =
                    {-Computer Modern Rightarrow[line cap=butt]}]

                            (0,0) --
                    (1,0);

-
/pgf/arrow keys/line join=⟨round or miter⟩(no default) 
Sets the line join to round or miter (bevel is not allowed). This time, the key only has an effect on paths that have “corners” in them. The same rules as for line cap apply: the size is not affects, but the tip end is:

                    \usetikzlibrary {arrows.meta}

                    \tikz [line width=2mm]

                      \draw [arrows =
                    {-Computer Modern Rightarrow[line join=miter]}]

                            (0,0) --
                    (1,0);


The following keys set both of the above:


You can also set the width of lines used inside arrow tips:
-
/pgf/arrow keys/line width=⟨dimension⟩ ⟨line width factor⟩ ⟨outer factor⟩(no default) 
This key sets the line width inside an arrow tip for drawing (out)lines of the arrow tip. When you set this width to 0pt, which makes sense only for closed tips, the arrow tip is only filled. This can result in better rendering of some small arrow tips and in case of bend arrow tips (because the line joins will also be bend and not “mitered”.)
The meaning of the factors is as usual the same as for length or width.


-
/pgf/arrow keys/line width'=⟨dimension⟩ ⟨length factor⟩(no default) 
Works like line width only the factor is with respect to the length.
16.3.8 Bending and Flexing
Up to now, we have only added arrow tip to the end of straight lines, which is in some sense “easy”. Things get far more difficult, if the line to which we wish to end an arrow tip is curved. In the following, we have a look at the different actions that can be taken and how they can be configured.
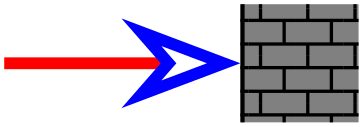
To get a feeling for the difficulties involved, consider the following situation: We have a “gray wall” at the \(x\)-coordinate of and a red line that ends in its middle.
                \usetikzlibrary {patterns}

                \def\wall{ \fill     [fill=black!50]  (1,-.5) rectangle
                (2,.5);

                           \pattern  [pattern=bricks] (1,-.5) rectangle
                (2,.5);

                           \draw     [line width=1pt]  (1cm+.5pt,-.5) --
                ++(0,1); }

                \begin{tikzpicture}

                  \wall

                  % The "line"

                  \draw [red,line width=1mm] (-1,0) --
                (1,0);

                \end{tikzpicture}
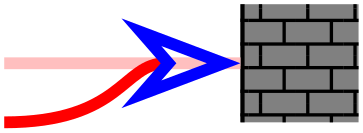
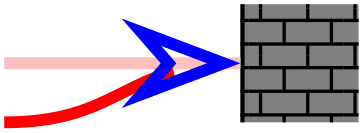
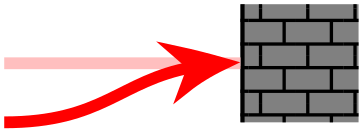
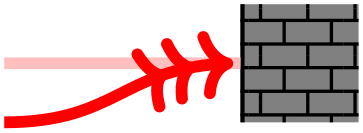
Now we wish to add a blue open arrow tip the red line like, say, Stealth[length=1cm,open,blue]:

                \usetikzlibrary {arrows.meta}

                \begin{tikzpicture}

                  \wall

                  \draw [red,line width=1mm,-{Stealth[length=1cm,open,blue]}]

                        (-1,0) --
                (1,0);

                \end{tikzpicture}
There are several noteworthy things about the blue arrow tip:
-
1. Notice that the red line no longer goes all the way to the wall. Indeed, the red line ends more or less exactly where it meets the blue line, leaving the arrow tip empty. Now, recall that the red line was supposed to be the path (-2,0)--(1,0); however, this path has obviously become much shorter (by 6.25mm to be precise). This effect is called path shortening in TikZ.
-
2. The very tip of the arrow just “touches” the wall, even we zoom out a lot. This point, where the original path ended and where the arrow tip should now lie, is called the tip end in TikZ.
-
3. Finally, the point where the red line touches the blue line is the point where the original path “visually ends”. Notice that this is not the same as the point that lies at a distance of the arrow’s length from the wall – rather it lies at a distance of length minus the inset. Let us call this point the visual end of the arrow.
As pointed out earlier, for straight lines, shortening the path and rotating and shifting the arrow tip so that it ends precisely at the tip end and the visual end lies on a line from the tip end to the start of the line is relatively easy.
For curved lines, things are much more difficult and TikZ copes with the difficulties in different ways, depending on which options you add to arrows. Here is now a curved red line to which we wish to add our arrow tip (the original straight red line is shown in light red):
                \begin{tikzpicture}

                  \wall

                  \draw [red!25,line width=1mm] (-1,0) --
                (1,0);

                  \draw [red,line width=1mm] (-1,-.5) .. controls
                (0,-.5) and
                (0,0) .. (1,0);

                \end{tikzpicture}
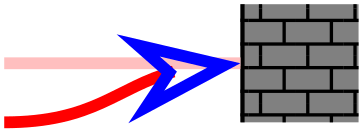
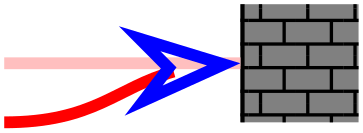
The first way of dealing with curved lines is dubbed the “quick and dirty” way (although the option for selecting this option is politely just called “quick” …):
-
/pgf/arrow keys/quick(no value) 
Recall that curves in TikZ are actually Bézier curves, which means that they start and end at certain points and we specify two vectors, one for the start and one for the end, that provide tangents to the curve at these points. In particular, for the end of the curve, there is a point called the second support point of the curve such that a tangent to the curve at the end goes through this point. In our above example, the second support point is at the middle of the light red line and, indeed, a tangent to the red line at the point touching the wall is perfectly horizontal.
In order to add our arrow tip to the curved path, our first objective is to “shorten” the path by 6.25mm. Unfortunately, this is now much more difficult than for a straight path. When the quick option is added to an arrow tip (it is also the default if no special libraries are loaded), we cheat somewhat: Instead of really moving along 6.25mm along the path, we simply shift the end of the curve by 6.25mm along the tangent (which is easy to compute). We also have to shift the second support point by the same amount to ensure that the line still has the same tangent at the end. This will result in the following:

                    \usetikzlibrary {arrows.meta}

                    \begin{tikzpicture}

                      \wall

                      \draw [red!25,line width=1mm] (-1,0) --
                    (1,0);

                      \draw [red,line width=1mm,-{Stealth[length=1cm,open,blue,quick]}]

                            (-1,-.5) .. controls
                    (0,-.5) and
                    (0,0) .. (1,0);

                    \end{tikzpicture}
They main problem with the above picture is that the red line is no longer equal to the original red line (notice much sharper curvature near its end). In our example this is not such a bad thing, but it certainly “not a nice thing” that adding arrow tips to a curve changes the overall shape of the curves. This is especially bothersome if there are several similar curves that have different arrow heads. In this case, the similar curves now suddenly look different.
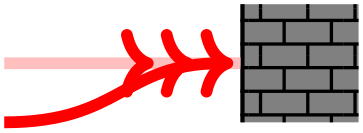
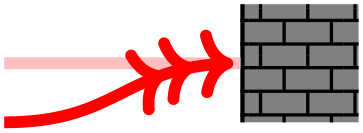
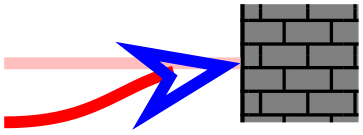
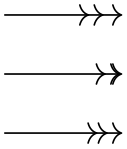
Another big problem with the above approach is that it works only well if there is only a single arrow tip. When there are multiple ones, simply shifting them along the tangent as the quick option does produces less-than-satisfactory results:
                    \begin{tikzpicture}

                      \wall

                      \draw [red!25,line width=1mm] (-1,0) --
                    (1,0);

                      \draw [red,line width=1mm,-{[quick,sep]>>>}]

                            (-1,-.5) .. controls
                    (0,-.5) and
                    (0,0) .. (1,0);

                    \end{tikzpicture}
Note that the third arrow tip does not really lie on the curve any more.
Because of the shortcomings of the quick key, more powerful mechanisms for shortening lines and rotating arrows tips have been implemented. To use them, you need to load the following library:
-
TikZ Library bending 
\usetikzlibrary{bending} %
LaTeX
and plain
TeX
\usetikzlibrary[bending] % ConTeXt
Load this library to use the flex, flex', or
bending arrow keys. When this library is loaded, flex becomes the
default mode that is used with all paths, unless quick is explicitly selected for the arrow tip.
-
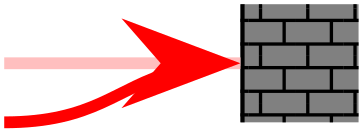
/pgf/arrow keys/flex=⟨factor⟩ (default 1) 
-
1. Instead of simply shifting the visual end of the arrow along the tangent of the curve’s end, we really move it along the curve by the necessary distance. This operation is more expensive than the quick operation – but not that expensive, only expensive enough so that it is not selected by default for all arrow tips. Indeed, some compromises are made in the implementation where accuracy was traded for speed, so the distance by which the line end is shifted is not necessarily exactly 6.25mm; only something reasonably close.
-
2. The supports of the line are updated accordingly so that the shortened line will still follow exactly the original line. This means that the curve deformation effect caused by the quick command does not happen here.
-
3. Next, the arrow tip is rotated and shifted as follows: First, we shift it so that its tip is exactly at the tip end, where the original line ended. Then, the arrow is rotated so the the visual end lies on the line:
                        \usetikzlibrary {arrows.meta,bending}

                        \begin{tikzpicture}

                          \wall

                          \draw [red!25,line width=1mm] (-1,0) --
                        (1,0);

                          \draw [red,line width=1mm,-{Stealth[length=1cm,open,blue,flex]}]

                                (-1,-.5) .. controls
                        (0,-.5) and
                        (0,0) .. (1,0);

                        \end{tikzpicture}
When the bending library is loaded, this key is applied to all arrow tips by default. It has the following effect:
As can be seen in the example, the flex option gives a result that is visually pleasing and does not deform the path.
There is, however, one possible problem with the flex option: The arrow tip no longer points along the tangent of the end of the path. This may or may not be a problem, put especially for larger arrow tips readers will use the orientation of the arrow head to gauge the direction of the tangent of the line. If this tangent is important (for example, if it should be horizontal), then it may be necessary to enforce that the arrow tip “really points in the direction of the tangent”.
To achieve this, the flex option takes an optional ⟨factor⟩ parameter, which defaults to 1. This factor specifies how much the arrow tip should be rotated: If set to 0, the arrow points exactly along a tangent to curve at its tip. If set to 1, the arrow point exactly along a line from the visual end point on the curve to the tip. For values in the middle, we interpolate the rotation between these two extremes; so flex=.5 will rotate the arrow’s visual end “halfway away from the tangent towards the actual position on the line”.
                    \usetikzlibrary {arrows.meta,bending}

                    \begin{tikzpicture}

                      \wall

                      \draw [red!25,line width=1mm] (-1,0) --
                    (1,0);

                      \draw [red,line width=1mm,-{Stealth[length=1cm,open,blue,flex=0]}]

                            (-1,-.5) .. controls
                    (0,-.5) and
                    (0,0) .. (1,0);

                    \end{tikzpicture}
                    \usetikzlibrary {arrows.meta,bending}

                    \begin{tikzpicture}

                      \wall

                      \draw [red!25,line width=1mm] (-1,0) --
                    (1,0);

                      \draw [red,line width=1mm,-{Stealth[length=1cm,open,blue,flex=.5]}]

                            (-1,-.5) .. controls
                    (0,-.5) and
                    (0,0) .. (1,0);

                    \end{tikzpicture}
Note how in the above examples the red line is visible inside the open arrow tip. Open arrow tips do not go well with a flex value other than 1. Here is a more realistic use of the flex=0 key:
                    \usetikzlibrary {arrows.meta,bending}

                    \begin{tikzpicture}

                      \wall

                      \draw [red!25,line width=1mm] (-1,0) --
                    (1,0);

                      \draw [red,line width=1mm,-{Stealth[length=1cm,flex=0]}]

                            (-1,-.5) .. controls
                    (0,-.5) and
                    (0,0) .. (1,0);

                    \end{tikzpicture}
If there are several arrow tips on a path, the flex option positions them independently, so that each of them lies optimally on the path:
                    \usetikzlibrary {bending}

                    \begin{tikzpicture}

                      \wall

                      \draw [red!25,line width=1mm] (-1,0) --
                    (1,0);

                      \draw [red,line width=1mm,-{[flex,sep]>>>}]

                            (-1,-.5) .. controls
                    (0,-.5) and
                    (0,0) .. (1,0);

                    \end{tikzpicture}
-
/pgf/arrow keys/flex'=⟨factor⟩ (default 1) 
The flex' key is almost identical to the flex key. The only difference is that a factor of 1 corresponds to rotating the arrow tip so that the instead of the visual end, the “ultimate back end” of the arrow tip lies on the red path. In the example instead of having the arrow tip at a distance of 6.25mm from the tip lie on the path, we have the point at a distance of 1cm from the tip lie on the path:
                    \usetikzlibrary {arrows.meta,bending}

                    \begin{tikzpicture}

                      \wall

                      \draw [red!25,line width=1mm] (-1,0) --
                    (1,0);

                      \draw [red,line width=1mm,-{Stealth[length=1cm,open,blue,flex']}]

                            (-1,-.5) .. controls
                    (0,-.5) and
                    (0,0) .. (1,0);

                    \end{tikzpicture}
Otherwise, the factor works as for flex and, indeed flex=0 and flex'=0 have the same effect.
The main use of this option is not so much with an arrow tip like Stealth but rather with tips like the standard > in the context of a strongly curved line:
                    \usetikzlibrary {arrows.meta,bending}

                    \begin{tikzpicture}

                      \wall

                      \draw [red!25,line width=1mm] (-1,0) --
                    (1,0);

                      \draw [red,line width=1mm,-{Computer Modern Rightarrow[flex]}]

                            (0,-.5) .. controls
                    (1,-.5) and
                    (0.5,0) .. (1,0);

                    \end{tikzpicture}
In the example, the flex option does not really flex the arrow since for a tip like the Computer Modern arrow, the visual end is the same as the arrow tip – after all, the red line does, indeed, end almost exactly where it used to end.
Nevertheless, you may feel that the arrow tip looks “wrong” in the sense that it should be rotated. This is exactly what the flex' option does since it allows us to align the “back end” of the tip with the red line:
                    \usetikzlibrary {arrows.meta,bending}

                    \begin{tikzpicture}

                      \wall

                      \draw [red!25,line width=1mm] (-1,0) --
                    (1,0);

                      \draw [red,line width=1mm,-{Computer Modern Rightarrow[flex'=.75]}]

                            (0,-.5) .. controls
                    (1,-.5) and
                    (0.5,0) .. (1,0);

                    \end{tikzpicture}
In the example, I used flex'=.75 so as not to overpronounce the effect. Usually, you will have to fiddle with it sometime to get the “perfectly aligned arrow tip”, but a value of .75 is usually a good start.
-
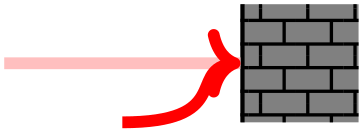
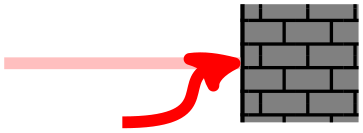
/pgf/arrow keys/bend(no value) 
Bending an arrow tip is a radical solution to the problem of positioning arrow tips on a curved line: The arrow tip is no longer “rigid” but the drawing itself will now bend along the curve. This has the advantage that all the problems of flexing with wrong tangents and overflexing disappear. The downsides are longer computation times (bending an arrow is much more expensive that flexing it, let alone than quick mode) and also the fact that excessive bending can lead to ugly arrow tips. On the other hand, for most arrow tips their bend version are visually quite pleasing and create a sophisticated look:
                    \usetikzlibrary {arrows.meta,bending}

                    \begin{tikzpicture}

                      \wall

                      \draw [red!25,line width=1mm] (-1,0) --
                    (1,0);

                      \draw [red,line width=1mm,-{Stealth[length=20pt,bend]}]

                            (-1,-.5) .. controls
                    (0,-.5) and
                    (0,0) .. (1,0);

                    \end{tikzpicture}
                    \usetikzlibrary {bending}

                    \begin{tikzpicture}

                      \wall

                      \draw [red!25,line width=1mm] (-1,0) --
                    (1,0);

                      \draw [red,line width=1mm,-{[bend,sep]>>>}]

                            (-1,-.5) .. controls
                    (0,-.5) and
                    (0,0) .. (1,0);

                    \end{tikzpicture}
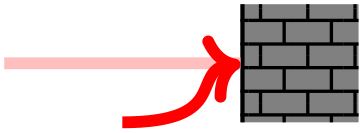
                    \usetikzlibrary {arrows.meta,bending}

                    \begin{tikzpicture}

                      \wall

                      \draw [red!25,line width=1mm] (-1,0) --
                    (1,0);

                      \draw [red,line width=1mm,-{Stealth[bend,round,length=20pt]}]

                            (0,-.5) .. controls
                    (1,-.5) and
                    (0.25,0) .. (1,0);

                    \end{tikzpicture}
16.4 Arrow Tip Specifications
16.4.1 Syntax
When you select the arrow tips for the start and the end of a path, you can specify a whole sequence of arrow tips, each having its own local options. At the beginning of this section, it was pointed out that the syntax for selecting the start and end arrow tips is the following:
⟨start specification⟩-⟨end specification⟩
We now have a closer look at what these specifications may look like. The general syntax of the ⟨start specification⟩ is as follows:
[⟨options for all tips⟩] ⟨first arrow tip spec⟩ ⟨second arrow tip spec⟩ ⟨third arrow tip spec⟩ …
As can be seen, an arrow tip specification may start with some options in brackets. If this is the case, the ⟨options for all tips⟩ will, indeed, be applied to all arrow tips that follow. (We will see, in a moment, that there are even more places where options may be specified and a list of the ordering in which the options are applied will be given later.)
The main part of a specification is taken up by a sequence of individual arrow tip specifications. Such a specification can be of three kinds:
-
1. It can be of the form ⟨arrow tip kind name⟩[⟨options⟩].
-
2. It can be of the form ⟨shorthand⟩[⟨options⟩].
-
3. It can be of the form ⟨single char shorthand⟩[⟨options⟩]. Note that only for this form the brackets are optional.
The easiest kind is the first one: This adds an arrow tip of the kind ⟨arrow tip kind name⟩ to the sequence of arrow tips with the ⟨options⟩ applied to it at the start (for the ⟨start specification⟩) or at the end (for the ⟨end specification⟩). Note that for the ⟨start specification⟩ the first arrow tip specified in this way will be at the very start of the curve, while for the ⟨end specification⟩ the ordering is reversed: The last arrow tip specified will be at the very end of the curve. This implies that a specification like
Stealth[] Latex[] - Latex[] Stealth[]
will give perfectly symmetric arrow tips on a line (as one would expect).
It is important that even if there are no ⟨options⟩ for an arrow tip, the square brackets still need to be written to indicate the end of the arrow tip’s name. Indeed, the opening brackets are used to divide the arrow tip specification into names.
Instead of a ⟨arrow tip kind name⟩, you may also provide the name of a so-called shorthand. Shorthands look like normal arrow tip kind names and, indeed, you will often be using shorthands without noticing that you do. The idea is that instead of, say, Computer Modern Rightarrow you might wish to just write Rightarrow or perhaps just To or even just >. For this, you can create a shorthand that tells TikZ that whenever this shorthand is used, another arrow tip kind is meant. (Actually, shorthands are somewhat more powerful, we have a detailed look at them in Section 16.4.4.) For shorthands, the same rules apply as for normal arrow tip kinds: You need to provide brackets so that TikZ can find the end of the name inside a longer specification.
The third kind of arrow tip specifications consist of just a single letter like > or ) or * or even o or x (but you may not use [, ], or - since they will confuse the parser). These single letter arrow specifications will invariably be shorthands that select some “real” arrow tip instead. An important feature of single letter arrow tips is that they do not need to be followed by options (but they may).
Now, since we can use any letter for single letter shorthands, how can TikZ tell whether by foo[] we mean an arrow tip kind foo without any options or whether we mean an arrow tip called f, followed by two arrow tips called o? Or perhaps an arrow tip called f followed by an arrow tip called oo? To solve this problem, the following rule is used to determine which of the three possible specifications listed above applies: First, we check whether everything from the current position up to the next opening bracket (or up to the end) is the name of an arrow tip or of a shorthand. In our case, foo would first be tested under this rule. Only if foo is neither the name of an arrow tip kind nor of a shorthand does TikZ consider the first letter of the specification, f in our case. If this is not the name of a shorthand, an error is raised. Otherwise the arrow tip corresponding to f is added to the list of arrow tips and the process restarts with the rest. Thus, we would next text whether oo is the name of an arrow tip or shorthand and, if not, whether o is such a name.
All of the above rules mean that you can rather easily specify arrow tip sequences if they either mostly consist of single letter names or of longer names. Here are some examples:
-
• ->>> is interpreted as three times the > shorthand since >>> is not the name of any arrow tip kind (and neither is >>).
-
• ->[]>> has the same effect as the above.
-
• -[]>>> also has the same effect.
-
• ->[]>[]>[] so does this.
-
• ->Stealth yields an arrow tip > followed by a Stealth arrow at the end.
-
• -Stealth> is illegal since there is no arrow tip Stealth> and since S is also not the name of any arrow tip.
-
• -Stealth[] > is legal and does what was presumably meant in the previous item.
-
• < Stealth- is legal and is the counterpart to -Stealth[] >.
-
• -Stealth[length=5pt] Stealth[length=6pt] selects two stealth arrow tips, but at slightly different sizes for the end of lines.
An interesting question concerns how flexing and bending interact with multiple arrow tips: After all, flexing and quick mode use different ways of shortening the path so we cannot really mix them. The following rule is used: We check, independently for the start and the end specifications, whether at least one arrow tip in them uses one of the options flex, flex', or bend. If so, all quick settings in the other arrow tips are ignored and treated as if flex had been selected for them, too.
16.4.2 Specifying Paddings
When you provide several arrow tips in a row, all of them are added to the start or end of the line:
The question now is what will be the distance between them? For this, the following arrow key is important:
-
/pgf/arrow keys/sep=⟨dimension⟩ ⟨line width factor⟩ ⟨outer factor⟩ (default 0.88pt .3 1) 
When a sequence of arrow tips is specified in an arrow tip specification for the end of the line, the arrow tips are normally arranged in such a way that the tip of each arrow ends exactly at the “back end” of the next arrow tip (for start specifications, the ordering is inverted, of course). Now, when the sep option is set, instead of exactly touching the back end of the next arrow, the specified ⟨dimension⟩ is added as additional space (the distance may also be negative, resulting in an overlap of the arrow tips). The optional factors have the same meaning as for the length key, see that key for details.
Let us now have a look at some examples. First, we use two arrow tips with different separations between them:

You can also specify a sep for the last arrow tip in the sequence (for end specifications, otherwise for the first arrow tip). In this case, this first arrow tip will not exactly “touch” the point where the path ends, but will rather leave the specified amount of space. This is usually quite desirable.
Indeed, adding a sep to an arrow tip is very desirable, so you will usually write something like >={To[sep]} somewhere near the start of your files.
One arrow tip kind can be quite useful in this context: The arrow tip kind _. It draws nothing and has zero length, but it has sep set as a default option. Since it is a single letter shorthand, you can write short and clean “code” in this way:

However, using the sep option will be faster than using the _ arrow tip and it also allows you to specify the desired length directly.
16.4.3 Specifying the Line End
In the previous examples of sequences of arrow tips, the line of the path always ended at the last of the arrow tips (for end specifications) or at the first of the arrow tips (for start specifications). Often, this is what you may want, but not always. Fortunately, it is quite easy to specify the desired end of the line: The special single char shorthand . is reserved to indicate that last arrow that is still part of the line; in other words, the line will stop at the last arrow before . is encountered (for end specifications) are at the first arrow following . (for start specifications).

                \tikz [very thick] \draw [<<<->>>] (0,0) --
                (2,0);

                \tikz [very thick] \draw [<.<<->.>>] (0,0) --
                (2,0);

                \tikz [very thick] \draw [<<.<-.>>>] (0,0) --
                (2,0);

\tikz [very thick] \draw [<<.<->.>>] (0,0) to [bend left] (2,0);
It is permissible that there are several dots in a specification, in this case the first one “wins” (for end specifications, otherwise the last one).
Note that . is parsed as any other shorthand. In particular, if you wish to add a dot after a normal arrow tip kind name, you need to add brackets:
                \usetikzlibrary {arrows.meta}

                \tikz [very thick] \draw [-{Stealth[] . Stealth[] Stealth[]}] (0,0) --
                (2,0);
Adding options to . is permissible, but they have no effect. In particular, sep has no effect since a dot is not an arrow.
16.4.4 Defining Shorthands
It is often desirable to create “shorthands” for the names of arrow tips that you are going to use very often. Indeed, in most documents you will only need a single arrow tip kind and it would be useful that you could refer to it just as > in your arrow tip specifications. As another example, you might constantly wish to switch between a filled and a non-filled circle as arrow tips and would like to use * and o are shorthands for these case. Finally, you might just like to shorten a long name like Computer Modern Rightarrow down to just, say To or something similar.
All of these case can be addressed by defining appropriate shorthands. This is done using the following handler:
-
Key handler ⟨key⟩/.tip=⟨end specification⟩ 
Defined the ⟨key⟩ as a name that can be used inside arrow tip specifications. If the ⟨key⟩ has a path before it, this path is ignored (so there is only one “namespace” for arrow tips). Whenever it is used, it will be replaced by the ⟨end specification⟩. Note that you must always provide (only) an end specification; when the ⟨key⟩ is used inside a start specification, the ordering and the meaning of the keys inside the ⟨end specification⟩ are translated automatically.


In the last of the examples, we used foo[red] to make the arrows red. Any options given to a shorthand upon use will be passed on to the actual arrows tip for which the shorthand stands. Thus, we could also have written Stealth[sep,red] Latex[sep,red] instead of foo[red]. In other words, the “replacement” of a shorthand by its “meaning” is a semantic replacement rather than a syntactic replacement. In particular, the ⟨end specification⟩ will be parsed immediately when the shorthand is being defined. However, this applies only to the options inside the specification, whose values are evaluated immediately. In contrast, which actual arrow tip kind is meant by a given shorthand used inside the ⟨end specification⟩ is resolved only up each use of the shorthand. This means that when you write
dup /.tip = >>
and then later write
> /.tip = whatever
then dup will have the effect as if you had written whatever[]whatever[]. You will find that this behavior is what one would expect.
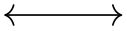
There is one problem we have not yet addressed: The asymmetry of single letter arrow tips like > or ). When someone writes

we rightfully expect one arrow tip pointing left at the left end and an arrow tip pointing right at the right end. However, compare

In both cases, we have identical text in the start and end specifications, but in the first case we rightfully expect the left arrow to be flipped.
The solution to this problem is that it is possible to define two names for the same arrow tip, namely one that is used inside start specifications and one for end specifications. Now, we can decree that the “name of >” inside start specifications is simply < and the above problems disappear.
To specify different names for a shorthand in start and end specifications, use the following syntax: Instead of ⟨key⟩, you use ⟨name in start specifications⟩-⟨name in end specifications⟩. Thus, to set the > key correctly, you actually need to write


Note that the above also works even though we have not set < as an arrow tip name for end specifications! The reason this works is that the TikZ (more precisely, pgf) actually uses the following definition internally:
>-< /.tip = >[reversed]
Translation: “When < is used in an end specification, please replace it by >, but reversed. Also, when > is used in a start specification, we also mean this inverted >.”
By default, > is a shorthand for To and To is a shorthand for to (an arrow from the old libraries) when arrows.meta is not loaded library. When arrows.meta is loaded, To is redefined to mean the same as Computer Modern Rightarrow.
-
/tikz/>=⟨end arrow specification⟩(no default) 
This is a short way of saying <->/.tip=⟨end arrow specification⟩.

                    \usetikzlibrary {arrows.meta}

                    \begin{tikzpicture}[scale=2,ultra thick]

                      \begin{scope}[>=Latex]

                        \draw[>->]    (0pt,3ex) --
                    (1cm,3ex);

                        \draw[|<->>|] (0pt,2ex) --
                    (1cm,2ex);

                      \end{scope}

                      \begin{scope}[>=Stealth]

                        \draw[>->]    (0pt,1ex) --
                    (1cm,1ex);

                        \draw[|<<.<->|] (0pt,0ex) --
                    (1cm,0ex);

                      \end{scope}

                    \end{tikzpicture}
-
/tikz/shorten <=⟨length⟩(no default) 
Shorten the path by ⟨length⟩ in the direction of the starting point.
-
/tikz/shorten >=⟨length⟩(no default) 
Shorten the path by ⟨length⟩ in the direction of the end point.
16.4.5 Scoping of Arrow Keys
There are numerous places where you can specify keys for an arrow tip. There is, however, one final place that we have not yet mentioned:
-
/tikz/arrows=[⟨arrow keys⟩](no default)
The arrows key, which is normally used to set the arrow tips for the current scope, can also be used to set some arrow keys for the current scope. When the argument to arrows starts with an opening bracket and only otherwise contains one further closing bracket at the very end, this semantic of the arrow key is assumed.
The ⟨arrow keys⟩ will be set for the rest of current scope. This is useful for generally setting some design parameters or for generally switching on, say, bending as in:
We can now summarize which arrow keys are applied in what order when an arrow tip is used:
-
1. First, the so-called defaults are applied, which are values for the different parameters of a key. They are fixed in the definition of the key and cannot be changed. Since they are executed first, they are only the ultimate fallback.
-
2. The ⟨keys⟩ from the use of arrows=[⟨keys⟩] in all enclosing scopes.
-
3. Recursively, the ⟨keys⟩ provided with the arrow tip inside shorthands.
-
4. The keys provided at the beginning of an arrow tip specification in brackets.
-
5. The keys provided directly next to the arrow tip inside the specification.
16.5 Reference: Arrow Tips
-
TikZ Library arrows.meta 
\usepgflibrary{arrows.meta} %
LaTeX
and plain
TeX
and pure pgf
\usepgflibrary[arrows.meta] % ConTeXt and pure pgf
\usetikzlibrary{arrows.meta} %
LaTeX
and plain
TeX
when using TikZ
\usetikzlibrary[arrows.meta] % ConTeXt when using TikZ
This library defines a large number of standard “meta” arrow tips. “Meta” means that you can
configure these arrow tips in many different ways like changing their size or their line caps and joins and many other
details.
The only reason this library is not loaded by default is for compatibility with older versions of TikZ. You can, however, safely load and use this library alongside the older libraries arrows and arrows.spaced.
The different arrow tip kinds defined in the arrows.meta library can be classified in different groups:
-
• Barbed arrow tips consist mainly of lines that “point backward” from the tip of the arrow and which are not filled. For them, filling has no effect. A typical example is
 . Here is the list of defined arrow tips:
Appearance of the below at line width 0.4pt 0.8pt 1.6pt Arc Barb[]  thin
thin
 thick
thick

Bar[]  thin
thin
 thick
thick

Bracket[]  thin
thin
 thick
thick

Hooks[]  thin
thin
 thick
thick

Parenthesis[]  thin
thin
 thick
thick

Straight Barb[]  thin
thin
 thick
thick

Tee Barb[]  thin
thin
 thick
thick

All of these arrow tips can be configured and resized in many different ways as described in the following. Above, they are shown at their “natural” sizes, which are chosen in such a way that for a line width of 0.4pt their width matches the height of a letter “x” in Computer Modern at 11pt (with some “overshooting” to create visual consistency).
-
• Mathematical arrow tips are actually a subclass of the barbed arrow tips, but we list them separately. They contain arrow tips that look exactly like the tips of arrows used in mathematical fonts such as the \to-symbol \(\to \) from standard TeX.
Appearance of the below at line width 0.4pt 0.8pt 1.6pt Classical TikZ Rightarrow[]  thin
thin
 thick
thick

Computer Modern Rightarrow[]  thin
thin
 thick
thick

Implies[] on double line  thin
thin
 thick
thick

To[]  thin
thin
 thick
thick

The To arrow tip is a shorthand for Computer Modern Rightarrow when arrows.meta is loaded.
-
• Geometric arrow tips consist of a filled shape like a kite or a circle or a “stealth-fighter-like” shape. A typical example is
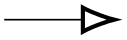
 . These arrow tips can also be used in an “open” variant as in
 .
.
Appearance of the below at line width 0.4pt 0.8pt 1.6pt Circle[]  thin
thin
 thick
thick

Diamond[]  thin
thin
 thick
thick

Ellipse[]  thin
thin
 thick
thick

Kite[]  thin
thin
 thick
thick

Latex[]  thin
thin
 thick
thick

Latex[round]  thin
thin
 thick
thick

Rectangle[]  thin
thin
 thick
thick

Square[]  thin
thin
 thick
thick

Stealth[]  thin
thin
 thick
thick

Stealth[round]  thin
thin
 thick
thick

Triangle[]  thin
thin
 thick
thick

Turned Square[]  thin
thin
 thick
thick

Here are the “open” variants:
Appearance of the below at line width 0.4pt 0.8pt 1.6pt Circle[open]  thin
thin
 thick
thick

Diamond[open]  thin
thin
 thick
thick

Ellipse[open]  thin
thin
 thick
thick

Kite[open]  thin
thin
 thick
thick

Latex[open]  thin
thin
 thick
thick

Latex[round,open]  thin
thin
 thick
thick

Rectangle[open]  thin
thin
 thick
thick

Square[open]  thin
thin
 thick
thick

Stealth[open]  thin
thin
 thick
thick

Stealth[round,open]  thin
thin
 thick
thick

Triangle[open]  thin
thin
 thick
thick

Turned Square[open]  thin
thin
 thick
thick

Note that “open” arrow tips are not the same as “filled with white”, which is also available (just say fill=white). The difference is that the background will “shine through” an open arrow, while a filled arrow always obscures the background:

                    \usetikzlibrary {arrows.meta}

                    \tikz {

                      \shade [left color=white, right color=red!50] (0,0) rectangle
                    (4,1);


                      \draw [ultra thick,-{Triangle[open]}]       (0,2/3) --
                    ++
                    (3,0);

                      \draw [ultra thick,-{Triangle[fill=white]}] (0,1/3) --
                    ++
                    (3,0);

                    }
-
• Cap arrow tips are used to add a “cap” to the end of a line. The graphic languages underlying TikZ (pdf, postscript or svg) all support three basic types of line caps on a very low level: round, rectangular, and “butt”. Using cap arrow tips, you can add new caps to lines and use different caps for the end and the start. An example is the line
 .
.
Appearance of the below at line width 1ex 1em Butt Cap[] 

Fast Round[] 

Fast Triangle[] 

Round Cap[] 

Triangle Cap[] 

-
• Special arrow tips are used for some specific purpose and do not fit into the above categories.
Appearance of the below at line width 0.4pt 0.8pt 1.6pt Rays[]  thin
thin
 thick
thick

Rays[n=8]  thin
thin
 thick
thick

16.5.1 Barbed Arrow Tips
-
Arrow Tip Kind Arc Barb
This arrow tip attaches an arc to the end of the line whose angle is given by the arc option. The length and width parameters refer to the size of the arrow tip for arc set to 180 degrees, which is why in the example for arc=210 the actual length is larger than the specified length. The line width is taken into account for the computation of the length and width. Use the round option to add round caps to the end of the arcs.

| Appearance of the below at line width | 0.4pt | 0.8pt | 1.6pt |
| Arc Barb[] |
 thin
thin
|
 thick
thick
|

|
| Arc Barb[sep] Arc Barb[] |
 thin
thin
|
 thick
thick
|

|
| Arc Barb[sep] . Arc Barb[] |
 thin
thin
|
 thick
thick
|

|
| Arc Barb[arc=120] |
 thin
thin
|
 thick
thick
|

|
| Arc Barb[arc=270] |
 thin
thin
|
 thick
thick
|

|
| Arc Barb[length=2pt] |
 thin
thin
|
 thick
thick
|

|
| Arc Barb[length=2pt,width=5pt] |
 thin
thin
|
 thick
thick
|

|
| Arc Barb[line width=2pt] |
 thin
thin
|
 thick
thick
|

|
| Arc Barb[reversed] |
 thin
thin
|
 thick
thick
|

|
| Arc Barb[round] |
 thin
thin
|
 thick
thick
|

|
| Arc Barb[slant=.3] |
 thin
thin
|
 thick
thick
|

|
| Arc Barb[left] |
 thin
thin
|
 thick
thick
|

|
| Arc Barb[right] |
 thin
thin
|
 thick
thick
|

|
| Arc Barb[harpoon,reversed] |
 thin
thin
|
 thick
thick
|

|
| Arc Barb[red] |
 thin
thin
|
 thick
thick
|

|
The following options have no effect: open, fill.
On double lines, the arrow tip will not look correct.
-
Arrow Tip Kind Bar
A simple bar. This is a simple instance of Tee Barb for length zero.
-
Arrow Tip Kind Bracket
This is an instance of the Tee Barb arrow tip that results in something resembling a bracket. Just like the Parenthesis arrow tip, a Bracket is not modelled from a text square bracket, but rather its size has been chosen so that it fits with the other arrow tips.

| Appearance of the below at line width | 0.4pt | 0.8pt | 1.6pt |
| Bracket[] |
 thin
thin
|
 thick
thick
|

|
| Bracket[sep] Bracket[] |
 thin
thin
|
 thick
thick
|

|
| Bracket[sep] . Bracket[] |
 thin
thin
|
 thick
thick
|

|
| Bracket[reversed] |
 thin
thin
|
 thick
thick
|

|
| Bracket[round] |
 thin
thin
|
 thick
thick
|

|
| Bracket[slant=.3] |
 thin
thin
|
 thick
thick
|

|
| Bracket[left] |
 thin
thin
|
 thick
thick
|

|
| Bracket[right] |
 thin
thin
|
 thick
thick
|

|
| Bracket[harpoon,reversed] |
 thin
thin
|
 thick
thick
|

|
| Bracket[red] |
 thin
thin
|
 thick
thick
|

|
The following options have no effect: open, fill.
On double lines, the arrow tip will not look correct.
-
Arrow Tip Kind Hooks
This arrow tip attaches two “hooks” to the end of the line. The length and width parameters refer to the size of the arrow tip if both arcs are 180 degrees; in the example the arc is 210 degrees and, thus, the arrow is actually longer that the length dictates. The line width is taken into account for the computation of the length and width. The arc option is used to specify the angle of the arcs. Use the round option to add round caps to the end of the arcs.
| Appearance of the below at line width | 0.4pt | 0.8pt | 1.6pt |
| Hooks[] |
 thin
thin
|
 thick
thick
|

|
| Hooks[sep] Hooks[] |
 thin
thin
|
 thick
thick
|

|
| Hooks[sep] . Hooks[] |
 thin
thin
|
 thick
thick
|

|
| Hooks[arc=120] |
 thin
thin
|
 thick
thick
|

|
| Hooks[arc=270] |
 thin
thin
|
 thick
thick
|

|
| Hooks[length=2pt] |
 thin
thin
|
 thick
thick
|

|
| Hooks[length=2pt,width=5pt] |
 thin
thin
|
 thick
thick
|

|
| Hooks[line width=2pt] |
 thin
thin
|
 thick
thick
|

|
| Hooks[reversed] |
 thin
thin
|
 thick
thick
|

|
| Hooks[round] |
 thin
thin
|
 thick
thick
|

|
| Hooks[slant=.3] |
 thin
thin
|
 thick
thick
|

|
| Hooks[left] |
 thin
thin
|
 thick
thick
|

|
| Hooks[right] |
 thin
thin
|
 thick
thick
|

|
| Hooks[harpoon,reversed] |
 thin
thin
|
 thick
thick
|

|
| Hooks[red] |
 thin
thin
|
 thick
thick
|

|
The following options have no effect: open, fill.
On double lines, the arrow tip will not look correct.
-
Arrow Tip Kind Parenthesis
This arrow tip is an instantiation of the Arc Barb so that it resembles a parenthesis. However, the idea is not to recreate a “real” parenthesis as it is used in text, but rather a “bow” at a size that harmonizes with the other arrow tips at their default sizes.

| Appearance of the below at line width | 0.4pt | 0.8pt | 1.6pt |
| Parenthesis[] |
 thin
thin
|
 thick
thick
|

|
| Parenthesis[sep] Parenthesis[] |
 thin
thin
|
 thick
thick
|

|
| Parenthesis[sep] . Parenthesis[] |
 thin
thin
|
 thick
thick
|

|
| Parenthesis[reversed] |
 thin
thin
|
 thick
thick
|

|
| Parenthesis[round] |
 thin
thin
|
 thick
thick
|

|
| Parenthesis[slant=.3] |
 thin
thin
|
 thick
thick
|

|
| Parenthesis[left] |
 thin
thin
|
 thick
thick
|

|
| Parenthesis[right] |
 thin
thin
|
 thick
thick
|

|
| Parenthesis[harpoon,reversed] |
 thin
thin
|
 thick
thick
|

|
| Parenthesis[red] |
 thin
thin
|
 thick
thick
|

|
The following options have no effect: open, fill.
On double lines, the arrow tip will not look correct.
-
Arrow Tip Kind Straight Barb
This is the “archetypal” arrow head, consisting of just two straight lines. The length and width parameters refer to the horizontal and vertical distances between the points on the path making up the arrow tip. As can be seen, the line width of the arrow tip’s path is not taken into account. The angle option is particularly useful to set the opening angle at the tip of the arrow head. The round option gives a “softer” or “rounder” version of the arrow tip.

| Appearance of the below at line width | 0.4pt | 0.8pt | 1.6pt |
| Straight Barb[] |
 thin
thin
|
 thick
thick
|

|
| Straight Barb[] Straight Barb[] |
 thin
thin
|
 thick
thick
|

|
| Straight Barb[] . Straight Barb[] |
 thin
thin
|
 thick
thick
|

|
| Straight Barb[length=5pt] |
 thin
thin
|
 thick
thick
|

|
| Straight Barb[length=5pt,width=5pt] |
 thin
thin
|
 thick
thick
|

|
| Straight Barb[line width=2pt] |
 thin
thin
|
 thick
thick
|

|
| Straight Barb[reversed] |
 thin
thin
|
 thick
thick
|

|
| Straight Barb[angle=60:2pt 3] |
 thin
thin
|
 thick
thick
|

|
| Straight Barb[round] |
 thin
thin
|
 thick
thick
|

|
| Straight Barb[slant=.3] |
 thin
thin
|
 thick
thick
|

|
| Straight Barb[left] |
 thin
thin
|
 thick
thick
|

|
| Straight Barb[right] |
 thin
thin
|
 thick
thick
|

|
| Straight Barb[harpoon,reversed] |
 thin
thin
|
 thick
thick
|

|
| Straight Barb[red] |
 thin
thin
|
 thick
thick
|

|
The following options have no effect: open, fill.
On double lines, the arrow tip will not look correct.
-
Arrow Tip Kind Tee Barb
This arrow tip attaches a little “T” on both sides of the tip. The arrow inset dictates the distance from the back end to the middle of the stem of the T. When the inset is equal to the length, the arrow tip is drawn as a single line, not as three lines (this is important for the “round” version since, then, the corners get rounded).

| Appearance of the below at line width | 0.4pt | 0.8pt | 1.6pt |
| Tee Barb[] |
 thin
thin
|
 thick
thick
|

|
| Tee Barb[sep] Tee Barb[] |
 thin
thin
|
 thick
thick
|

|
| Tee Barb[sep] . Tee Barb[] |
 thin
thin
|
 thick
thick
|

|
| Tee Barb[inset=0pt] |
 thin
thin
|
 thick
thick
|

|
| Tee Barb[inset'=0pt 1] |
 thin
thin
|
 thick
thick
|

|
| Tee Barb[line width=2pt] |
 thin
thin
|
 thick
thick
|

|
| Tee Barb[round] |
 thin
thin
|
 thick
thick
|

|
| Tee Barb[round,inset'=0pt 1] |
 thin
thin
|
 thick
thick
|

|
| Tee Barb[slant=.3] |
 thin
thin
|
 thick
thick
|

|
| Tee Barb[left] |
 thin
thin
|
 thick
thick
|

|
| Tee Barb[right] |
 thin
thin
|
 thick
thick
|

|
| Tee Barb[harpoon,reversed] |
 thin
thin
|
 thick
thick
|

|
| Tee Barb[red] |
 thin
thin
|
 thick
thick
|

|
The following options have no effect: open, fill.
On double lines, the arrow tip will not look correct.
16.5.2 Mathematical Barbed Arrow Tips
-
Arrow Tip Kind Classical TikZ Rightarrow
This arrow tip is the “old” or “classical” arrow tip that used to be the standard in TikZ in earlier versions. It was modelled on an old version of the tip of \rightarrow (\(\rightarrow \)) of the Computer Modern fonts. However, this “old version” was really old, Donald Knuth (the designer of both TeX and of the Computer Modern fonts) replaced the arrow tip of the mathematical fonts in 1992.
The main problem with this arrow tip is that it is “too small” at its natural size. I recommend using the new Computer Modern Rightarrow arrow tip instead, which matches the current \(\to \). This new version is also the default used as > and as To, now.
| Appearance of the below at line width | 0.4pt | 0.8pt | 1.6pt |
| Classical TikZ Rightarrow[] |
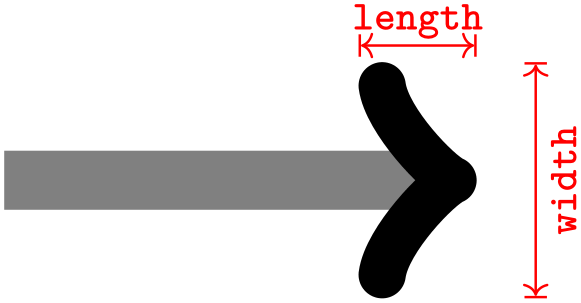 thin
thin
|
 thick
thick
|

|
| Classical TikZ Rightarrow[sep] Classical TikZ Rightarrow[] |
 thin
thin
|
 thick
thick
|

|
| Classical TikZ Rightarrow[sep] . Classical TikZ Rightarrow[] |
 thin
thin
|
 thick
thick
|

|
| Classical TikZ Rightarrow[length=3pt] |
 thin
thin
|
 thick
thick
|

|
| Classical TikZ Rightarrow[sharp] |
 thin
thin
|
 thick
thick
|

|
| Classical TikZ Rightarrow[slant=.3] |
 thin
thin
|
 thick
thick
|

|
| Classical TikZ Rightarrow[left] |
 thin
thin
|
 thick
thick
|

|
| Classical TikZ Rightarrow[right] |
 thin
thin
|
 thick
thick
|

|
| Classical TikZ Rightarrow[harpoon,reversed] |
 thin
thin
|
 thick
thick
|

|
| Classical TikZ Rightarrow[red] |
 thin
thin
|
 thick
thick
|

|
The following options have no effect: open, fill.
On double lines, the arrow tip will not look correct.
-
Arrow Tip Kind Computer Modern Rightarrow
For a line width of 0.4pt (the default), this arrow tip looks very much like \rightarrow (\(\to \)) of the Computer Modern math fonts. However, it is not a “perfect” match: the line caps and joins of the “real” \(\to \) are rounded differently from this arrow tip; but it takes a keen eye to notice the difference. When the arrows.meta library is loaded, this arrow tip becomes the default of To and, thus, is used whenever > is used (unless, of course, you redefined >).

| Appearance of the below at line width | 0.4pt | 0.8pt | 1.6pt |
| Computer Modern Rightarrow[] |
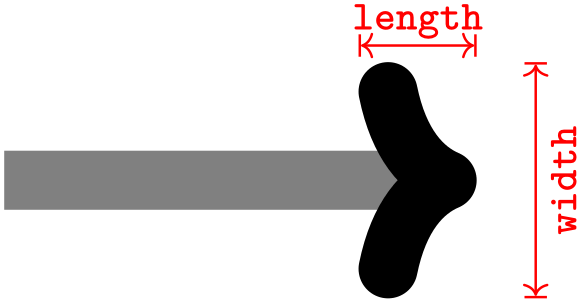 thin
thin
|
 thick
thick
|

|
| Computer Modern Rightarrow[sep] Computer Modern Rightarrow[] |
 thin
thin
|
 thick
thick
|

|
| Computer Modern Rightarrow[sep] . Computer Modern Rightarrow[] |
 thin
thin
|
 thick
thick
|

|
| Computer Modern Rightarrow[length=3pt] |
 thin
thin
|
 thick
thick
|

|
| Computer Modern Rightarrow[sharp] |
 thin
thin
|
 thick
thick
|

|
| Computer Modern Rightarrow[slant=.3] |
 thin
thin
|
 thick
thick
|

|
| Computer Modern Rightarrow[left] |
 thin
thin
|
 thick
thick
|

|
| Computer Modern Rightarrow[right] |
 thin
thin
|
 thick
thick
|

|
| Computer Modern Rightarrow[harpoon,reversed] |
 thin
thin
|
 thick
thick
|

|
| Computer Modern Rightarrow[red] |
 thin
thin
|
 thick
thick
|

|
The following options have no effect: open, fill.
On double lines, the arrow tip will not look correct.
-
Arrow Tip Kind Implies
This arrow tip makes only sense in conjunction with the double option. The idea is that you attach it to a double line to get something that looks like TeX’s \implies arrow (\(\implies \)). A typical use of this arrow tip is

| Appearance of the below at line width | 0.4pt | 0.8pt | 1.6pt |
| Implies[] on double line |
 thin
thin
|
 thick
thick
|

|
| Implies[red] on double line |
 thin
thin
|
 thick
thick
|

|
-
Arrow Tip Kind To
This is a shorthand for Computer Modern Rightarrow when the arrows.meta library is loaded. Otherwise, it is a shorthand for the classical TikZ rightarrow.
16.5.3 Geometric Arrow Tips
-
Arrow Tip Kind Circle
Although this tip is called “circle”, you can also use it to draw ellipses if you set the length and width to different values. Neither round nor reversed has any effect on this arrow tip.

| Appearance of the below at line width | 0.4pt | 0.8pt | 1.6pt |
| Circle[] |
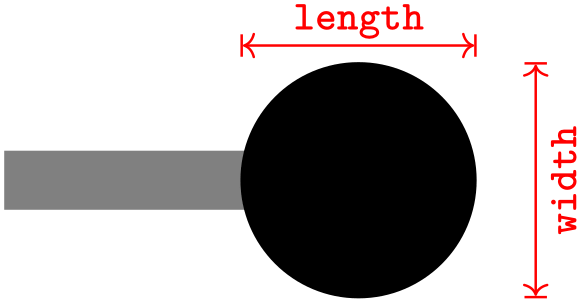 thin
thin
|
 thick
thick
|

|
| Circle[sep] Circle[] |
 thin
thin
|
 thick
thick
|

|
| Circle[sep] . Circle[] |
 thin
thin
|
 thick
thick
|

|
| Circle[open] |
 thin
thin
|
 thick
thick
|

|
| Circle[length=3pt] |
 thin
thin
|
 thick
thick
|

|
| Circle[slant=.3] |
 thin
thin
|
 thick
thick
|

|
| Circle[left] |
 thin
thin
|
 thick
thick
|

|
| Circle[right] |
 thin
thin
|
 thick
thick
|

|
| Circle[red] |
 thin
thin
|
 thick
thick
|

|
-
Arrow Tip Kind Diamond
This is an instance of Kite where the length is larger than the width.
| Appearance of the below at line width | 0.4pt | 0.8pt | 1.6pt |
| Diamond[] |
 thin
thin
|
 thick
thick
|

|
| Diamond[] Diamond[] |
 thin
thin
|
 thick
thick
|

|
| Diamond[] . Diamond[] |
 thin
thin
|
 thick
thick
|

|
| Diamond[open] |
 thin
thin
|
 thick
thick
|

|
| Diamond[length=10pt] |
 thin
thin
|
 thick
thick
|

|
| Diamond[round] |
 thin
thin
|
 thick
thick
|

|
| Diamond[slant=.3] |
 thin
thin
|
 thick
thick
|

|
| Diamond[left] |
 thin
thin
|
 thick
thick
|

|
| Diamond[right] |
 thin
thin
|
 thick
thick
|

|
| Diamond[red] |
 thin
thin
|
 thick
thick
|

|
| Diamond[fill=red!50] |
 thin
thin
|
 thick
thick
|

|
-
Arrow Tip Kind Ellipse
This is a shorthand for a “circle” that is twice as wide as high.
| Appearance of the below at line width | 0.4pt | 0.8pt | 1.6pt |
| Ellipse[] |
 thin
thin
|
 thick
thick
|

|
| Ellipse[sep] Ellipse[] |
 thin
thin
|
 thick
thick
|

|
| Ellipse[sep] . Ellipse[] |
 thin
thin
|
 thick
thick
|

|
| Ellipse[open] |
 thin
thin
|
 thick
thick
|

|
| Ellipse[length=10pt] |
 thin
thin
|
 thick
thick
|

|
| Ellipse[round] |
 thin
thin
|
 thick
thick
|

|
| Ellipse[slant=.3] |
 thin
thin
|
 thick
thick
|

|
| Ellipse[left] |
 thin
thin
|
 thick
thick
|

|
| Ellipse[right] |
 thin
thin
|
 thick
thick
|

|
| Ellipse[red] |
 thin
thin
|
 thick
thick
|

|
| Ellipse[fill=red!50] |
 thin
thin
|
 thick
thick
|

|
-
Arrow Tip Kind Kite
This arrow tip consists of four lines that form a “kite”. The inset prescribed how far the width-axis of the kite is removed from the back end. Note that the inset cannot be negative, use a Stealth arrow tip for this.

| Appearance of the below at line width | 0.4pt | 0.8pt | 1.6pt |
| Kite[] |
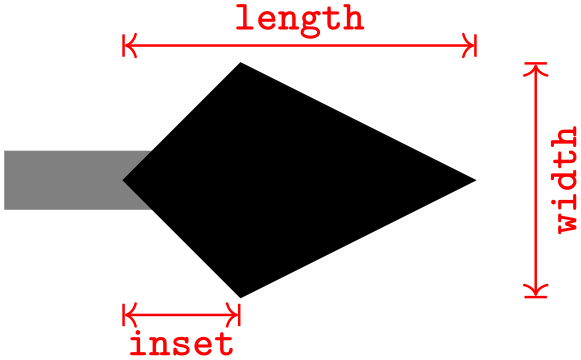 thin
thin
|
 thick
thick
|

|
| Kite[sep] Kite[] |
 thin
thin
|
 thick
thick
|

|
| Kite[sep] . Kite[] |
 thin
thin
|
 thick
thick
|

|
| Kite[open] |
 thin
thin
|
 thick
thick
|

|
| Kite[length=6pt,width=4pt] |
 thin
thin
|
 thick
thick
|

|
| Kite[length=6pt,width=4pt,inset=1.5pt] |
 thin
thin
|
 thick
thick
|

|
| Kite[round] |
 thin
thin
|
 thick
thick
|

|
| Kite[slant=.3] |
 thin
thin
|
 thick
thick
|

|
| Kite[left] |
 thin
thin
|
 thick
thick
|

|
| Kite[right] |
 thin
thin
|
 thick
thick
|

|
| Kite[red] |
 thin
thin
|
 thick
thick
|

|
-
Arrow Tip Kind Latex
This arrow tip is the same as the arrow tip used in LaTeX’s standard pictures (via the \vec command), if you set the length to 4pt. The default size for this arrow tip was set slightly larger so that it fits better with the other geometric arrow tips.

| Appearance of the below at line width | 0.4pt | 0.8pt | 1.6pt |
| Latex[] |
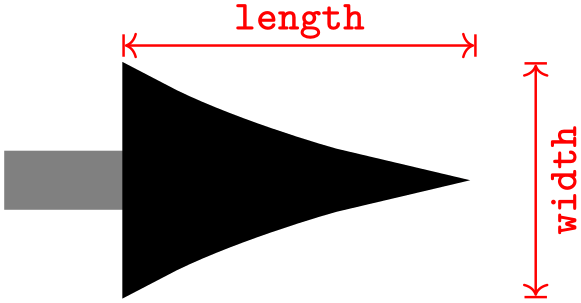 thin
thin
|
 thick
thick
|

|
| Latex[sep] Latex[] |
 thin
thin
|
 thick
thick
|

|
| Latex[sep] . Latex[] |
 thin
thin
|
 thick
thick
|

|
| Latex[open] |
 thin
thin
|
 thick
thick
|

|
| Latex[length=4pt] |
 thin
thin
|
 thick
thick
|

|
| Latex[round] |
 thin
thin
|
 thick
thick
|

|
| Latex[slant=.3] |
 thin
thin
|
 thick
thick
|

|
| Latex[left] |
 thin
thin
|
 thick
thick
|

|
| Latex[right] |
 thin
thin
|
 thick
thick
|

|
| Latex[red] |
 thin
thin
|
 thick
thick
|

|
-
Arrow Tip Kind LaTeX
Another spelling for the Latex arrow tip.
-
Arrow Tip Kind Rectangle

| Appearance of the below at line width | 0.4pt | 0.8pt | 1.6pt |
| Rectangle[] |
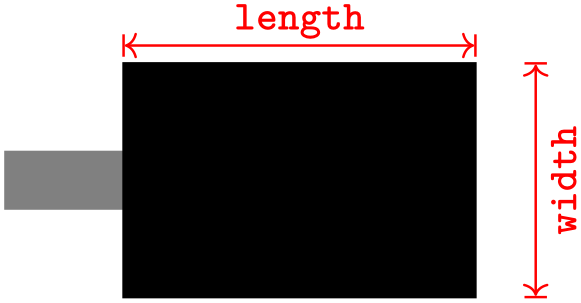 thin
thin
|
 thick
thick
|

|
| Rectangle[sep] Rectangle[] |
 thin
thin
|
 thick
thick
|

|
| Rectangle[sep] . Rectangle[] |
 thin
thin
|
 thick
thick
|

|
| Rectangle[open] |
 thin
thin
|
 thick
thick
|

|
| Rectangle[length=4pt] |
 thin
thin
|
 thick
thick
|

|
| Rectangle[round] |
 thin
thin
|
 thick
thick
|

|
| Rectangle[slant=.3] |
 thin
thin
|
 thick
thick
|

|
| Rectangle[left] |
 thin
thin
|
 thick
thick
|

|
| Rectangle[right] |
 thin
thin
|
 thick
thick
|

|
| Rectangle[red] |
 thin
thin
|
 thick
thick
|

|
-
Arrow Tip Kind Square
An instance of the Rectangle whose width is identical to the length.
| Appearance of the below at line width | 0.4pt | 0.8pt | 1.6pt |
| Square[] |
 thin
thin
|
 thick
thick
|

|
| Square[sep] Square[] |
 thin
thin
|
 thick
thick
|

|
| Square[sep] . Square[] |
 thin
thin
|
 thick
thick
|

|
| Square[open] |
 thin
thin
|
 thick
thick
|

|
| Square[length=4pt] |
 thin
thin
|
 thick
thick
|

|
| Square[round] |
 thin
thin
|
 thick
thick
|

|
| Square[slant=.3] |
 thin
thin
|
 thick
thick
|

|
| Square[left] |
 thin
thin
|
 thick
thick
|

|
| Square[right] |
 thin
thin
|
 thick
thick
|

|
| Square[red] |
 thin
thin
|
 thick
thick
|

|
-
Arrow Tip Kind Stealth
This arrow tip is similar to a Kite, only the inset now counts “inwards”. Because of that sharp angles, for this arrow tip is makes quite a difference, visually, if use the round option. Also, using the harpoon option (or left or right) will lengthen the arrow tip because of the even sharper corner at the tip.

| Appearance of the below at line width | 0.4pt | 0.8pt | 1.6pt |
| Stealth[] |
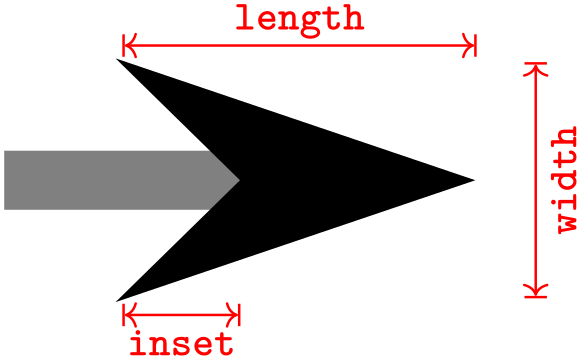 thin
thin
|
 thick
thick
|

|
| Stealth[sep] Stealth[] |
 thin
thin
|
 thick
thick
|

|
| Stealth[sep] . Stealth[] |
 thin
thin
|
 thick
thick
|

|
| Stealth[open] |
 thin
thin
|
 thick
thick
|

|
| Stealth[length=6pt,width=4pt] |
 thin
thin
|
 thick
thick
|

|
| Stealth[length=6pt,width=4pt,inset=1.5pt] |
 thin
thin
|
 thick
thick
|

|
| Stealth[round] |
 thin
thin
|
 thick
thick
|

|
| Stealth[slant=.3] |
 thin
thin
|
 thick
thick
|

|
| Stealth[left] |
 thin
thin
|
 thick
thick
|

|
| Stealth[right] |
 thin
thin
|
 thick
thick
|

|
| Stealth[red] |
 thin
thin
|
 thick
thick
|

|
-
Arrow Tip Kind Triangle
An instance of a Kite with zero inset.
| Appearance of the below at line width | 0.4pt | 0.8pt | 1.6pt |
| Triangle[] |
 thin
thin
|
 thick
thick
|

|
| Triangle[sep] Triangle[] |
 thin
thin
|
 thick
thick
|

|
| Triangle[sep] . Triangle[] |
 thin
thin
|
 thick
thick
|

|
| Triangle[open] |
 thin
thin
|
 thick
thick
|

|
| Triangle[length=4pt] |
 thin
thin
|
 thick
thick
|

|
| Triangle[angle=45:1pt 3] |
 thin
thin
|
 thick
thick
|

|
| Triangle[angle=60:1pt 3] |
 thin
thin
|
 thick
thick
|

|
| Triangle[angle=90:1pt 3] |
 thin
thin
|
 thick
thick
|

|
| Triangle[round] |
 thin
thin
|
 thick
thick
|

|
| Triangle[slant=.3] |
 thin
thin
|
 thick
thick
|

|
| Triangle[left] |
 thin
thin
|
 thick
thick
|

|
| Triangle[right] |
 thin
thin
|
 thick
thick
|

|
| Triangle[red] |
 thin
thin
|
 thick
thick
|

|
-
Arrow Tip Kind Turned Square
An instance of a Kite with identical width and height and mid-inset.
| Appearance of the below at line width | 0.4pt | 0.8pt | 1.6pt |
| Turned Square[] |
 thin
thin
|
 thick
thick
|

|
| Turned Square[sep] Turned Square[] |
 thin
thin
|
 thick
thick
|

|
| Turned Square[sep] . Turned Square[] |
 thin
thin
|
 thick
thick
|

|
| Turned Square[open] |
 thin
thin
|
 thick
thick
|

|
| Turned Square[length=4pt] |
 thin
thin
|
 thick
thick
|

|
| Turned Square[round] |
 thin
thin
|
 thick
thick
|

|
| Turned Square[slant=.3] |
 thin
thin
|
 thick
thick
|

|
| Turned Square[left] |
 thin
thin
|
 thick
thick
|

|
| Turned Square[right] |
 thin
thin
|
 thick
thick
|

|
| Turned Square[red] |
 thin
thin
|
 thick
thick
|

|
16.5.4 Caps
Recall that a cap is a way of ending a line. The graphic languages underlying TikZ (pdf, postscript or svg) all support three basic types of line caps on a very low level: round, rectangular, and “butt”. Using cap arrow tips, you can add new caps to lines and use different caps for the end and the start.
-
Arrow Tip Kind Butt Cap
This arrow tip ends the line “in the normal way” with a straight end. This arrow tip is only need to “cover up” the actual line cap, if this happens to differ from the normal cap. In the following example, the line cap is “round”, but, nevertheless, the right end is a “butt” cap:

-
Arrow Tip Kind Fast Round
This arrow tip is not really a cap, you use it in conjunction with (typically) the Round Cap. The idea is that you end your line using the round cap and then add several Fast Rounds. As for Round Cap, the length parameter dictates the length is the length of the “main part”, the inset sets the length of a line that comes before this tip.

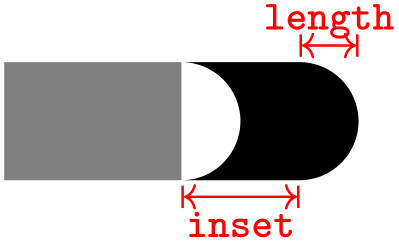
                    \usetikzlibrary {arrows.meta}

                    \tikz \draw [line width=1ex,

                                 -{Round Cap []. Fast Round[] Fast Round[]}]

                      (0,0) --
                    (1,0);
Note that in conjunction with the bend option, this works even quite well for curves:

                    \usetikzlibrary {arrows.meta,bending}

                    \tikz [f/.tip = Fast Round] % shorthand

                      \draw [line width=1ex, -{[bend] Round Cap[] . f f f}]

                      (0,0) to
                    [bend left] (1,0);
| Appearance of the below at line width | 1ex | 1em |
| Fast Round[] |
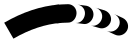
|

|
| Fast Round[reversed] |

|

|
| Fast Round[cap angle=60] |

|

|
| Fast Round[cap angle=60,inset=5pt] |

|

|
| Fast Round[length=.5ex] |

|

|
| Fast Round[slant=.3] |

|

|
-
Arrow Tip Kind Fast Triangle

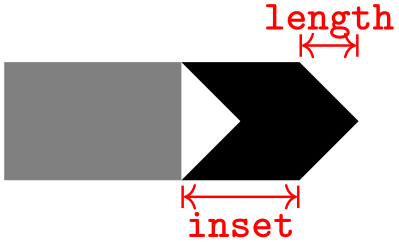
                    \usetikzlibrary {arrows.meta}

                    \tikz \draw [line width=1ex,

                                 -{Triangle Cap []. Fast Triangle[] Fast Triangle[]}]

                      (0,0) --
                    (1,0);
Again, this tip works well for curves:

                    \usetikzlibrary {arrows.meta,bending}

                    \tikz [f/.tip = Fast Triangle] % shorthand

                      \draw [line width=1ex, -{[bend] Triangle Cap[] . f f f}]

                      (0,0) to
                    [bend left] (1,0);
| Appearance of the below at line width | 1ex | 1em |
| Fast Triangle[] |

|

|
| Fast Triangle[reversed] |

|

|
| Fast Triangle[cap angle=60] |

|

|
| Fast Triangle[cap angle=60,inset=5pt] |

|

|
| Fast Triangle[length=.5ex] |

|

|
| Fast Triangle[slant=.3] |

|

|

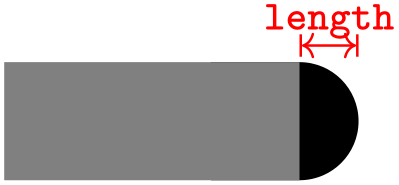


-
Arrow Tip Kind Triangle Cap
-
/pgf/arrow keys/cap angle=⟨angle⟩(no default) 

You can get any angle you want at the tip by specifying a length that is an appropriate multiple of the line width. The following options does this computation for you:
Sets length to an appropriate multiple of the line width so that the angle of a Triangle Cap is exactly ⟨angle⟩ at the tip.
| Appearance of the below at line width | 1ex | 1em |
| Triangle Cap[] |
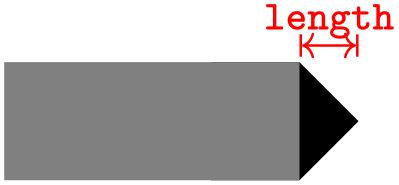
|

|
| Triangle Cap[reversed] |

|

|
| Triangle Cap[cap angle=60] |

|

|
| Triangle Cap[cap angle=60,reversed] |

|

|
| Triangle Cap[length=.5ex] |

|

|
| Triangle Cap[slant=.3] |

|

|
16.5.5 Special Arrow Tips
-
Arrow Tip Kind Rays
This arrow tip attaches a “bundle of rays” to the tip. The number of evenly spaced rays is given by the n arrow key (see below). When the number is even, the rays will lie to the left and to the right of the direction of the arrow; when the number is odd, the rays are rotated in such a way that one of them points perpendicular to the direction of the arrow (this is to ensure that no ray points in the direction of the line, which would look strange). The length and width describe the length and width of an ellipse into which the rays fit.

| Appearance of the below at line width | 0.4pt | 0.8pt | 1.6pt |
| Rays[] |
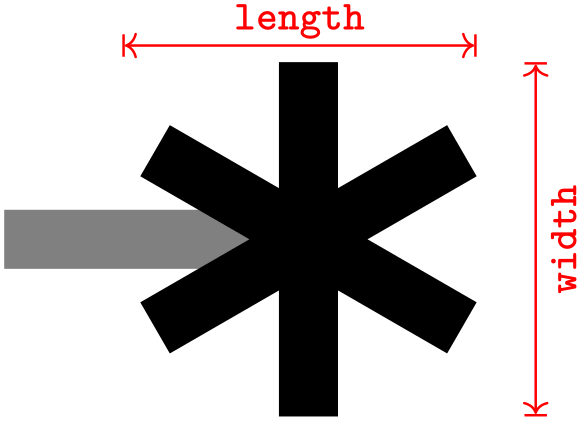 thin
thin
|
 thick
thick
|

|
| Rays[sep] Rays[] |
 thin
thin
|
 thick
thick
|

|
| Rays[sep] . Rays[] |
 thin
thin
|
 thick
thick
|

|
| Rays[width'=0pt 2] |
 thin
thin
|
 thick
thick
|

|
| Rays[round] |
 thin
thin
|
 thick
thick
|

|
| Rays[n=2] |
 thin
thin
|
 thick
thick
|

|
| Rays[n=3] |
 thin
thin
|
 thick
thick
|

|
| Rays[n=4] |
 thin
thin
|
 thick
thick
|

|
| Rays[n=5] |
 thin
thin
|
 thick
thick
|

|
| Rays[n=6] |
 thin
thin
|
 thick
thick
|

|
| Rays[n=7] |
 thin
thin
|
 thick
thick
|

|
| Rays[n=8] |
 thin
thin
|
 thick
thick
|

|
| Rays[n=9] |
 thin
thin
|
 thick
thick
|

|
| Rays[slant=.3] |
 thin
thin
|
 thick
thick
|

|
| Rays[left] |
 thin
thin
|
 thick
thick
|

|
| Rays[right] |
 thin
thin
|
 thick
thick
|

|
| Rays[left,n=5] |
 thin
thin
|
 thick
thick
|

|
| Rays[right,n=5] |
 thin
thin
|
 thick
thick
|

|
| Rays[red] |
 thin
thin
|
 thick
thick
|

|
-
/pgf/arrow keys/n=⟨number⟩ (no default, initially 4) 
Sets the number of rays in a Rays arrow tip.