TikZ and PGF Manual
Libraries
63 Three Point Perspective Drawing Library
by Max Snippe
-
TikZ Library perspective 
\usetikzlibrary{perspective} %
LaTeX
and plain
TeX
\usetikzlibrary[perspective] % ConTeXt
This library provides tools for perspective drawing with one, two, or three vanishing points.
63.1 Coordinate Systems
-
Coordinate system three point perspective 
-
/tikz/cs/x=⟨number⟩ (no default, initially 0)
-
/tikz/cs/y=⟨number⟩ (no default, initially 0)
-
/tikz/cs/z=⟨number⟩ (no default, initially 0)
The three point perspective coordinate system is very similar to the xyz coordinate system, save that it will display the provided coordinates with a perspective projection.
The \(x\) component of the coordinate. Should be given without unit.
Same as x.
Same as x.
-
Coordinate system tpp 
The tpp coordinate system is an alias for the three point perspective coordinate system.
63.2 Setting the view
-
/tikz/3d view={⟨azimuth⟩}{⟨elevation⟩} (default {-30}{15}) 
With the 3d view option, the projection of the 3D coordinates on the 2D page is defined. It is determined by rotating the coordinate system by \(-\meta {azimuth}\) around the \(z\)-axis, and by ⟨elevation⟩ around the (new) \(x\)-axis, as shown below.
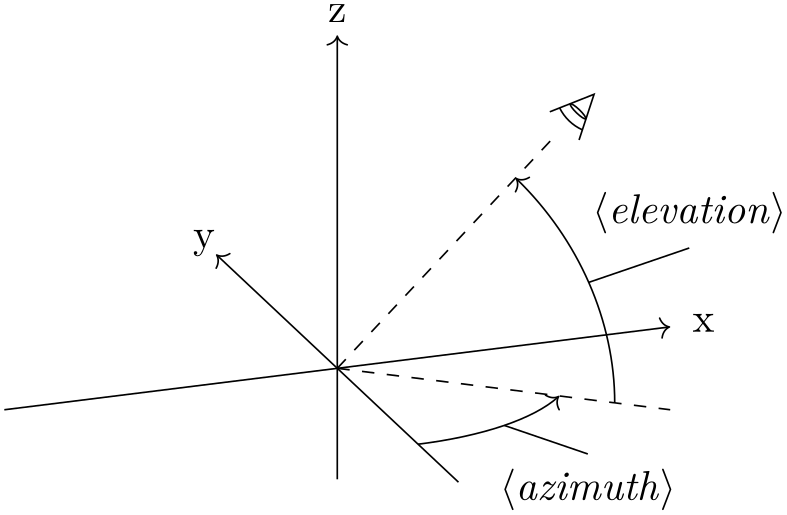
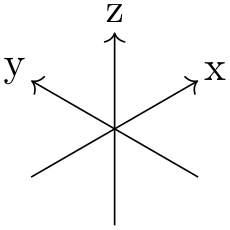
For example, when both ⟨azimuth⟩ and ⟨elevation⟩ are 0\(^\circ \), \(+z\) will be pointing upward, and \(+x\) will be pointing right. The default is as shown below.
-
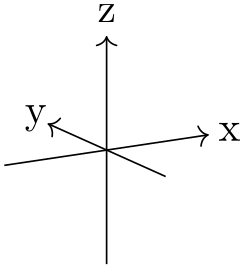
/tikz/isometric view(style, no value) 
A special kind of 3d view is isometric, which can be set with the isometric view style. It simply sets 3d view={-45}{35.26}. The value for ⟨elevation⟩ is determined with \(\arctan (1/\sqrt {2})\). In isometric projection the angle between any pair of axes is 120\(^\circ \), as shown below.
63.3 Defining the perspective
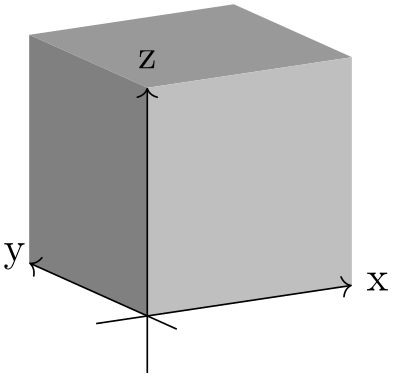
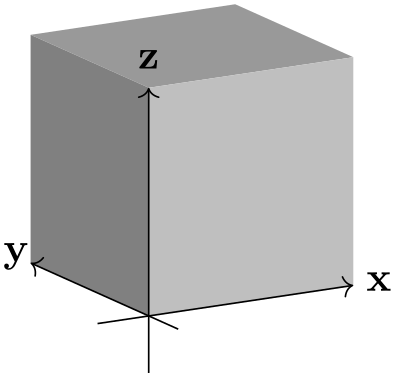
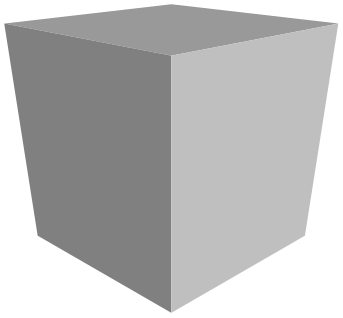
In this section, the following example cuboid will be used with various scaling. As a reference, the axes will be shown too, without perspective projection.
                \usetikzlibrary {perspective}

                \newcommand\simplecuboid[3]{%

                  \fill[gray!80!white] (tpp cs:x=0,y=0,z=#3)

                    --
                (tpp cs:x=0,y=#2,z=#3)

                    --
                (tpp cs:x=#1,y=#2,z=#3)

                    --
                (tpp cs:x=#1,y=0,z=#3) --
                cycle;

                  \fill[gray]  (tpp cs:x=0,y=0,z=0)

                    --
                (tpp cs:x=0,y=0,z=#3)

                    --
                (tpp cs:x=0,y=#2,z=#3)

                    --
                (tpp cs:x=0,y=#2,z=0) --
                cycle;

                  \fill[gray!50!white] (tpp cs:x=0,y=0,z=0)

                    --
                (tpp cs:x=0,y=0,z=#3)

                    --
                (tpp cs:x=#1,y=0,z=#3)

                    --
                (tpp cs:x=#1,y=0,z=0) --
                cycle;}

                \newcommand{\simpleaxes}[3]{%

                  \draw[->] (-0.5,0,0) --
                (#1,0,0) node[pos=1.1]{x};

                  \draw[->] (0,-0.5,0) --
                (0,#2,0) node[pos=1.1]{y};

                  \draw[->] (0,0,-0.5) --
                (0,0,#3) node[pos=1.1]{z};}


                \begin{tikzpicture}[3d view]

                  \simplecuboid{2}{2}{2}

                  \simpleaxes{2}{2}{2}

                \end{tikzpicture}
-
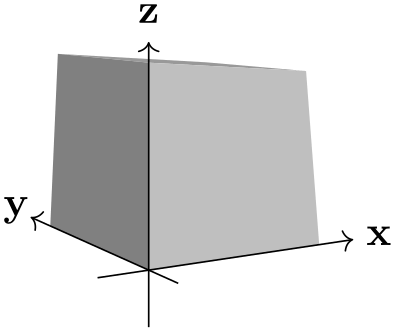
/tikz/perspective=⟨vanishing points⟩ (default p={(10,0,0)},q={(0,10,0)},r={(0,0,20)}) 
-
/tikz/perspective/p={⟨x,y,z⟩} (no default, initially (0,0,0)) 
-
/tikz/perspective/q={⟨x,y,z⟩} (no default, initially (0,0,0)) 
-
/tikz/perspective/r={⟨x,y,z⟩} (no default, initially (0,0,0)) 
The ‘strength’ of the perspective can be determined by setting the location of the vanishing points. The default values have a stronger perspective towards \(x\) and \(y\) than towards \(z\), as shown below.
                    \usetikzlibrary {perspective}

                    \begin{tikzpicture}[3d view,perspective]

                      \simplecuboid{2}{2}{2}

                      \simpleaxes{2}{2}{2}

                    \end{tikzpicture}
From this example it also shows that the maximum dimensions of the cuboid are no longer 2 by 2 by 2. This is inherent to the perspective projection.
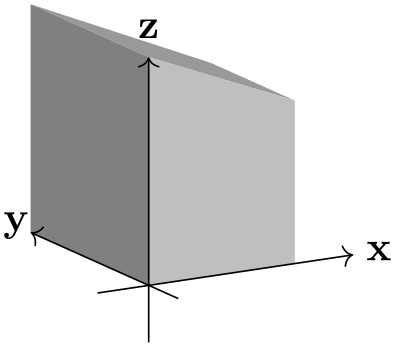
The location of the vanishing point that determines the ‘strength’ of the perspective in \(x\)-direction can be set with the p key.
                        \usetikzlibrary {perspective}

                        \begin{tikzpicture}[

                          3d view,

                          perspective={

                              p = {(5,0,0)}}]

                          \simplecuboid{2}{2}{2}

                          \simpleaxes{2}{2}{2}

                        \end{tikzpicture}
Note also that when only p is provided, the perspective in \(y\) and \(z\) direction is turned off.
To turn off the perspective in \(x\)-direction, one must set the \(x\) component of p to 0 (e.g. p={(0,a,b)}, where a and b can be any number and will be ignored). Or one can provide q and r and omit p.
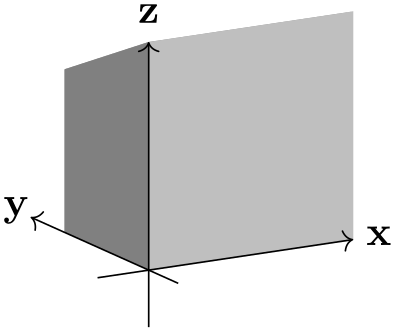
By changing the \(y\) and \(z\) components of p, one can achieve various effects.
                        \usetikzlibrary {perspective}

                        \begin{tikzpicture}[

                          3d view,

                          perspective={

                              p = {(5,0,1)}}]

                          \simplecuboid{2}{2}{2}

                          \simpleaxes{2}{2}{2}

                        \end{tikzpicture}

                        \usetikzlibrary {perspective}

                        \begin{tikzpicture}[

                          3d view,

                          perspective={

                              p = {(5,1,0)}}]

                          \simplecuboid{2}{2}{2}

                          \simpleaxes{2}{2}{2}

                        \end{tikzpicture}

                        \usetikzlibrary {perspective}

                        \begin{tikzpicture}[

                          3d view,

                          perspective={

                              p = {(5,1,1)}}]

                          \simplecuboid{2}{2}{2}

                          \simpleaxes{2}{2}{2}

                        \end{tikzpicture}
Similar to p, but can be turned off by setting its \(y\) component to 0.

                        \usetikzlibrary {perspective}

                        \begin{tikzpicture}[

                          3d view,

                          perspective={

                              q = {(0,5,0)}}]

                          \simplecuboid{2}{2}{2}

                          \simpleaxes{2}{2}{2}

                        \end{tikzpicture}
Similar to p, but can be turned off by setting its \(z\) component to 0.
                        \usetikzlibrary {perspective}

                        \begin{tikzpicture}[

                          3d view,

                          perspective={

                              r = {(0,0,5)}}]

                          \simplecuboid{2}{2}{2}

                          \simpleaxes{2}{2}{2}

                        \end{tikzpicture}
63.4 Shortcomings
Currently a number of things are not working, mostly due to the fact that PGF uses a 2D coordinate system underwater, and perspective projection is a non-linear affine transformation which needs to be aware of all three coordinates. These three coordinates are currently lost when processing a 3D coordinate. The issues include, but possibly are not limited to:
-
• Keys like shift, xshift, yshift are not working
-
• Keys like rotate around x, rotate around y, and rotate around z are not working
-
• Units are not working
-
• Most keys from the 3d library are unsupported, e.g. all the canvas is .. plane keys.
63.5 Examples
An r that lies ‘below’ your drawing can mimic a macro effect.
                \usetikzlibrary {perspective}

                \begin{tikzpicture}[

                  isometric view,

                  perspective={

                      p = {(8,0,0)},

                      q = {(0,8,0)},

                      r = {(0,0,-8)}}]


                  \simplecuboid{2}{2}{2}


                \end{tikzpicture}
A peculiar phenomenon inherent to perspective drawing, is that however great your coordinate will become in the direction of the vanishing point, it will never reach it.
                \usetikzlibrary {perspective}

                \begin{tikzpicture}[

                  isometric view,

                  perspective={

                      p = {(4,0,0)},

                      q = {(0,4,0)}}]


                    \node[fill=red,circle,inner sep=1.5pt,label=above:p] at
                (4,0,0){};


                    \foreach \i in
                {0,...,100}{

                      \filldraw[fill =
                gray] (tpp cs:x=\i,y=0,z=0)

                        --
                (tpp cs:x=\i+0.5,y=0,z=0)

                        --
                (tpp cs:x=\i+0.5,y=2,z=0)

                        --
                (tpp cs:x=\i,y=2,z=0)

                        --
                cycle;}

                \end{tikzpicture}
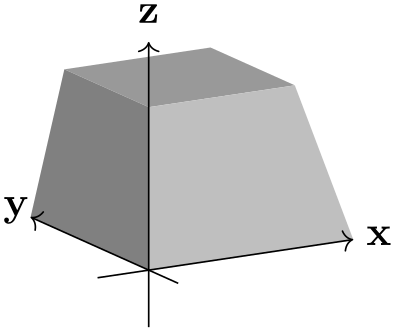
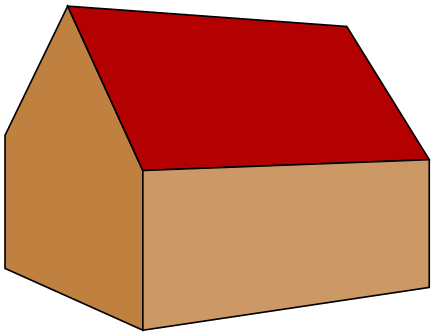
Even for simple examples, the added perspective might add another ‘dimension’ to your drawing. In this case, two vanishing points give a more intuitive result then three would.

                \usetikzlibrary {perspective}

                \begin{tikzpicture}[

                  scale=0.7,

                  3d view,

                  perspective={

                      p = {(20,0,0)},

                      q = {(0,20,0)}}]


                  \filldraw[fill=brown] (tpp cs:x=0,y=0,z=0)

                    --
                (tpp cs:x=0,y=4,z=0)

                    --
                (tpp cs:x=0,y=4,z=2)

                    --
                (tpp cs:x=0,y=2,z=4)

                    --
                (tpp cs:x=0,y=0,z=2) --
                cycle;

                  \filldraw[fill=red!70!black] (tpp cs:x=0,y=0,z=2)

                    --
                (tpp cs:x=5,y=0,z=2)

                    --
                (tpp cs:x=5,y=2,z=4)

                    --
                (tpp cs:x=0,y=2,z=4) --
                cycle;

                  \filldraw[fill=brown!80!white] (tpp cs:x=0,y=0,z=0)

                    --
                (tpp cs:x=0,y=0,z=2)

                    --
                (tpp cs:x=5,y=0,z=2)

                    --
                (tpp cs:x=5,y=0,z=0) --
                cycle;

                \end{tikzpicture}
With the vanishing points nearby, the distortion of parallel lines becomes very strong. This might lead to Dimension too large errors.
                \usetikzlibrary {perspective}

                \begin{tikzpicture}[

                  3d view,

                  perspective={

                      p = {(2,0,0)},

                      q = {(0,2,0)},

                      r = {(0,0,2)}},

                  scale=4,

                  vanishing point/.style={fill,circle,inner sep=2pt}]


                  \simplecuboid{3}{1}{2}


                  \node[vanishing point,label = right:p] (p) at
                (2,0,0){};

                  \node[vanishing point,label = left:q] (q) at
                (0,2,0){};

                  \node[vanishing point,label = above:r] (r) at
                (0,0,2){};


                  \begin{scope}[dotted]

                    \foreach \y in {0,1}{

                      \foreach \z in
                {0,2}{

                        \draw (tpp cs:x=0,y=\y,z=\z) --
                (p.center);}}

                    \foreach \x in {0,3}{

                      \foreach \z in
                {0,2}{

                        \draw (tpp cs:x=\x,y=0,z=\z) --
                (q.center);}}

                    \foreach \x in {0,3}{

                      \foreach \y in {0,1}{

                        \draw (tpp cs:x=\x,y=\y,z=0) --
                (r.center);}}

                  \end{scope}

                \end{tikzpicture}