TikZ and PGF Manual
Libraries
50 Decoration Library
50.1 Overview and Common Options
The decoration libraries define a number of (more or less useful) decorations that can be applied to paths. The usage of decorations is not covered in the present section, please consult Sections 24, which explains how decorations are used in TikZ, and 103, which explains how new decorations can be defined.
The decorations are influenced by a number of parameters that can be set using the decoration option. These parameters are typically shared between different decorations. In the following, the general options are documented (they are defined directly in the decoration module), special-purpose keys are documented with the decoration that uses it.
Since you are encouraged to use these keys to make your own decorations configurable, it is indicated for each key where the value is stored (so that you can access it). Note that some values are stored in TeX dimension registers while others are stored in macros.
-
/pgf/decoration/amplitude=⟨dimension⟩ (no default, initially 2.5pt) 
This key determines the “desired height” (or amplitude) of decorations for which this makes sense. For instance, the initial value of 2.5pt means that deforming decorations should deform a path by up to 2.5pt away from the original path.
This key sets the TeX-dimension \pgfdecorationsegmentamplitude.
-
/pgf/decoration/meta-amplitude=⟨dimension⟩ (no default, initially 2.5pt) 
This key determines the amplitude for a meta-decoration.
The key sets the TeX-macro (!) \pgfmetadecorationsegmentamplitude.
-
/pgf/decoration/segment length=⟨dimension⟩ (no default, initially 10pt) 
Many decorations are made up of small segments. This key determines the desired length of such segments.
This key sets the TeX-dimension \pgfdecorationsegmentlength.
-
/pgf/decoration/meta-segment length=⟨dimension⟩ (no default, initially 1cm) 
This determined the length of the meta-segments from which a meta-decoration is made up.
This key sets the TeX-macro (!) \pgfmetadecorationsegmentlength.
-
/pgf/decoration/angle=⟨degree⟩ (no default, initially 45) 
The way some decorations look like depends on a configurable angle. For instance, a wave decoration consists of arcs and the opening angle of these arcs is given by the angle.
This key sets the TeX-macro \pgfdecorationsegmentangle.
-
/pgf/decoration/aspect=⟨factor⟩ (no default, initially 0.5) 
For some decorations there is a natural aspect ratio. For instance, for a brace decoration the aspect ratio determines where the brace point will be.
This key sets the TeX-macro \pgfdecorationsegmentaspect.
-
/pgf/decoration/start radius=⟨dimension⟩ (no default, initially 2.5pt) 
For some decorations there is a natural start radius (of some circle, presumably).
This key stores the value directly inside the key.
-
/pgf/decoration/end radius=⟨dimension⟩ (no default, initially 2.5pt) 
For some decorations there is a natural end radius (of some circle, presumably).
This key stores the value directly inside the key.
-
/pgf/decoration/radius=⟨dimension⟩(style, no default) 
Sets the start and end radius simultaneously.
-
/pgf/decoration/path has corners=⟨boolean⟩ (no default, initially false) 
This is a hint to the decoration code as to whether the path has corners or not. If a path has a sharp corner, setting this option to true may result in better rendering of the decoration because the joins of input segments are approached “more carefully” than when this key is set to false. However, if the path is, say, a smooth circle, setting this key to true will usually look worse. Most decorations ignore this key, anyway. Internally, it sets the TeX-if \ifpgfdecoratepathhascorners.
50.2 Handling “Dimension too large” errors
In case you should run into a “Dimension too large error” when using the decorations libraries, there is a pretty high chance that you can resolve this by using the fpu library in combination with /pgf/fpu/install only={reciprocal}. Please note that this key should only be applied locally to avoid other errors (see also at the definition of this key in section 56.2).
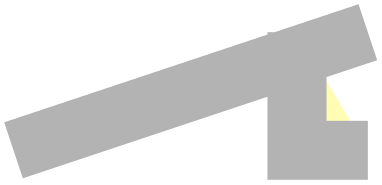
                \usetikzlibrary {decorations.markings,fpu}

                \begin{tikzpicture}

                  \begin{scope}[/pgf/fpu/install only={reciprocal}]

                    \draw[postaction=decorate,decoration={

                          markings,mark=at
                  position 0.52 with {

                              \draw circle[radius=2pt];

                          }},

                    ] plot[smooth,variable=\x,domain=-1:1] (\x*\x*\x,\x*\x);

                  \end{scope}

                \end{tikzpicture}
50.3 Path Morphing Decorations
-
TikZ Library decorations.pathmorphing 
\usepgflibrary{decorations.pathmorphing} %
LaTeX
and plain
TeX
and pure pgf
\usepgflibrary[decorations.pathmorphing] % ConTeXt and pure pgf
\usetikzlibrary{decorations.pathmorphing} %
LaTeX
and plain
TeX
when using TikZ
\usetikzlibrary[decorations.pathmorphing] % ConTeXt when using TikZ
A path morphing decoration “morphs” or “deforms” the to-be-decorated path. This means that
what used to be a straight line might afterwards be a snaking curve and have bumps. However, a line is still a line and path
deforming decorations do not change the number of subpaths. For instance, if the path used to consist of two circles and an
open arc, the path will, after the decoration process, still consist of two closed subpaths and one open subpath.
50.3.1 Decorations Producing Straight Line Paths
The following deformations use only straight lines in order to morph the paths.
-
Decoration lineto
This decoration replaces the path by straight lines. For each curve, the path simply goes directly from the start point to the end point. In the following example, the arc actually consist of two subcurves.
This decoration is actually always defined when the decoration module is loaded, but it is documented here for consistency.

                    \usetikzlibrary {decorations}

                    \begin{tikzpicture}[decoration=lineto]

                      \draw [help lines] grid
                    (3,2);

                      \draw [decorate,fill=yellow!80!black]

                        (0,0) --
                    (3,1) arc
                    (0:180:1.5 and 1) --
                    cycle;

                    \end{tikzpicture}
-
Decoration straight zigzag
-
• amplitude determines how much the zigzag line raises above and falls below a straight line to the target point.
-
• segment length determines the length of a complete “up-down” cycle.
-
• meta-segment length determines the length of the curveto and the zigzag decorations.
This (meta-)decoration decorates the path by alternating between curveto and zigzag decorations. It always finishes with the curveto decoration. The following parameters influence the decoration:
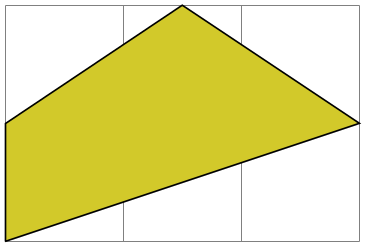
                    \usetikzlibrary {decorations.pathmorphing}

                    \begin{tikzpicture}[decoration={straight zigzag,meta-segment length=1.1cm}]

                      \draw [help lines] grid
                    (3,2);

                      \draw [decorate,fill=yellow!80!black]

                        (0,0) --
                    (3,1) arc
                    (0:180:1.5 and 1) --
                    cycle;

                    \end{tikzpicture}
-
Decoration random steps
-
• segment length determines the basic length of each step.
-
• amplitude The end of each step is perturbed both in \(x\)- and in \(y\)-direction by two values drawn uniformly from the interval \([-d,d]\), where \(d\) is the value of amplitude.
This decoration consists of straight line segments. The line segments head towards the target, but each step is randomly shifted a little bit. The following parameters influence the decorations:
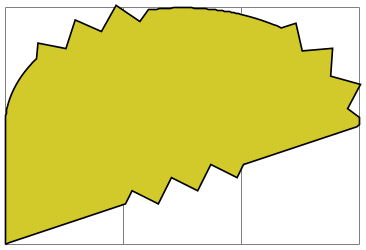
                    \usetikzlibrary {decorations.pathmorphing}

                    \begin{tikzpicture}

                        [decoration={random steps,segment length=2mm}]

                      \draw [help lines] grid
                    (3,2);

                      \draw [decorate,fill=yellow!80!black]

                        (0,0) --
                    (3,1) arc
                    (0:180:1.5 and 1) --
                    cycle;

                    \end{tikzpicture}
-
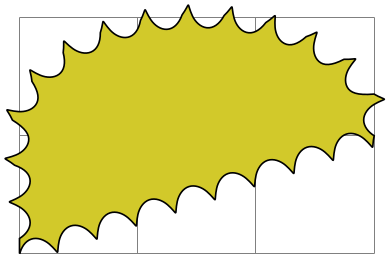
Decoration saw
-
• amplitude determines how much each spike raises above the straight line.
-
• segment length determines the length each spike.
This decoration looks like the blade of a saw. The following parameters influence the decoration:
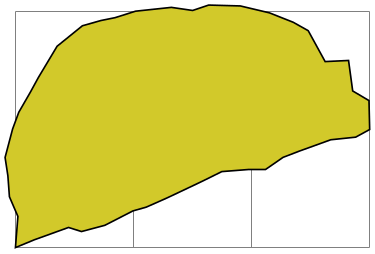
                    \usetikzlibrary {decorations.pathmorphing}

                    \begin{tikzpicture}[decoration=saw]

                      \draw [help lines] grid
                    (3,2);

                      \draw [decorate,fill=yellow!80!black]

                        (0,0) --
                    (3,1) arc
                    (0:180:1.5 and 1) --
                    cycle;

                    \end{tikzpicture}
-
Decoration zigzag
-
• amplitude determines how much the zigzag line raises above and falls below a straight line to the target point.
-
• segment length determines the length of a complete “up-down” cycle.
This decoration looks like a zigzag line. The following parameters influence the decoration:
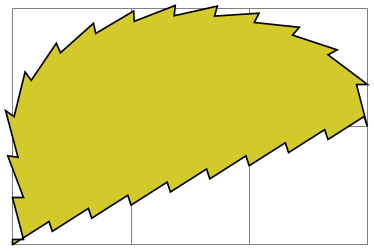
                    \usetikzlibrary {decorations.pathmorphing}

                    \begin{tikzpicture}[decoration=zigzag]

                      \draw [help lines] grid
                    (3,2);

                      \draw [decorate,fill=yellow!80!black]

                        (0,0) --
                    (3,1) arc
                    (0:180:1.5 and 1) --
                    cycle;

                    \end{tikzpicture}
50.3.2 Decorations Producing Curved Line Paths
-
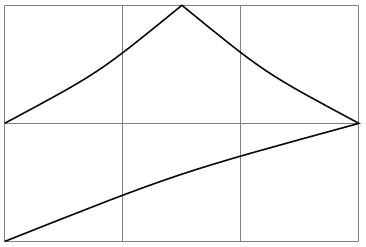
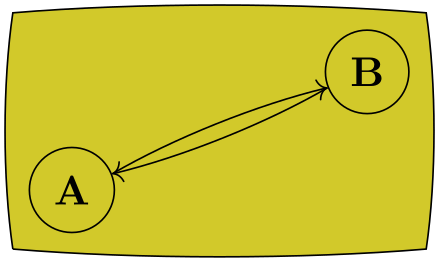
Decoration bent
-
• amplitude determines the amplitude of the bend.
-
• aspect determines how tight the bend is. A good value is around 0.3.
This decoration adds a slightly bent line from the start to the target. The amplitude of the bend is given amplitude (an amplitude of zero gives a straight line).
Note that this decoration makes only little sense for curves. You should apply it only to straight lines.
                    \usetikzlibrary {decorations.pathmorphing}

                    \begin{tikzpicture}[decoration=bent]

                      \draw [help lines] grid
                    (3,2);

                      \draw [decorate] (0,0) --
                    (3,1) --
                    (1.5,2) --
                    (0,1);

                    \end{tikzpicture}
                    \usetikzlibrary {decorations.pathmorphing}

                    \begin{tikzpicture}[decoration={bent,aspect=.3}]

                      \draw [decorate,fill=yellow!80!black] (0,0) rectangle
                    (3.5,2);

                      \node[circle,draw] (A) at
                    (.5,.5) {A};

                      \node[circle,draw] (B) at
                    (3,1.5) {B};

                      \draw[->,decorate] (A) --
                    (B);

                      \draw[->,decorate] (B) --
                    (A);

                    \end{tikzpicture}
-
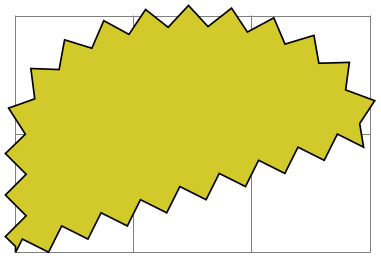
Decoration bumps
-
• amplitude determines the height of the half ellipse.
-
• segment length determines the width of the half ellipse.
This decoration replaces the path by little half ellipses. The following parameters influence it.
                    \usetikzlibrary {decorations.pathmorphing}

                    \begin{tikzpicture}[decoration=bumps]

                      \draw [help lines] grid
                    (3,2);

                      \draw [decorate,fill=yellow!80!black]

                        (0,0) --
                    (3,1) arc
                    (0:180:1.5 and 1) --
                    cycle;

                    \end{tikzpicture}
-
Decoration coil
-
• amplitude determines how much the coil rises above the path and falls below it. Thus, this is the radius of the coil.
-
• segment length determines the distance between two consecutive “curls”. Thus, when the spring is see “from the side” this will be the wave length of the sine curve.
-
• aspect determines the “viewing direction”. A value of 0 means “looking from the side” and a value of 0.5, which is the default, means “look more from the front”.
This decoration replaces the path by a coiled line. To understand how this works, imagine a three-dimensional spring. The spring’s axis points along the path toward the target. Then, we “view” the spring from a certain angle. If we look “straight from the side” we will see a perfect sine curve, if we look “more from the front” we will see a coil. The following parameters influence the decoration:

                    \usetikzlibrary {decorations.pathmorphing}

                    \begin{tikzpicture}[decoration=coil]

                      \draw [help lines] grid
                    (3,2);

                      \draw [decorate,fill=yellow!80!black]

                        (0,0) --
                    (3,1) arc
                    (0:180:1.5 and 1) --
                    cycle;

                    \end{tikzpicture}
                    \usetikzlibrary {decorations.pathmorphing}

                    \begin{tikzpicture}

                        [decoration={coil,aspect=0.3,segment length=3mm,amplitude=3mm}]

                      \draw [help lines] grid
                    (3,2);

                      \draw [decorate,fill=yellow!80!black]

                        (0,0) --
                    (3,1) arc
                    (0:180:1.5 and 1) --
                    cycle;

                    \end{tikzpicture}
-
Decoration curveto
This decoration simply yields a line following the original path. This means that (ideally) it does not change the path and follows any curves in the path (hence the name). In reality, due to the internals of how decorations are implemented, this decoration actually replaces the path by numerous small straight lines.
This decoration is mostly useful in conjunction with meta-decorations. It is also actually defined in the decoration module and is always available.

                    \usetikzlibrary {decorations.pathmorphing}

                    \begin{tikzpicture}[decoration=curveto]

                      \draw [help lines] grid
                    (3,2);

                      \draw [decorate,fill=yellow!80!black]

                        (0,0) --
                    (3,1) arc
                    (0:180:1.5 and 1) --
                    cycle;

                    \end{tikzpicture}
-
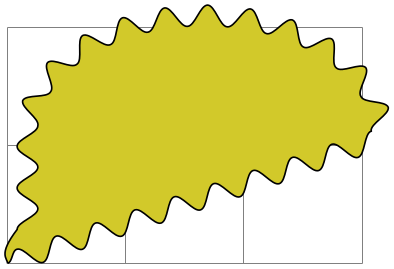
Decoration snake
-
• amplitude determines the sine wave’s amplitude.
-
• segment length determines the sine wave’s wavelength.
This decoration replaces the path by a line that looks like a snake seen from above. More precisely, the snake is a sine wave with a “softened” start and ending. The following parameters influence the snake:

                    \usetikzlibrary {decorations.pathmorphing}

                    \begin{tikzpicture}[decoration=snake]

                      \draw [help lines] grid
                    (3,2);

                      \draw [decorate,fill=yellow!80!black]

                        (0,0) --
                    (3,1) arc
                    (0:180:1.5 and 1) --
                    cycle;

                    \end{tikzpicture}
50.4 Path Replacing Decorations
-
TikZ Library decorations.pathreplacing 
\usepgflibrary{decorations.pathreplacing} %
LaTeX
and plain
TeX
and pure pgf
\usepgflibrary[decorations.pathreplacing] % ConTeXt and pure pgf
\usetikzlibrary{decorations.pathreplacing} %
LaTeX
and plain
TeX
when using TikZ
\usetikzlibrary[decorations.pathreplacing] % ConTeXt when using TikZ
This library defines decorations that replace the to-be-decorated path by another path. Unlike morphing decorations, the
replaced path might be quite different, for instance a straight line might be replaced by a set of circles. Note that
filling a path that has been replaced using one of the decorations in this library typically does not fill the original area
but, rather, the smaller area of the newly-created path segments.
-
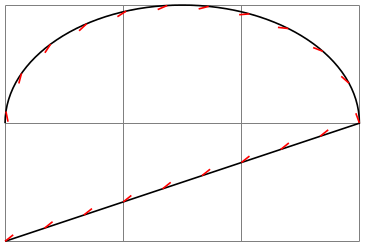
Decoration border
-
• segment length determines the distance between consecutive ticks.
-
• amplitude determines the length of the ticks.
-
• angle determines the angle between the ticks and the line of the path.
This decoration adds straight lines to the path that are at a specific angle to the line toward the target. The idea is to add these little lines to indicate the “border” of an area. The following parameters influence the decoration:
                    \usetikzlibrary {decorations.pathreplacing}

                    \begin{tikzpicture}[decoration=border]

                      \draw [help lines] grid
                    (3,2);

                      \draw [postaction={decorate,draw,red}]

                            (0,0) --
                    (3,1) arc
                    (0:180:1.5 and 1);

                    \end{tikzpicture}
-
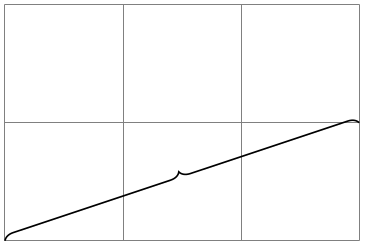
Decoration brace
-
• amplitude determines how much the brace rises above the path.
-
• aspect determines the fraction of the total length where the “middle part” of the brace will be.
This decoration replaces a straight line path by a long brace. The left and right end of the brace will be exactly on the start and endpoint of the decoration. The decoration really only makes sense for paths that are a straight line.
                    \usetikzlibrary {decorations.pathreplacing}

                    \begin{tikzpicture}[decoration=brace]

                      \draw [help lines] grid
                    (3,2);

                      \draw [decorate] (0,0) --
                    (3,1);

                    \end{tikzpicture}
-
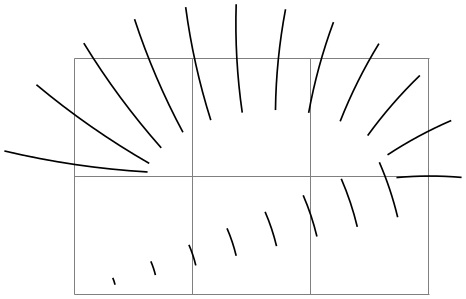
Decoration expanding waves
-
• segment length determines the distance between consecutive arcs.
-
• angle determines the opening angle below and above the path. Thus, the total opening angle is twice this angle.
This decoration adds arcs to the path that get bigger along the line towards the target. The following parameters influence the decoration:
                    \usetikzlibrary {decorations.pathreplacing}

                    \begin{tikzpicture}[decoration={expanding waves,angle=5}]

                      \draw [help lines] grid
                    (3,2);

                      \draw [decorate] (0,0) --
                    (3,1) arc
                    (0:180:1.5 and 1);

                    \end{tikzpicture}
-
Decoration moveto
This decoration simply jumps to the end of the path using a move-to path operation. It is mainly useful as pre=moveto or post=moveto decorations.
This decoration is actually always defined when the decoration module is loaded, but it is documented here for consistency.
-
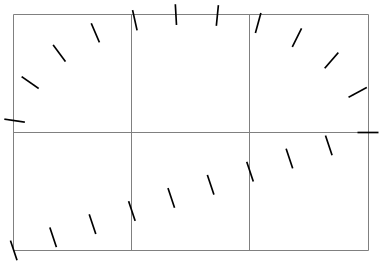
Decoration ticks
-
• segment length determines the distance between consecutive ticks.
-
• amplitude determines half the length of the ticks.
This decoration replaces the path by straight lines that are orthogonal to the path. The following parameters influence the decoration:
                    \usetikzlibrary {decorations.pathreplacing}

                    \begin{tikzpicture}[decoration=ticks]

                      \draw [help lines] grid
                    (3,2);

                      \draw [decorate] (0,0) --
                    (3,1) arc
                    (0:180:1.5 and 1);

                    \end{tikzpicture}
-
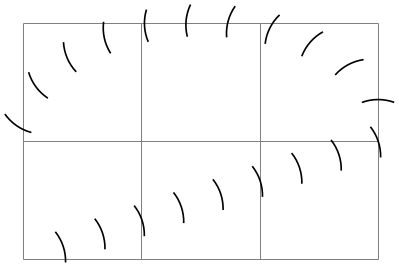
Decoration waves
-
• segment length determines the distance between consecutive arcs.
-
• angle determines the opening angle below and above the path. Thus, the total opening angle is twice this angle.
-
• radius determines the radius of each arc.
This decoration replaces the path by arcs that have a constant size. The following parameters influence the decoration:
                    \usetikzlibrary {decorations.pathreplacing}

                    \begin{tikzpicture}[decoration={waves,radius=4mm}]

                      \draw [help lines] grid
                    (3,2);

                      \draw [decorate] (0,0) --
                    (3,1) arc
                    (0:180:1.5 and 1);

                    \end{tikzpicture}
-
Decoration show path construction
-
/pgf/decoration/moveto code=⟨code⟩ (no default, initially {}) 
-
/pgf/decoration/lineto code=⟨code⟩ (no default, initially {}) 
-
/pgf/decoration/curveto code=⟨code⟩ (no default, initially {}) 
-
/pgf/decoration/closepath code=⟨code⟩ (no default, initially {}) 
-
\tikzinputsegmentfirst 
-
\tikzinputsegmentlast 
-
\tikzinputsegmentsupporta 
-
\tikzinputsegmentsupportb 
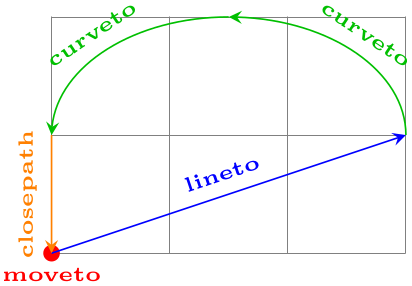
This decoration allows “something different” to be done for each type of input segment (i.e., moveto, lineto, curveto or closepath). Typically, each segment will be replaced with another path, but this need not necessarily be the case.
                    \usetikzlibrary {decorations.pathreplacing}

                    \begin{tikzpicture}[>=stealth, every node/.style={midway, sloped, font=\tiny},

                      decoration={show path construction,

                          moveto code={

                            \fill [red] (\tikzinputsegmentfirst) circle [radius=2pt]

                              node [fill=none, below] {moveto};},

                          lineto code={

                            \draw [blue,->] (\tikzinputsegmentfirst) --
                      (\tikzinputsegmentlast)

                              node [above] {lineto};

                          },

                          curveto code={

                            \draw [green!75!black,->] (\tikzinputsegmentfirst) .. controls

                              (\tikzinputsegmentsupporta) and
                      (\tikzinputsegmentsupportb)

                              ..(\tikzinputsegmentlast) node [above] {curveto};

                          },

                          closepath code={

                            \draw [orange,->] (\tikzinputsegmentfirst) --
                      (\tikzinputsegmentlast)

                              node [above] {closepath};}

                        }]

                      \draw [help lines] grid
                    (3,2);

                      \path [decorate] (0,0) --
                    (3,1) arc
                    (0:180:1.5 and 1) --
                    cycle;

                    \end{tikzpicture}
The following keys can be used to specify the code to execute for each type of input segment.
Set the code to be executed for every moveto input segment. It is important to remember that the transformations applied by the decoration automaton are turned off when ⟨code⟩ is executed.
Set the code to be executed for every lineto input segment.
Set the code to be executed for every curveto input segment.
Set the code to be executed for every closepath input segment.
Within ⟨code⟩ the first and last points on the current input segment can be accessed using \pgfpointdecoratedinputsegmentfirst and \pgfpointdecoratedinputsegmentlast. For curves, the control (support) points can be accessed using \pgfpointdecoratedinputsegmentsupporta and \pgfpointdecoratedinputsegmentsupportb.
In TikZ, you can use the following macros inside a TikZ coordinate.
The first point on the current input segment path.
The last point on the current input segment path.
The first support on the curveto input segment path.
The second support on the curveto input segment path.
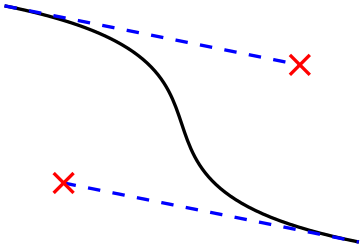
                    \usetikzlibrary {decorations.pathreplacing,shapes.misc}

                    \tikzset{

                      show curve controls/.style={

                        decoration={

                            show path construction,

                            curveto code={

                              \draw [blue, dashed]

                                (\tikzinputsegmentfirst)    --
                      (\tikzinputsegmentsupporta)

                                node
                      [at end, cross out, draw, solid, red, inner sep=2pt]{};

                              \draw [blue, dashed]

                                (\tikzinputsegmentsupportb) --
                      (\tikzinputsegmentlast)

                                node
                      [at start, cross out, draw, solid, red, inner sep=2pt]{};

                            }

                          },decorate


                      }

                    }


                    \begin{tikzpicture}

                      \draw [postaction=show curve controls, thick]

                        (0,2) .. controls
                    (2.5,1.5) and
                    (0.5,0.5) .. (3,0);

                    \end{tikzpicture}
50.5 Marking Decorations
50.5.1 Overview
A marking on a path is any kind of graphic that is placed on a specific position on a path. Markings are useful in rather diverse situations: you can use them to, say, place little “footsteps” along a path as if someone where walking along the path; to place arrow tips on the middle of a path to indicate the “direction” in which something is flowing; or you can use them to place informative information at certain positions of a path.
For historical reasons there are three different libraries for placing marks on a path. They differ in what kind of markings can be added to a path. We start with the most general and most useful of these libraries.
50.6 Arbitrary Markings
-
TikZ Library decorations.markings 
\usepgflibrary{decorations.markings} %
LaTeX
and plain
TeX
and pure pgf
\usepgflibrary[decorations.markings] % ConTeXt and pure pgf
\usetikzlibrary{decorations.markings} %
LaTeX
and plain
TeX
when using TikZ
\usetikzlibrary[decorations.markings] % ConTeXt when using TikZ
Markings are arbitrary “marks” that can be put on a path. Marks can be arrow tips or nodes or even whole
pictures.
-
Decoration markings
-
/pgf/decoration/mark=at position ⟨pos⟩ with ⟨code⟩(no default) 
-
1. It can be a non-negative dimension like 0pt or 2cm or 5cm/2. In this case, it refers to the position along the path that is this far displaced from the start.
-
2. It can be a negative dimension like -1cm-2pt or -1sp. In this case, the position is taken from the end of the path. Thus, -1cm is the position that is \(-1\)cm displaced from the end of the path.
-
3. It can be a dimensionless non-negative number like 1/2 or 0.333+2*0.1. In this case, the ⟨pos⟩ is interpreted as a factor of the total path length. Thus, a ⟨pos⟩ or 0.5 refers to the middle of the path, 0.1 is near the start, and so on.
-
4. It can be a dimensionless negative number like -0.1. Then, again, the fraction of the path length counts “from the end”.
-
/pgf/decoration/mark info/sequence number(no value) 
-
/pgf/decoration/mark info/distance from start(no value) 
-
/pgf/decoration/mark=between positions ⟨start pos⟩ and ⟨end pos⟩ step ⟨stepping⟩ with ⟨code⟩(no default)
-
/pgf/decoration/reset marks(no value) 
-
/pgf/decoration/mark connection node=⟨node name⟩ (no default, initially empty) 
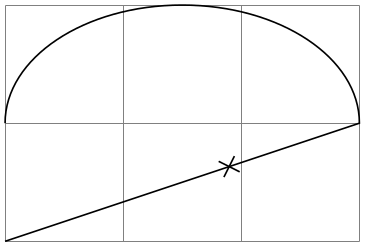
A marking can be thought of a “little picture” or more precisely of “some scope contents” that is placed “on” a path at a certain position. Suppose the marking should be a simple cross. We can produce this with the following code:
If we use this code as a marking at position 2cm on a path, then the following happens: pgf determines the position on the path that is 2cm along the path. Then it translates the coordinate system to this position and rotates it such that the positive \(x\)-axis is tangent to the path. Then a protective scope is created, inside which the above code is executed – resulting in a little cross on the path.
The markings decoration allows you to place one or more such markings on a path. The decoration destroys the input path (except in certain cases, detailed later), which means that it uses the path for determining positions on the path, but after the decoration is done this path is gone. You typically need to use a postaction to add markings.
Let us start with the above example in real code:
\usetikzlibrary {decorations.markings}
\begin{tikzpicture}[decoration={
markings,% switch on markings
mark=% actually add a mark
at
position 2cm
with
{
                    \draw (-2pt,-2pt) --
                    (2pt,2pt);

                    \draw (2pt,-2pt) --
                    (-2pt,2pt);
}
}
]
\draw [help lines] grid
(3,2);
\draw [postaction={decorate}] (0,0) --
(3,1) arc
(0:180:1.5 and 1);
\end{tikzpicture}
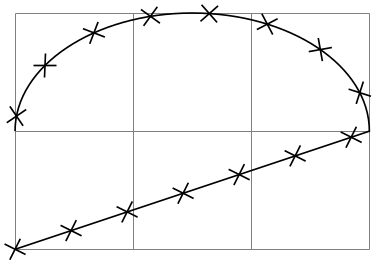
We can also add the cross repeatedly:
                    \usetikzlibrary {decorations.markings}

                    \begin{tikzpicture}[decoration={

                          markings,% switch on markings

                          mark=% actually add a mark

                            between positions 0 and 1
                      step 5mm

                            with

                            {

                              \draw (-2pt,-2pt) --
                      (2pt,2pt);

                              \draw (2pt,-2pt) --
                      (-2pt,2pt);

                            }

                          }

                          ]

                      \draw [help lines] grid
                    (3,2);

                      \draw [postaction={decorate}] (0,0) --
                    (3,1) arc
                    (0:180:1.5 and 1);

                    \end{tikzpicture}
The mark decoration option is used to specify a marking. It comes in two versions:
The options specifies that when a marking decoration is applied, there should be a marking at position ⟨pos⟩ on the path whose code is given by ⟨code⟩.
The ⟨pos⟩ can have four different forms:
The ⟨pos⟩ determines a position on the path. When the marking is applied, the (high level) coordinate system will have been transformed so that the origin lies at this position and the positive \(x\)-axis points along the path. For this coordinate system, the ⟨code⟩ is executed. It can contain all sorts of graphic drawing commands, including (even named) nodes.
If the position lies past the end of the path (for instance if ⟨pos⟩ is set to 1.2), the marking will not be drawn.
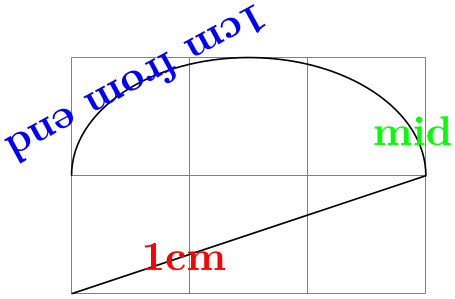
It is possible to give the mark option several times, which causes several markings to be applied. In this case, however, it is necessary that the positions on the path are in increasing order. That is, it is not allowed (and will result in chaos) to have a marking that lies earlier on the path to follow a marking that is later on the path.
                        \usetikzlibrary {decorations.markings}

                        \begin{tikzpicture}[decoration={

                              markings,% switch on markings

                              mark=at position 1cm  with
                          \node[red]{1cm};,

                              mark=at position .5   with
                          \node[green]{mid};,

                              mark=at position -1cm with {\node[blue,transform shape]{1cm from end};}}

                              ]

                          \draw [help lines] grid
                        (3,2);

                          \draw [postaction={decorate}] (0,0) --
                        (3,1) arc
                        (0:180:1.5 and 1);

                        \end{tikzpicture}
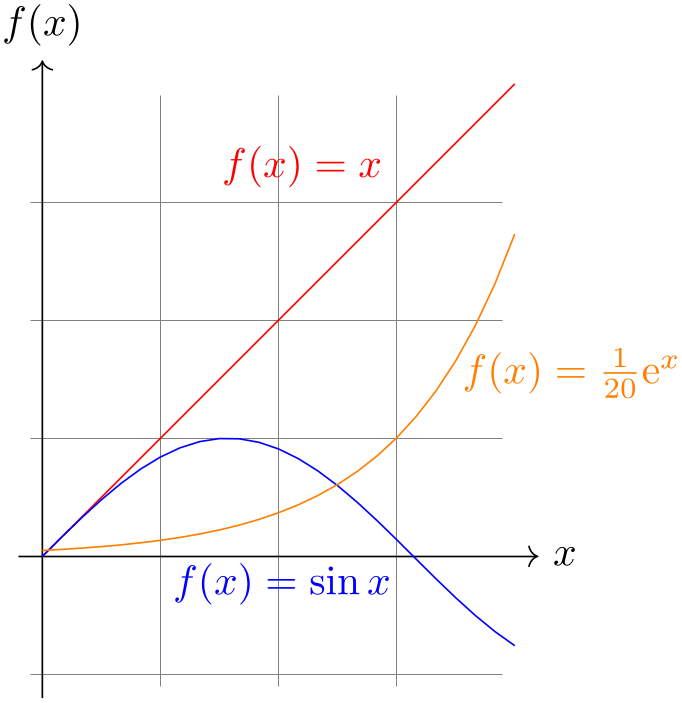
Here is an example that shows how markings can be used to place text on plots:
                        \usetikzlibrary {decorations.markings}

                        \begin{tikzpicture}[domain=0:4,label/.style={postaction={

                                decorate,

                                decoration={

                                  markings,

                                  mark=at
                          position .75 with
                          \node #1;}}}]

                          \draw[very thin,color=gray] (-0.1,-1.1) grid
                        (3.9,3.9);


                          \draw[->] (-0.2,0) --
                        (4.2,0) node[right] {$x$};

                          \draw[->] (0,-1.2) --
                        (0,4.2) node[above] {$f(x)$};


                          \draw[red,label={[above left]{$f(x)=x$}}]                       plot
                        (\x,\x);

                          \draw[blue,label={[below left]{$f(x)=\sin x$}}]                 plot
                        (\x,{sin(\x r)});

                          \draw[orange,label={[right]{$f(x)=
                          \frac{1}{20} \mathrm e^x$}}] plot
                        (\x,{0.05*exp(\x)});

                        \end{tikzpicture}
When the ⟨code⟩ is being executed, two special keys will have been set up, whose value may be of interest:
This key can only be read. Its value (which can be obtained using the \pgfkeysvalueof command) is a “sequence number” of the mark. The first mark that is added to a path has number 1, the second number 2, and so on. This key is mainly useful in conjunction with repeated markings (see below).
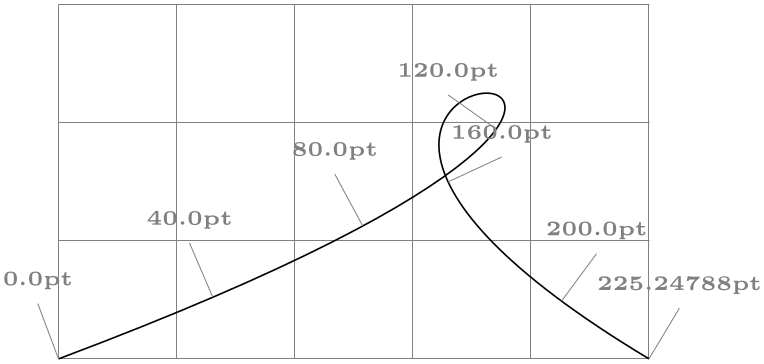
This key can only be read. Its value is the distance of the marking from the start of the path in points. For instance, if the path length is 100pt and the marking is in the middle of the path, the value of this key would be 50.0pt.
A second way to use the mark key is the following:
This works similarly to the at position version of this option, only multiple marks are placed, starting at ⟨start pos⟩ and then spaced apart by ⟨stepping⟩. The ⟨start pos⟩, the ⟨end pos⟩, and also the ⟨stepping⟩ may all be specified in the same way as for the at position version, that is, either using units or no units and also using positive or negative values.
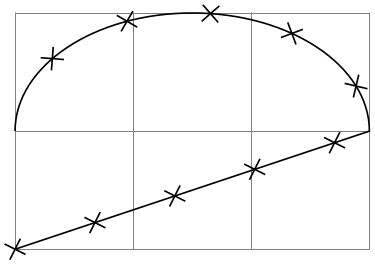
Let us start with a simple example in which we place ten crosses along a path starting with the beginning of the path (⟨start pos⟩ = 0) and ending at the end (⟨end pos⟩ = 1).
                        \usetikzlibrary {decorations.markings}

                        \begin{tikzpicture}[decoration={markings,

                              mark=between positions 0 and 1
                          step 0.1

                                   with { \draw (-2pt,-2pt) --
                          (2pt,2pt);

                                          \draw (2pt,-2pt) --
                          (-2pt,2pt); }} ]

                          \draw [help lines] grid
                        (3,2);

                          \draw [postaction={decorate}] (0,0) --
                        (3,1) arc
                        (0:180:1.5 and 1);

                        \end{tikzpicture}
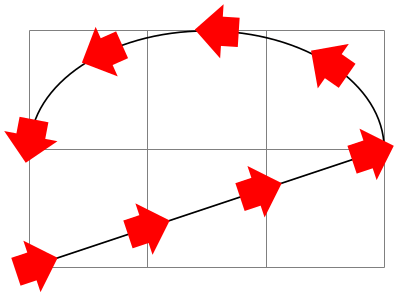
In the next example we place arrow shapes on the path instead of crosses. Note the use of the transform shape option to ensure that the nodes are actually rotated.
                        \usetikzlibrary {decorations.markings,shapes.arrows}

                        \begin{tikzpicture}[decoration={markings,

                              mark=between positions 0 and 1
                          step 1cm

                                with { \node [single arrow,fill=red,

                                              single arrow head extend=3pt,transform shape] {};}}]

                          \draw [help lines] grid
                        (3,2);

                          \draw [postaction={decorate}] (0,0) --
                        (3,1) arc
                        (0:180:1.5 and 1);

                        \end{tikzpicture}
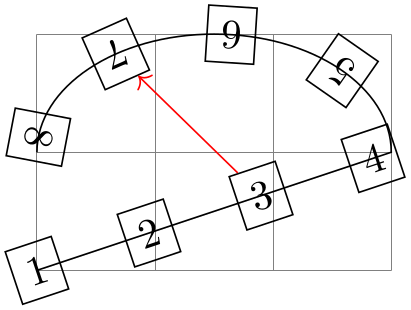
Using the key sequence number we can also “number” the nodes and even refer to them later on.
                        \usetikzlibrary {decorations.markings}

                        \begin{tikzpicture}[decoration={markings,

                              mark=between positions 0 and 1
                          step 1cm with {

                                \node [draw,

                                  name=mark-\pgfkeysvalueof{/pgf/decoration/mark info/sequence number},

                                  transform shape]

                                {\pgfkeysvalueof{/pgf/decoration/mark info/sequence number}};}}]

                          \draw [help lines] grid
                        (3,2);

                          \draw [postaction={decorate}] (0,0) --
                        (3,1) arc
                        (0:180:1.5 and 1);

                          \draw [red,->] (mark-3) --
                        (mark-7);

                        \end{tikzpicture}
In the following example we use the distance info to place “length information” on a path:
                        \usetikzlibrary {decorations.markings}

                        \begin{tikzpicture}[decoration={markings,

                              % Main marks

                              mark=between positions 0 and 1
                          step 40pt with

                                { \draw [help lines] (0,0) --
                          (0,0.5)

                                  node[above,font=\tiny]{

                                    \pgfkeysvalueof{/pgf/decoration/mark info/distance from
                          start}}; },

                              mark=at position -0.1pt with

                                { \draw [help lines] (0,0) --
                          (0,0.5)

                                  node[above,font=\tiny]{

                                    \pgfkeysvalueof{/pgf/decoration/mark info/distance from
                          start}}; }}]

                          \draw [help lines] grid
                        (5,3);

                          \draw [postaction={decorate}]  (0,0) .. controls
                        (8,3) and
                        (0,3) .. (5,0) ;

                        \end{tikzpicture}
Since mark options accumulate, there needs to be a way to “reset” things, so that any mark options set in an enclosing scope do not interfere. This option does exactly this. Note that when the ⟨code⟩ of a marking is executed, the markings are automatically reset.
As mentioned earlier, the decoration usually destroys the path. However, this is no longer the case when the following key is set:
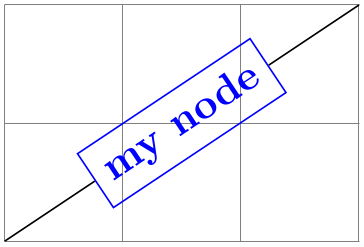
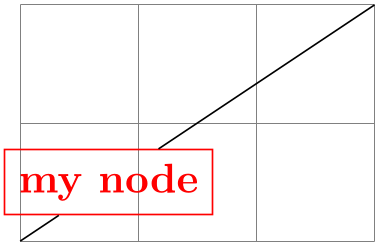
When this key is set to a non-empty ⟨node name⟩ while the decoration is being processed, the following happens: The marking code should, among possibly other things, define a node named ⟨node name⟩. Then, the output path of this decoration will contain a line-to to “one end” of this node, followed by a moveto to the “other end” of the node. More precisely, the first end is given by the position on the border of ⟨node name⟩ that lies in the direction “from which the path heads toward the node” while the other end lies on the border “where the path heads away from the node”. Furthermore, this option causes the decoration to end with a line-to to the end instead of a move-to.
The net effect of all this is that when you decorate a straight line with one or more markings that contain just a node, the line will effectively connect these nodes.
Here are two examples that show how this works:
                        \usetikzlibrary {decorations.markings}

                        \begin{tikzpicture}[decoration={markings,

                              mark connection node=my
                          node,

                              mark=at position .5 with

                                {\node [draw,blue,transform shape] (my node) {my
                          node};}}]

                          \draw [help lines] grid
                        (3,2);

                          \draw decorate
                        { (0,0) --
                        (3,2) };

                        \end{tikzpicture}
                        \usetikzlibrary {decorations.markings}

                        \begin{tikzpicture}[decoration={markings,

                              mark connection node=my
                          node,

                              mark=at position .25 with

                                {\node [draw,red] (my node) {my node};}}]

                          \draw [help lines] grid
                        (3,2);

                          \draw decorate
                        { (0,0) --
                        (3,2) };

                        \end{tikzpicture}
50.6.1 Arrow Tip Markings
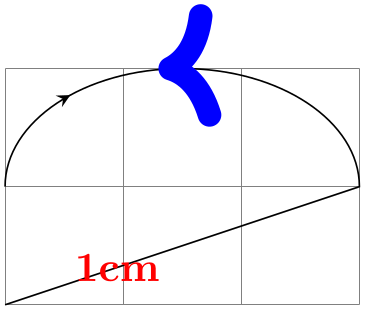
Frequent markings that are hard to create correctly are arrow tips. For them, two special commands are available when the ⟨code⟩ of a mark option is executed. (They are only defined in this code):
-
\arrow[⟨options⟩]{⟨arrow end tip⟩} 
This command simply draws the ⟨arrow end tip⟩ at the origin, pointing right. This is exactly what you need when you want to draw an arrow tip as a marking.
The ⟨options⟩ can only be given when TikZ is used. In this case, they are executed in a scope that contains the arrow tip.
                    \usetikzlibrary {decorations.markings}

                    \begin{tikzpicture}[decoration={

                          markings,% switch on markings

                          mark=at position 1cm  with {\node[red]{1cm};},

                          mark=at position .75  with {\arrow[blue,line width=2mm]{>}},

                          mark=at position -1cm with {\arrowreversed[black]{stealth}}}

                          ]

                      \draw [help lines] grid
                    (3,2);

                      \draw [postaction={decorate}] (0,0) --
                    (3,1) arc
                    (0:180:1.5 and 1);

                    \end{tikzpicture}
Here is a more useful example:
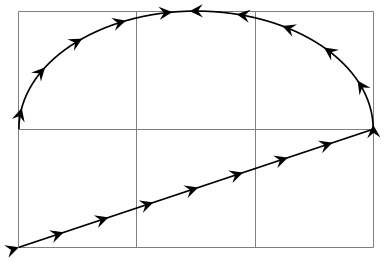
                    \usetikzlibrary {decorations.markings}

                    \begin{tikzpicture}[decoration={

                          markings,% switch on markings

                          mark=between positions 0 and .75
                      step 4mm with {\arrow{stealth}},

                          mark=between positions .75 and 1
                      step 4mm with {\arrowreversed{stealth}}}

                          ]

                      \draw [help lines] grid
                    (3,2);

                      \draw [postaction={decorate}] (0,0) --
                    (3,1) arc
                    (0:180:1.5 and 1);

                    \end{tikzpicture}
-
\arrowreversed[⟨options⟩]{⟨arrow end tip⟩} 
As above, only the arrow end tip is flipped and points in the other direction.
50.6.2 Footprint Markings
-
TikZ Library decorations.footprints 
\usepgflibrary{decorations.footprints} %
LaTeX
and plain
TeX
and pure pgf
\usepgflibrary[decorations.footprints] % ConTeXt and pure pgf
\usetikzlibrary{decorations.footprints} %
LaTeX
and plain
TeX
when using TikZ
\usetikzlibrary[decorations.footprints] % ConTeXt when using TikZ
The decorations of this library can be used to decorate a path with little footprints, as if someone had
“walked” along the path.
-
Decoration footprints
-
/pgf/decoration/foot length(initially 10pt) 
-
/pgf/decoration/stride length(initially 30pt) 
-
/pgf/decoration/foot sep(initially 4pt) 
-
/pgf/decoration/foot angle(initially 10) 
-
/pgf/decoration/foot of(initially human) 
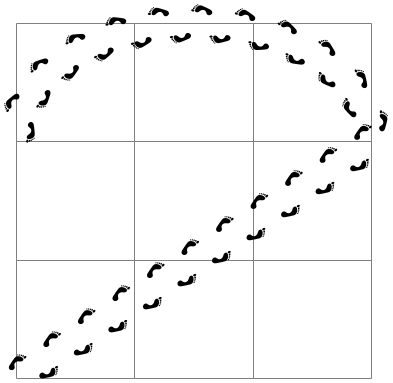
The footprint decoration adds little footprints around the path. They start with the left foot.
                    \usetikzlibrary {decorations.footprints}

                    \begin{tikzpicture}[decoration={footprints,foot length=5pt,stride length=10pt}]

                      \draw [help lines] grid
                    (3,3);

                      \fill [decorate] (0,0) --
                    (3,2) arc
                    (0:180:1.5 and 1);

                    \end{tikzpicture}
You can influence the way this decoration looks using the following options:
The length or size of the footprint itself. A larger value makes the footprint larger, but does not change the stride length.
                        \usetikzlibrary {decorations.footprints}

                        \begin{tikzpicture}[decoration={footprints,foot length=20pt}]

                          \fill [decorate] (0,0) --
                        (3,0);

                        \end{tikzpicture}
The length of strides. This is the distance between the beginnings of left footprints along the path.

                        \usetikzlibrary {decorations.footprints}

                        \begin{tikzpicture}[decoration={footprints,stride length=50pt}]

                          \fill [decorate] (0,0) --
                        (3,0);

                        \end{tikzpicture}
The separation in the middle between the footprints. The footprints are moved away from the path by half this amount.

                        \usetikzlibrary {decorations.footprints}

                        \begin{tikzpicture}[decoration={footprints,foot sep=10pt}]

                          \fill [decorate] (0,0) --
                        (3,0);

                        \end{tikzpicture}
Footprints are rotated by this much.

                        \usetikzlibrary {decorations.footprints}

                        \begin{tikzpicture}[decoration={footprints,foot angle=60}]

                          \fill [decorate] (0,0) --
                        (3,0);

                        \end{tikzpicture}
The species whose footprints are shown. Possible values are:
| Species | Result |
| gnome |
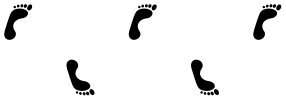
|
| human |

|
| bird |

|
| felis silvestris |

|
50.6.3 Shape Background Markings
The third library for adding markings uses the background paths of certain shapes. This library is included mostly for historical reasons, using the markings library is usually preferable.
-
TikZ Library decorations.shapes 
-
/pgf/decoration/shape width=⟨dimension⟩ (no default, initially 2.5pt) 
-
/pgf/decoration/shape height=⟨dimension⟩ (no default, initially 2.5pt) 
-
/pgf/decoration/shape size=⟨dimension⟩(no default) 
\usepgflibrary{decorations.shapes} %
LaTeX
and plain
TeX
and pure pgf
\usepgflibrary[decorations.shapes] % ConTeXt and pure pgf
\usetikzlibrary{decorations.shapes} %
LaTeX
and plain
TeX
when using TikZ
\usetikzlibrary[decorations.shapes] % ConTeXt when using TikZ
This library defines decorations that use shapes or shape-like drawings to decorate a path. The following options are common
options used by the decorations in this library:
The desired width of the shapes. For decorations that support varying shape sizes, this key sets both the start and end width (which can be overwritten using options like shape start width).
Works like the previous key, only for the height.
Sets the desired width and height simultaneously.
For the exact places and macros where these keys store the values, please consult the beginning of the code of the library.
-
Decoration crosses
-
• segment length determines the distance between (the centers of) consecutive crosses.
-
• shape height determines the height of each cross.
-
• shape width determines the width of each cross.
This decoration replaces the path by (diagonal) crosses. The following parameters influence the decoration:

                    \usetikzlibrary {decorations.shapes}

                    \begin{tikzpicture}[decoration=crosses]

                      \draw [help lines] grid
                    (3,2);

                      \draw [decorate] (0,0) --
                    (3,1) arc
                    (0:180:1.5 and 1);

                    \end{tikzpicture}
-
Decoration triangles
-
• segment length determines the distance between consecutive triangles.
-
• shape height determines the height of the triangle side that is orthogonal to the path.
-
• shape width determines the width of the triangle.
This decoration replaces the path by triangles that point along the path. The following parameters influence the decoration:
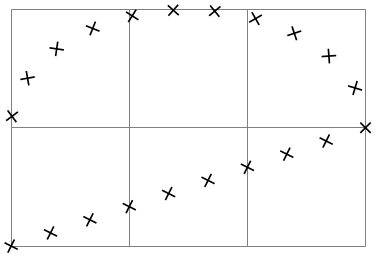
                    \usetikzlibrary {decorations.shapes}

                    \begin{tikzpicture}[decoration=triangles]

                      \draw [help lines] grid
                    (3,2);

                      \draw [decorate,fill=yellow!80!black] (0,0) --
                    (3,1) arc
                    (0:180:1.5 and 1);

                    \end{tikzpicture}
-
Decoration shape backgrounds
-
/pgf/decoration/anchor=⟨anchor⟩ (no default, initially center) 
-
/pgf/decoration/shape=⟨shape name⟩ (no default, initially circle) 
-
/pgf/decoration/shape sep=⟨spacing⟩ (no default, initially .25cm, between centers) 
-
/pgf/decoration/shape evenly spread=⟨number⟩(no default) 
-
/pgf/decoration/shape sloped=⟨boolean⟩ (no default, initially true) 
-
/pgf/decoration/shape scaled=⟨boolean⟩ (no default, initially false) 
-
/pgf/decoration/shape start width=⟨length⟩ (no default, initially 2.5pt) 
-
/pgf/decoration/shape start height=⟨length⟩ (no default, initially 2.5pt) 
-
/pgf/decoration/shape start size=⟨length⟩(style, no default) 
-
/pgf/decoration/shape end width=⟨length⟩ (no default, initially 2.5pt) 
-
/pgf/decoration/shape end height=⟨length⟩(no default) 
-
/pgf/decoration/shape end size=⟨length⟩(style, no default) 
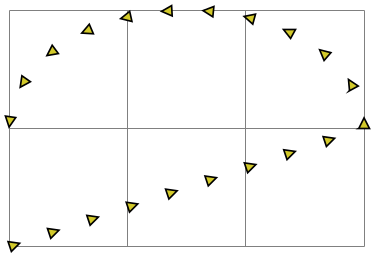
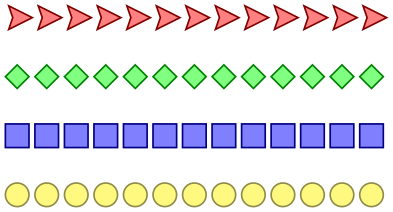
This is a general decoration that replaces the to-be-decorated path by repeated copies of the background path of an arbitrary shape that has previously been defined using the \pgfdeclareshape command (that is, you can use any shape in the shape libraries).
Please note that the background path of the shapes is used, but no nodes are created. This means that you cannot have text inside the shapes of this path, you cannot name them, or refer to them. Finally, this decoration will not work with shapes that depend strongly on the size of the text box (like the arrow shapes). If any of these restrictions pose a problem, use the markings library instead.
                    \usetikzlibrary {decorations.shapes,shapes.geometric}

                    \begin{tikzpicture}[decoration={shape
                      backgrounds,shape=star,shape
                      size=5pt}]

                      \draw [help lines] grid
                    (3,2);

                      \draw [decorate] (0,0) --
                    (3,1) arc
                    (0:180:1.5 and 1);

                    \end{tikzpicture}

                    \usetikzlibrary {decorations.shapes,shapes.geometric}

                    \tikzset{paint/.style={ draw=#1!50!black, fill=#1!50 },

                             decorate with/.style=

                    {decorate,decoration={shape backgrounds,shape=#1,shape
                      size=2mm}}}

                    \begin{tikzpicture}

                      \draw [decorate with=dart,      paint=red]    (0,1.5) --
                    (3,1.5);

                      \draw [decorate with=diamond,   paint=green]  (0,1)   --
                    (3,1);

                      \draw [decorate with=rectangle, paint=blue]   (0,0.5) --
                    (3,0.5);

                      \draw [decorate with=circle,    paint=yellow] (0,0)   --
                    (3,0);

                    \end{tikzpicture}
All shapes are positioned by the anchor that is specified via the anchor decoration option:
The anchor used to position the shape backgrounds.
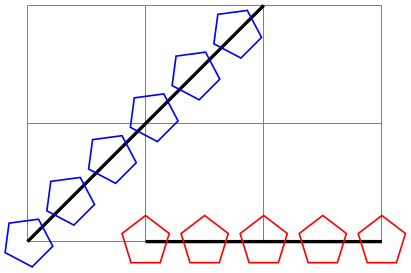
A shape background path is added at the start point of the path and, if the distance between the shapes is appropriate, at the end point of the path.
                    \usetikzlibrary {decorations.shapes,shapes.geometric}

                    \begin{tikzpicture}[decoration={

                            shape
                      backgrounds,shape=regular polygon,shape
                      size=4mm}]

                      \draw [help lines] grid
                    (3,2);

                      \draw [thick] (0,0) --
                    (2,2) (1,0) --
                    (3,0);

                      \draw [red, decorate, decoration={shape sep=.5cm}]  (1,0) --
                    (3,0);

                      \draw [blue, decorate, decoration={shape sep=.5cm}] (0,0) --
                    (2,2);

                    \end{tikzpicture}
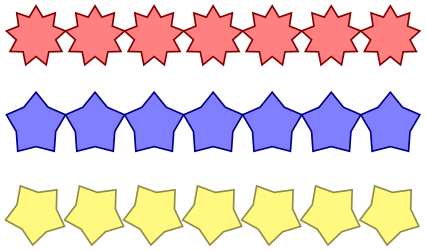
Keys for customizing specific shapes can be specified (e.g., star points, cloud puffs, kite angles, and so on). The size of the shape is “enforced” using transformations. This means that the shape is typeset with an empty text box and some default size values, resulting in an initial shape. This shape is then rescaled using coordinate transformations so that it has the desired size (which may vary as we travel along the to-be-decorated path). This means that settings involving angles and distances may not appear entirely accurate. More general options such as inner sep and minimum size will be ignored, but transformations can be applied to each segment as described below.
                    \usetikzlibrary {decorations.shapes,shapes.geometric}

                    \tikzset{

                      paint/.style={draw=#1!50!black, fill=#1!50},

                      my star/.style={decorate,decoration={shape
                      backgrounds,shape=star},

                                      star points=#1}
 }

                    \begin{tikzpicture}[decoration={shape sep=.5cm, shape size=.5cm}]

                      \draw [my star=9, paint=red]                            (0,1.5) --
                    (3,1.5);

                      \draw [my star=5, paint=blue]                           (0,.75) --
                    (3,.75);

                      \draw [my star=5, paint=yellow, shape border rotate=30] (0,0) --
                    (3,0);

                    \end{tikzpicture}
There are various keys to control the drawing of the shape decoration.
The shape whose background path is used.
Set the spacing between the shapes on the decorations path. This can be just a distance on its own, but the additional keywords between centers, and between borders (which must be preceded by a comma), specify that the distance is between the center anchors of the shapes or between the edges of the boundaries of the shape borders.
                        \usetikzlibrary {decorations.shapes,shapes.symbols}

                        \begin{tikzpicture}[

                            decoration={shape backgrounds,shape
                          size=.5cm,shape=signal},

                            signal from=west, signal to=east,

                            paint/.style={decorate, draw=#1!50!black, fill=#1!50}]

                          \draw [help lines] grid
                        (3,2);

                          \draw [paint=red, decoration={shape sep=.5cm}]

                            (0,2) --
                        (3,2);

                          \draw [paint=green, decoration={shape sep={1cm, between centers}}]

                            (0,1) --
                        (3,1);

                          \draw [paint=blue, decoration={shape sep={1cm, between borders}}]

                            (0,0) --
                        (3,0);

                        \end{tikzpicture}
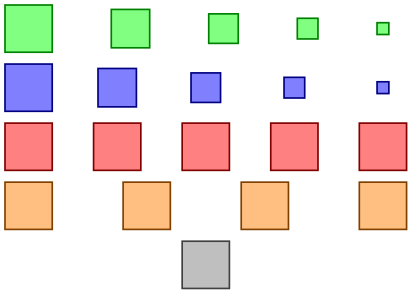
This key overrides the shape sep key and forces the decoration to fit ⟨number⟩ shapes evenly across the path. If ⟨number⟩ is less than 1, then no shapes will be used. If ⟨number⟩ equals 1, then one shape is put in the middle of the path. The additional keywords by centers (the default, if no keyword is specified) and by borders can be used (both preceded by a comma), to specify how the distance between shapes is determined. These keywords will only have a noticeable effect if the shapes sizes differ over time.
                        \usetikzlibrary {decorations.shapes}

                        \tikzset{

                          paint/.style={draw=#1!50!black, fill=#1!50},

                          spreading/.style={

                            decorate,decoration={shape
                          backgrounds, shape=rectangle,

                              shape start size=4mm,shape
                          end size=1mm,shape evenly
                          spread={#1}}}
 }

                        \begin{tikzpicture}

                          \fill [paint=green,spreading={5, by borders},

                                 decoration={shape scaled}]            (0,2)   --
                        (3,2);

                          \fill [paint=blue,spreading={5, by centers},

                                 decoration={shape scaled}]            (0,1.5) --
                        (3,1.5);

                          \fill [paint=red,    spreading=5]            (0,1)   --
                        (3,1);

                          \fill [paint=orange, spreading=4]            (0,.5)  --
                        (3,.5);

                          \fill [paint=gray,    spreading=1]            (0,0)   --
                        (3,0);

                        \end{tikzpicture}
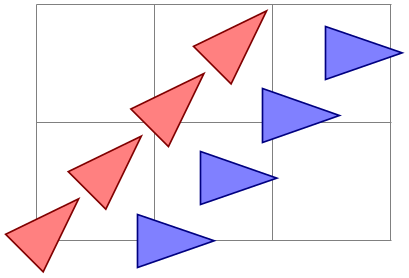
By default, shapes are rotated to the slope of the decorations path. If ⟨boolean⟩ is the value false, then this rotation is turned off. Internally this sets the TeX-if \ifpgfshapedecorationsloped accordingly.
                        \usetikzlibrary {decorations.shapes,shapes.geometric}

                        \tikzset{

                          paint/.style={draw=#1!50!black, fill=#1!50}
 }

                        \begin{tikzpicture}[decoration={

                              shape width=.65cm, shape
                          height=.45cm,

                              shape=isosceles triangle, shape
                          sep=.75cm,

                              shape
                          backgrounds}]

                          \draw [help lines] grid
                        (3,2);

                          \draw [paint=red,decorate] (0,0) --
                        (2,2);

                          \draw [paint=blue,decorate,decoration={shape sloped=false}]

                                                     (1,0) --
                        (3,2);

                        \end{tikzpicture}
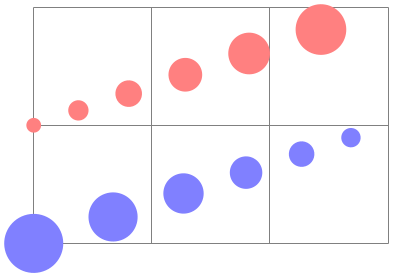
It is possible to scale the width and height of the shapes along the length of the decorations path. The shapes are scaled between the starting size and the ending size. The following keys customize the way the decoration shapes are scaled:
                        \usetikzlibrary {decorations.shapes}

                        \tikzset{

                          bigger/.style={decoration={shape start size=.125cm, shape
                          end size=.5cm}},

                          smaller/.style={decoration={shape start size=.5cm, shape
                          end size=.125cm}},

                          decoration={shape backgrounds,

                                        shape
                          sep={.25cm, between borders},shape scaled}
 }

                        \begin{tikzpicture}

                          \draw [help lines] grid
                        (3,2);

                          \fill [decorate, bigger, red!50]   (0,1) --
                        (3,2);

                          \fill [decorate, smaller, blue!50] (0,0) --
                        (3,1);

                        \end{tikzpicture}
If this key is set to false (which is the default), then only the start width and height are used. Note that the keys shape width and shape height set the start and end height simultaneously.
The starting width of the shape.
The starting height of the shape.
Sets both the start height and start width simultaneously.
The recommended ending width of the shape. Note that this is the width that a shape will take only if it is drawn exactly at the end of the path.
                        \usetikzlibrary {decorations.shapes}

                        \tikzset{

                          bigger/.style={decoration={shape start size=.25cm, shape
                          end size=1cm}},

                          smaller/.style={decoration={shape start size=1cm, shape
                          end size=.25cm}},

                          decoration={shape backgrounds,

                                        shape
                          sep={.25cm, between borders},shape scaled}
 }

                        \begin{tikzpicture}

                          \draw [help lines] grid
                        (3,2);

                          \fill [decorate,bigger,

                                 decoration={shape sep={.25cm, between borders}}, blue!50]

                            (0,1.5) --
                        (3,1.5);

                          \fill [decorate,smaller,

                                 decoration={shape sep={1cm, between centers}},   red!50]

                            (0,.5)  --
                        (3,.5);

                          \draw [gray, dotted] (0,1.625) --
                        (3,2)    (0,1.375) --
                        (3,1)

                                               (0,1)     --
                        (3,.625) (0,0)     --
                        (3,.375);

                        \end{tikzpicture}
The recommended ending height of the shape.
Set both the end height and end width simultaneously.
50.7 Text Decorations
-
TikZ Library decorations.text 
\usepgflibrary{decorations.text} %
LaTeX
and plain
TeX
and pure pgf
\usepgflibrary[decorations.text] % ConTeXt and pure pgf
\usetikzlibrary{decorations.text} %
LaTeX
and plain
TeX
when using TikZ
\usetikzlibrary[decorations.text] % ConTeXt when using TikZ
The decoration in this library decorates the path with some text. This can be used to draw text that follows a curve.
-
Decoration text along path
-
• Each character in the text is typeset in a separate \hbox. This means that if you want fancy things like kerning or ligatures you will have to manually annotate the characters in the decoration text within a group, for example, W{\kern-1ptA}TER.
-
• Each character is positioned using the center of its baseline. To move the text vertically (relative to the path), the additional decoration key raise should be used (see Section 24.4 for details).
-
• No attempt is made to ensure characters do not overlap when the angle between segments is considerably less than 180\(^\circ \) (this is tricky to do in TeX without a huge processing overhead). In general this should not be too much of a problem, but, once again, kerning can be used in most cases to overcome any undesirable effects.
-
• It is only possible to typeset text in math mode under considerable restrictions. Math mode is entered and exited using any character of category code 3 (e.g., in plain TeX this is $). Math subscripts and superscripts need to be contained within braces (e.g., {^y_i}) as do commands like \times or \cdot. However, even modestly complex mathematical typesetting is unlikely to be successful along a path (or even desirable).
-
• Some inaccuracies in positioning may be particularly apparent at input segment boundaries. This can (unfortunately) only be solved on a case-by-case basis by individually kerning the offending characters within a group.
-
/pgf/decoration/text=⟨text⟩ (no default, initially empty) 
-
/pgf/decoration/text format delimiters={⟨before⟩}{⟨after⟩} (no default, initially {|}{}) 
-
/pgf/decoration/text color=⟨color⟩ (no default, initially black) 
-
/pgf/decoration/reverse path=⟨boolean⟩ (no default, initially false) 
-
/pgf/decoration/text align={⟨alignment options⟩}(no default) 
-
/pgf/decoration/text align/align=⟨alignment⟩ (no default, initially left) 
-
/pgf/decoration/text align/left(style, no value) 
-
/pgf/decoration/text align/right(style, no value) 
-
/pgf/decoration/text align/center(style, no value) 
-
/pgf/decoration/text align/left indent=⟨length⟩ (no default, initially 0pt) 
-
/pgf/decoration/text align/right indent=⟨length⟩ (no default, initially 0pt) 
-
/pgf/decoration/text align/fit to path=⟨boolean⟩ (no default, initially false) 
-
/pgf/decoration/text align/fit to path stretching spaces=⟨boolean⟩ (no default, initially false) 
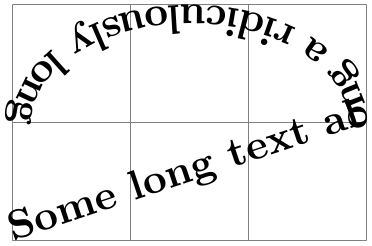
This decoration decorates the path with text. This drawing of the text is a “side effect” of the decoration. The to-be-decorated path is only used to determine where the characters should be put and it is thrown away after the decoration is done. This is why no line is shown in the following example.
                    \usetikzlibrary {decorations.text}

                    \catcode`\|12

                    \begin{tikzpicture}[decoration={text along
                      path,

                          text={Some long text
                      along a ridiculously long curve that}}]

                      \draw [help lines] grid
                    (3,2);

                      \draw [decorate] (0,0) --
                    (3,1) arc
                    (0:180:1.5 and 1);

                    \end{tikzpicture}
pgf “does its best” to typeset the text, however you should note the following points:
The following keys are used by the text decoration:
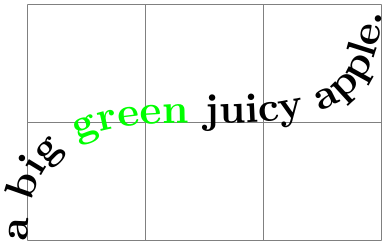
Sets the text to typeset along the curve. Consecutive spaces are ignored, so \ (or \space in LaTeX) should be used to insert multiple spaces. It is possible to format the text using normal formatting commands, such as \it, \bf and \color, within customizable delimiters. Initially these delimiters are both | (however, care will be needed regarding the category codes of delimiters – see below).
                        \usetikzlibrary {decorations.text}

                        \catcode`\|12

                        \begin{tikzpicture}

                          \draw [help lines] grid
                        (3,2);

                          \path [decorate,decoration={text along
                          path,

                                     text={a big |\color{green}|green|| juicy apple.}}]

                            (0,0) .. controls
                        (0,2) and
                        (3,0) .. (3,2);

                        \end{tikzpicture}
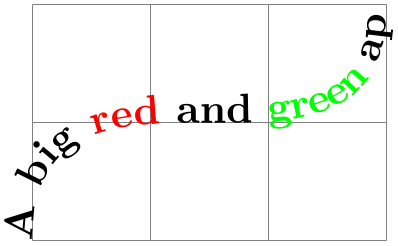
By following the first delimiter with +, the formatting commands are added to any existing formatting.
                        \usetikzlibrary {decorations.text}

                        \begin{tikzpicture}

                          \draw [help lines] grid
                        (3,2);

                          \path [decorate,decoration={text along
                          path,

                                     text={a |\large|big |+\bf\color{red}|red|| juicy apple.}}]

                            (0,0) .. controls
                        (0,2) and
                        (3,0) .. (3,2);

                        \end{tikzpicture}
Internally, the text is stored in the macro \pgfdecorationtext. Any characters that have not been typeset when the end of the path has been reached will be stored in \pgfdecorationrestoftext.
Set the characters that the text decoration will use to parse formatting commands. If ⟨after⟩ is empty, then ⟨before⟩ will be used for both delimiters. In general you should stick to characters whose category codes are 11 or 12. As + is used to indicate that the specified format commands are added to any existing ones, you should avoid using + as a delimiter.

                        \usetikzlibrary {decorations.text}

                        \begin{tikzpicture}

                          \draw [help lines] grid
                        (3,2);

                          \path [decorate, decoration={text along
                          path,text
                          format delimiters={[}{]},

                                     text={A big [\color{red}]red[] and [\color{green}]green[] apple.}}]

                            (0,0) .. controls
                        (0,2) and
                        (3,0) .. (3,2);

                        \end{tikzpicture}
The color of the text.
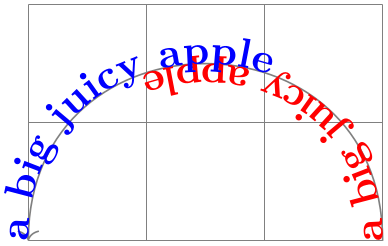
This key reverses the path. This is especially useful for typesetting text along different sides of curves.
                        \usetikzlibrary {decorations.text}

                        \begin{tikzpicture}

                          \draw [help lines] grid
                        (3,2);

                          \draw [gray, ->]

                            [postaction={decoration={text along
                          path,

                                text={a big juicy apple}, text
                          color=red}, decorate}]

                            [postaction={decoration={text along
                          path,

                                text={a big juicy apple}, text
                          color=blue, reverse path}, decorate}]

                            (3,0) .. controls
                        (3,2) and
                        (0,2) .. (0,0);

                        \end{tikzpicture}
This changes the key path to /pgf/decoration/text align and executes ⟨alignment options⟩.
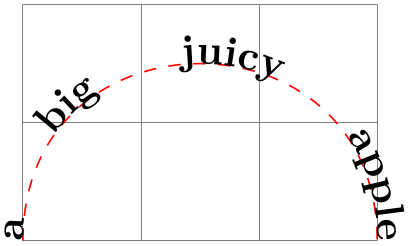
Aligns the text according to ⟨alignment⟩, which should be one of left, right, or center.
                        \usetikzlibrary {decorations.text}

                        \begin{tikzpicture}

                        \draw [help lines] grid
                        (3,2);

                        \draw [red, dashed]

                        [postaction={decoration={text along
                          path, text={a big juicy apple},

                            text align={align=right}}, decorate}]

                        (0,0) .. controls
                        (0,2) and
                        (3,2) .. (3,0);

                        \end{tikzpicture}
Aligns the text to the left end of the path.
Aligns the text to the right end of the path.
Aligns the text to the center of the path.
Specifies a distance which the automaton should move along before it starts typesetting the text.
Specifies a distance before the end of the path, where the automaton should stop typesetting the text.
This key makes the decoration automaton try to fit the text to the length of the path. The automaton shifts forward by a small amount between each character in order to fit the text to the path. If, however, the length of the text is longer than the length of the path (i.e., the automaton would have to shift backwards between characters) this key will have no effect.
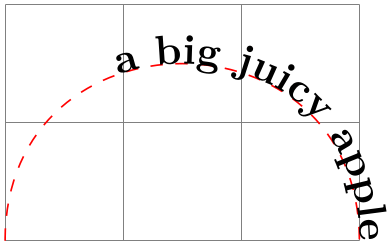
                        \usetikzlibrary {decorations.text}

                        \begin{tikzpicture}

                          \draw [help lines] grid
                        (3,2);

                          \draw [red, dashed]

                            [postaction={decoration={text along
                          path, text={a big juicy apple},

                                text align=fit
                          to path}, decorate}]

                            (0,0) .. controls
                        (0,2) and
                        (3,2) .. (3,0);

                        \end{tikzpicture}
This key works like the previous key except the automaton shifts forward only for space characters (including \space, but excluding \ ).
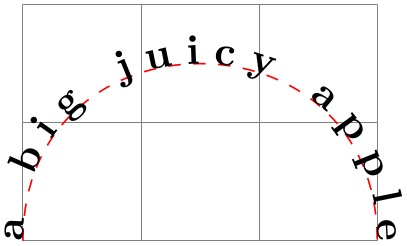
                        \usetikzlibrary {decorations.text}

                        \begin{tikzpicture}

                          \draw [help lines] grid
                        (3,2);

                          \draw [red, dashed]

                            [postaction={decoration={text along
                          path, text={a big juicy apple},

                                text align={fit
                          to path stretching spaces}}, decorate}]

                            (0,0) .. controls
                        (0,2) and
                        (3,2) .. (3,0);

                        \end{tikzpicture}
-
Decoration text effects along path
-
• formatting (e.g., font and color) cannot be specified in the decoration text. They can only be specified using the keys described below.
-
• as a consequence of using the TikZ node options, this decoration is only available in TikZ.
-
• due to the number of computations involved, this is quite a slow decoration.
-
/pgf/decoration/text={⟨text⟩}(no default)
-
/pgf/decoration/text align=⟨align⟩(no default)
-
/tikz/text effects={⟨options⟩}(no default) 
-
/pgf/decoration/text effects/every character(style, no value) 
-
/pgf/decoration/text effects/text along path(style, no value) 
-
/pgf/decoration/text effects/characters={⟨effects⟩}(no default) 
-
/pgf/decoration/text effects/character ⟨number⟩(style, no value) 
-
/pgf/decoration/text effects/every letter(style, no value) 
-
/pgf/decoration/text effects/letter ⟨number⟩(style, no value) 
-
/pgf/decoration/text effects/every first letter(style, no value) 
-
/pgf/decoration/text effects/every last letter(style, no value) 
-
/pgf/decoration/text effects/every word(style, no value) 
-
/pgf/decoration/text effects/word ⟨number⟩(style, no value) 
-
/pgf/decoration/text effects/word ⟨m⟩ letter ⟨n⟩(style, no value) 
-
/pgf/decoration/text effects/every word separator(style, no value) 
-
/pgf/decoration/text effects/word separator=⟨character⟩ (no default, initially space) 
-
/pgf/decoration/text effects/every character width(style, no value) 
-
/pgf/decoration/text effects/character widths={⟨effects⟩}(no default) 
-
/pgf/decoration/text effects/character count=⟨macro⟩(no default) 
-
/pgf/decoration/text effects/character total=⟨macro⟩(no default) 
-
/pgf/decoration/text effects/letter count=⟨macro⟩(no default) 
-
/pgf/decoration/text/effetcs/letter total=⟨macro⟩(no default) 
-
/pgf/decoration/text effects/word count=⟨macro⟩(no default) 
-
/pgf/decoration/text effects/word total=⟨macro⟩(no default) 
-
/pgf/decoration/text effects/style characters={⟨characters⟩} with {⟨effects⟩}(no default) 
-
/pgf/decoration/text effects/path from text={⟨true or false⟩} (default true) 
-
/pgf/decoration/text effects/path from text angle=⟨angle⟩(no default) 
-
/pgf/decoration/text effects/fit text to path=⟨true or false⟩ (default true) 
-
/pgf/decoration/text effects/scale text to path=⟨true or false⟩ (default true) 
-
/pgf/decoration/text effects/reverse text(no value) 
-
/pgf/decoration/text effects/group letters(no value) 
-
/pgf/decoration/text effects/repeat text=⟨times⟩(no default) 
-
/pgf/decoration/text effects/character command=⟨macro⟩(no default) 
-
/pgf/decoration/text effects/replace characters=⟨characters⟩ with {⟨code⟩}(no default) 
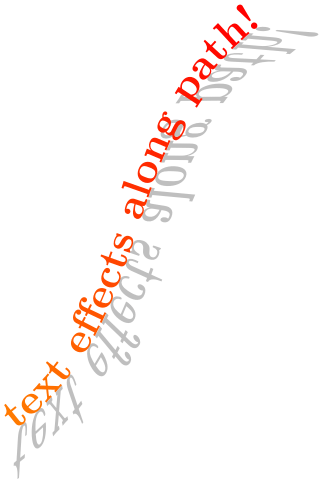
This decoration is similar to the text along path decoration except that each character is inserted into the picture as a TikZ node, and node options (such as text, scale and opacity) can be used to create ‘text effects’.
                    \usetikzlibrary {decorations.text,math}

                    \bfseries\large

                    \begin{tikzpicture}[decoration={text effects along
                      path,

                        text={text effects
                      along path!}, text
                      align=center,

                        text effects/.cd,

                          character count=\i, character
                      total=\n,

                          characters={evaluate={\c=\i/\n*100;}, text along
                      path, text=red!\c!orange},

                          character widths={text
                      along
                      path, xslant=0, yscale=1}}]


                    \path [postaction={decorate}, preaction={decorate,

                        text
                      effects={characters/.append={yscale=-1.5, opacity=0.5,

                          text=gray, xslant=(\i/\n-0.5)*3}}}]

                       (0,0) .. controls
                    ++(2,1) and
                    ++(-2,-1) .. (3,4);

                    \end{tikzpicture}
There are some important differences between this decoration and the text along path decoration:
The following keys are shared with the text along path decoration:
Set the text this decoration will use. Braces can be used to group multiple characters together, or commands that should not be expanded until they are typeset, for example gr{\"o}{\ss}eren. You should not use the formatting delimiters or math mode characters that the text along path decoration supports.
This sets the alignment of the text along the path. The ⟨align⟩ argument should be left, right or center. Spreading the text out, or stretching the spaces between words is not supported.
The decoration text can be thought of as consisting of characters arranged in to sequences of letters to make words which are separated by a word separator. This, however, does not mean that you are limited to using only natural language as the decoration text.
                    \usetikzlibrary {decorations.text}

                    \begin{tikzpicture}[decoration={text effects along
                      path,

                        text={000-001-010-011-100-101-110-111},

                        text effects/.cd,

                          path from
                      text,

                          word separator=-,

                          every letter/.style={shape=rectangle, fill=blue!20, draw=blue!40}}]


                    \path [decorate] (0,0);

                    \end{tikzpicture}
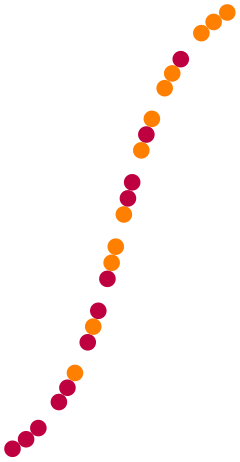
In addition, it is possible to replace characters with TikZ code:

                    \usetikzlibrary {decorations.text}

                    \begin{tikzpicture}[decoration={text effects along
                      path,

                        text={000-001-010-011-100-101-110-111}, text
                      align=center,

                        text effects/.cd,

                          word separator=-,

                          replace characters=0 with {\fill [purple] circle
                      [radius=2pt]; },

                          replace characters=1 with {\fill [orange] circle
                      [radius=2pt]; },

                          replace characters=- with {\path circle [radius=2pt]; },

                          every letter/.style={shape=rectangle, fill=blue!20, draw=blue!40}}]


                    \path [decorate] (0,0) .. controls
                    ++(2,0) and
                    ++(-2,0) .. (3,4);

                    \end{tikzpicture}
There are many keys and styles that can be used to add effects to the decoration text. Many of these keys have the parent path /pgf/decoration/text effects/, but for convenience, these keys can be accessed using the following key:
Execute every option in {⟨options⟩} with the key path for each option temporarily set to /pgf/decoration/text effects/.
The following keys can be used to customise the appearance of text in the text effects along path decoration.
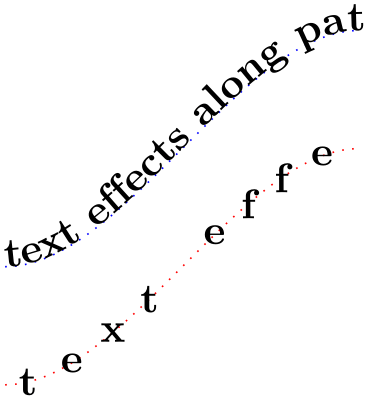
Set the effects that will be applied to every character in the decoration text. The effects will typically be TikZ node options. Initially, this style is empty so the decoration simply positions nodes at the appropriate position along the path. In order to make the text ‘follow the path’ like the text along path decoration the following key can be added to the every character style.
This style automatically sets the TikZ keys transform shape (to make the character slope with the path), anchor=baseline (to make the baseline of the characters ‘sit’ on the path) and inner xsep=0pt (to horizontally fit each node to the character it contains, reducing the spacing between characters).
                        \usetikzlibrary {decorations.text}

                        \begin{tikzpicture}[decoration={text effects along
                          path,

                              text={text effects
                          along path!}}]


                        \path [draw=red, dotted, postaction={decorate}]

                          (0,0) .. controls
                        ++(1,0) and
                        ++(-1,0) .. (3,2);

                        \path [draw=blue, dotted, yshift=1cm, postaction={decorate},

                          text effects={text along
                          path}]

                          (0,0) .. controls
                        ++(1,0) and
                        ++(-1,0) .. (3,2);

                        \end{tikzpicture}
Shorthand for the every character.
Specify additional effects for the character ⟨number⟩.
Specify additional effects for every letter (i.e., every character that isn’t the word separator) in the decoration text.
Specify the effects for letter ⟨number⟩ in every word.
Specify additional effects for the first letter in every word.
Specify additional effects for the last letter in every word.
Specify additional effects for every word in the decoration text.
Specify additional effects for word ⟨number⟩ in the decoration text.
Specify additional effects for letter ⟨n⟩ in word ⟨m⟩ in the decoration text.
Specify additional effects for every character that is a word separator.
Specify the character that is to be used as the word separator. This must be a single character such as a or - or the special value space (which should be used to indicate that spaces should be used as the separator).
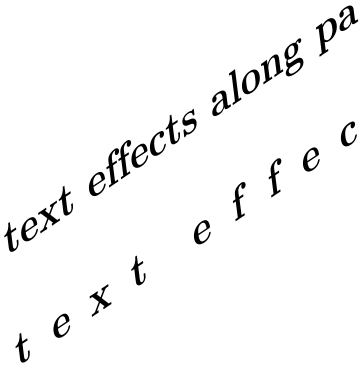
By default, the width for each character is calculated according to the bounding box of the node in which it is contained. However, if the node is rotated or slanted, or has a substantial inner sep, this bounding box will be quite big. The following key enables different effects to be applied to the node that is used to calculate the width.
This style is applied to the (invisible) nodes used for calculating the width of a character node.
Shorthand for the every character width style.
                        \usetikzlibrary {decorations.text}

                        \begin{tikzpicture}[decoration={text effects along
                          path,

                            text={text effects
                          along path!}, text
                          align=center,

                            text effects/.cd,

                              character count=\i,

                              characters={xslant=0.5, text
                          along path, name=c-\i}}]


                        \path [decorate] (0,0) --
                        (3,2);

                        \path [decorate,

                          text effects={character widths={inner xsep=0pt, xslant=0}}]

                          (0,1) --
                        (3,3);

                        \end{tikzpicture}
It is possible to parameterize effects, perhaps for doing calculations, or labelling nodes based on the number of the character in the decoration text. To access the number of the character, and the total number of characters the following keys can be used. However, these keys should not be used inside the style keys given above.
Store the number of the character being typeset in ⟨macro⟩.
                        \usetikzlibrary {decorations.text}

                        \begin{tikzpicture}[decoration={text effects along
                          path,

                            text={text effects
                          along path!},

                            text effects/.cd,

                              path from
                          text,

                              character count=\i, every
                          word separator/.style={fill=red!30},

                              characters={text
                          along
                          path, shape=circle, fill=gray!50}}]


                        \path [decorate, text effects={characters/.append={label=above:\footnotesize\i}}] (0,0);

                        \end{tikzpicture}
Store the total number of the characters in the decoration text in ⟨macro⟩. This key can be used with the character count key to produce some quite pleasing effects:

                        \usetikzlibrary {decorations.text,math}

                        \begin{tikzpicture}[decoration={text effects along
                          path,

                            text={text effects
                          along path!},

                            text effects/.cd,

                              character count=\i, character total=\n,

                              characters={text
                          along path, evaluate={\c=\i/\n*100;},

                                text=orange!\c!blue, scale=\i/\n+0.5}}]


                        \path [decorate]

                          (0,0) .. controls
                        ++(1,0) and
                        ++(-1,0) .. (3,2);

                        \end{tikzpicture}
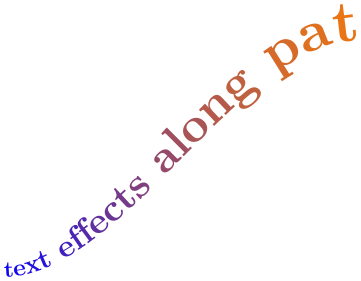
Store the number of letter being typeset (i.e., the position of the character in the word) in ⟨macro⟩. Numbering starts at 1 and the character acting as a word separator is numbered 0.
                        \usetikzlibrary {decorations.text}

                        \begin{tikzpicture}[decoration={text effects along
                          path,

                            text={text effects
                          along path!},

                            text effects/.cd,

                              path from
                          text, letter count=\i, every word separator/.style={fill=red!30},

                              characters={text
                          along
                          path, shape=circle, fill=gray!50}}]


                        \path [decorate, text effects={characters/.append={label=above:\footnotesize\i}}] (0,0);

                        \end{tikzpicture}
Store the number of letters in the current word in ⟨macro⟩. When the character is the word separator, this value is 0.
Store the number of words in the decoration text in ⟨macro⟩. Numbering starts at 1. When the character is the word separator, ⟨macro⟩ takes the number of the previous word. If the decoration text starts with a word separator ⟨macro⟩ will be 0.

                        \usetikzlibrary {decorations.text}

                        \begin{tikzpicture}[decoration={text effects along
                          path,

                            text={text effects
                          along path!},

                            text effects/.cd,

                              path from
                          text, word count=\i, every word separator/.style={fill=red!30},

                              characters={text
                          along
                          path, shape=circle, fill=gray!50}}]


                         \path [decorate, text effects={characters/.append={label=above:\footnotesize\i}}] (0,0);

                        \end{tikzpicture}
Store the total number of words in the decoration text in ⟨macro⟩.
It is also possible to apply effects to specific characters such as coloring every instance of the character a, or changing the font of every T in the decoration text:
This key enables ⟨effects⟩ to be applied to every character in the decoration text that is specified in ⟨characters⟩.

                        \usetikzlibrary {decorations.text}

                        \begin{tikzpicture}[decoration={text effects along
                          path,

                            text={Falsches {\"U}ben von Xylophonmusik
                          qu{\"a}lt jeden gr{\"o}{\ss}eren Zwerg},

                            text effects/.cd,

                              path from
                          text,

                              style characters=aeiou{\"U}{\"a}{\"o} with {text=blue},

                              characters={text
                          along path}}]


                        \path [decorate] (0,0);

                        \end{tikzpicture}
When this key is set to true and the decorated path consists only of a single point, the decoration will calculate the width of the decoration text using all the specified parameters as if the decorated path was actually a straight line starting from the given point. This ‘virtual’ straight line is then decorated with the text.

When used in conjunction with the path from text key, the straight line that is used as the decorated path is rotated by ⟨angle⟩ around the starting point.

                        \usetikzlibrary {decorations.text}

                        \begin{tikzpicture}[decoration={text effects along
                          path,

                            text={text effects
                          along path!},

                            text effects/.cd,

                              path from
                          text, path from
                          text angle=60,

                              character count=\i, character total=\n,

                              characters={text
                          along path, scale=\i/\n+0.5}}]


                        \path [decorate] (0,0);

                        \end{tikzpicture}
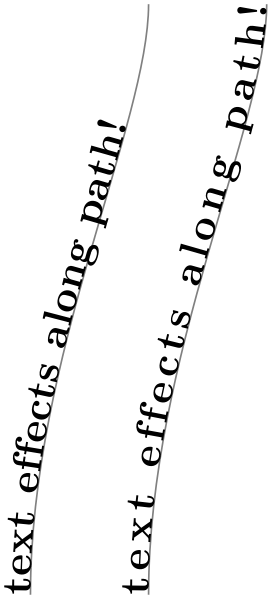
This key will make the decoration increase the space between characters so that the entire path is used by the decoration.
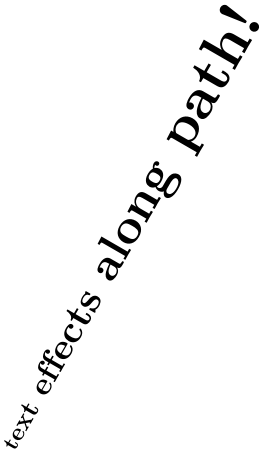
                        \usetikzlibrary {decorations.text}

                        \begin{tikzpicture}[decoration={text effects along
                          path,

                            text={text effects
                          along path!},

                            text effects/every character/.style={text
                          along path}}]


                        \path [draw=gray, postaction={decorate}, rotate=90]

                          (0,0) .. controls
                        ++(2,0) and
                        ++(-1,0) .. (5,-1);

                        \path [draw=gray, postaction={decorate}, rotate=90, yshift=-1cm,

                          text effects={fit text
                          to path}]

                          (0,0) .. controls
                        ++(2,0) and
                        ++(-1,0) .. (5,-1);

                        \end{tikzpicture}
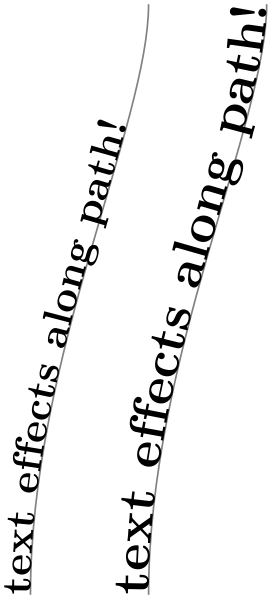
This key will make the decoration scale the text so that the entire path is used by the decoration.
                        \usetikzlibrary {decorations.text}

                        \begin{tikzpicture}[decoration={text effects along
                          path,

                            text={text effects
                          along path!},

                            text effects/every character/.style={text
                          along path}}]


                        \path [draw=gray, postaction={decorate}, rotate=90]

                          (0,0) .. controls
                        ++(2,0) and
                        ++(-1,0) .. (5,-1);

                        \path [draw=gray, postaction={decorate}, rotate=90, yshift=-1cm,

                          text effects={scale text
                          to path}]

                          (0,0) .. controls
                        ++(2,0) and
                        ++(-1,0) .. (5,-1);

                        \end{tikzpicture}
Reverse the order of the characters in the decoration text. This may be useful if using ‘right-to-left‘ languages. Unfortunately, any leading ‘soft’ spaces in the original text will be lost.
                        \usetikzlibrary {decorations.text}

                        \begin{tikzpicture}[decoration={text effects along
                          path,

                            text={text effects
                          along path!},

                            text effects/.cd,

                              path from
                          text, path from
                          text angle=60,

                              reverse text,

                              character count=\i, character total=\n,

                              characters={text
                          along path, scale=\i/\n+0.5}}]


                        \path [decorate] (0,0) .. controls
                        ++(1,0) and
                        ++(-1,0) .. (3,2);

                        \end{tikzpicture}
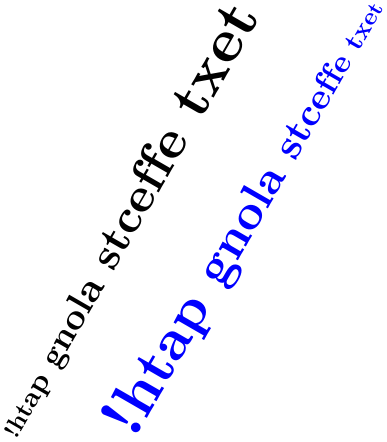
It is important to note that the reverse text key reverses the text before doing anything else. This means that the numbering of characters, letters and words will still be in the normal order, so any parameterized effects will have to take this into account. Alternatively, to get the numbering to follow the reversed text, it is possible to reverse the path and then invert the scale:
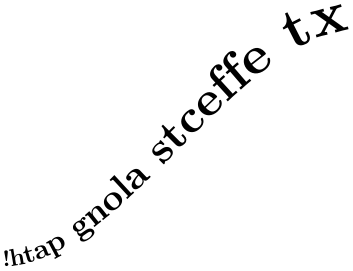
                        \usetikzlibrary {decorations.text}

                        \begin{tikzpicture}[decoration={text effects along
                          path,

                            text={text effects
                          along path!},

                            text effects/.cd,

                              path from
                          text, path from
                          text angle=60,

                              character count=\i, character total=\n,

                              characters={text
                          along path, scale=\i/\n+0.5}}]


                        \path [decorate, text effects={reverse text}] (0,0);

                        \path [blue, decorate, decoration={reverse path},

                            text effects={characters/.append={scale=-1}}] (1,0);

                        \end{tikzpicture}
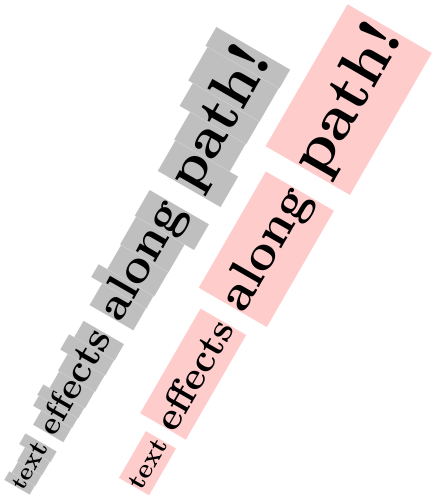
Group sequences of letters together so they are treated as a single ‘character’.
                        \usetikzlibrary {decorations.text}

                        \begin{tikzpicture}[decoration={text effects along
                          path,

                            text={text effects
                          along path!},

                            text effects/.cd,

                              path from
                          text, path from
                          text angle=60,

                              every word separator/.style={fill=none},

                              character count=\i, character total=\n,

                              characters={text
                          along
                          path, fill=gray!50, scale=\i/\n+0.5}}]


                        \path [decorate] (0,0);

                        \path [decorate, text effects={group letters,

                            characters/.append={fill=red!20}}]

                          (1,0);

                        \end{tikzpicture}
The order in which the reverse text and group letters keys are applied is important:
                    \usetikzlibrary {decorations.text}

                    \begin{tikzpicture}[decoration={text effects along
                      path,

                        text={text effects
                      along path!},

                        text effects/.cd,

                          path from
                      text, path from
                      text angle=60,

                          every word separator/.style={fill=none},

                          character count=\i, character
                      total=\n,

                          characters={text
                      along
                      path, fill=gray!50, scale=\i/\n+0.5}}]


                    \path [decorate, text effects={reverse text, group letters}] (0,0);

                    \path [decorate, text effects={group letters, reverse text,

                        characters/.append={fill=red!20}}] (1,0);

                    \end{tikzpicture}
Usually, when the decoration runs out of text, it simply stops. This key will make the decoration repeat the decoration text for the specified number of ⟨times⟩. If no value is given the text will be repeated until the path is finished. There are two points to remember however. Firstly the numbering of characters, letters and words will be restarted each time the text is repeated. Secondly, the options for alignment, scaling or fitting the text to the path, fitting the path to the text, and so on, are computed using the decoration text before the decoration starts. If any of these options are given the behavior of the repeat text key is undefined, but typically it will be ignored.

                        \usetikzlibrary {decorations.text}

                        \begin{tikzpicture}[decoration={text effects along
                          path,

                            text={text effects
                          along path!\ },

                            text effects/.cd,

                              repeat
                          text,

                              character count=\m, character total=\n,

                              characters={text
                          along path, scale=0.5+\m/\n/2}}]


                        \path [draw=gray, ultra thin, postaction=decorate]

                          (180:2) \foreach \a in
                        {0,...,12}{ arc
                        (180-\a*90:90-\a*90:1.5-\a/10) };

                        \end{tikzpicture}
This key specifies a command that is executed when each character is placed in the node. The ⟨macro⟩ should be an ordinary TeX macro which takes one argument. The argument will be a macro which when expanded will contain the current character.

                        \usetikzlibrary {decorations.text}

                        \def\mycommand#1{#1$_\n$}

                        \begin{tikzpicture}[decoration={text effects along
                          path,

                            text={text effects
                          along path!},

                            text effects/.cd,

                              path from
                          text, path from
                          text angle=60, group letters,

                              word count=\n,

                              every word/.style={character command=\mycommand},

                              characters={text
                          along path}}]


                        \path [decorate] (0,0);

                        \end{tikzpicture}
Replace the node for each character in ⟨characters⟩ with ⟨code⟩. The ⟨code⟩ can be thought of as describing a little picture or marking which will be used instead of the character node. The origin will be the current point along the decoration path. Any transformations associated with the ⟨characters⟩ (e.g., applied with the every character or every letter styles) will also be applied to ⟨code⟩.
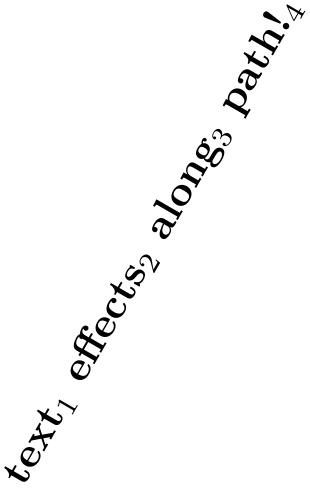
                        \usetikzlibrary {decorations.text}

                        \begin{tikzpicture}[decoration={text effects along
                          path,

                            text={text effects
                          along path!},

                            text effects/.cd,

                              path from
                          text, path from
                          text angle=60,

                              replace characters=e with {\fill [red!20]   (0,1mm) circle [radius=1mm];},

                              replace characters=a with {\fill [black!20] (0,1mm) circle [radius=1mm];},

                              character count=\i, character total=\n,

                              characters={text
                          along path, scale=\i/\n+0.5}}]


                        \path [decorate] (0,0);

                        \end{tikzpicture}
50.8 Fractal Decorations
-
TikZ Library decorations.fractals 
\usepgflibrary{decorations.fractals} %
LaTeX
and plain
TeX
and pure pgf
\usepgflibrary[decorations.fractals] % ConTeXt and pure pgf
\usetikzlibrary{decorations.fractals} %
LaTeX
and plain
TeX
when using TikZ
\usetikzlibrary[decorations.fractals] % ConTeXt when using TikZ
The decorations of this library can be used to create fractal lines. To use them, you typically have to apply the decoration
repeatedly to an originally straight path.
-
Decoration Koch curve type 1
This decoration replaces a straight line by a “rectangular bump”. By repeatedly applying this replacement, different levels of the Koch curve fractal can be created. Its Hausdorff dimension is \(\log 5/\log 3\).
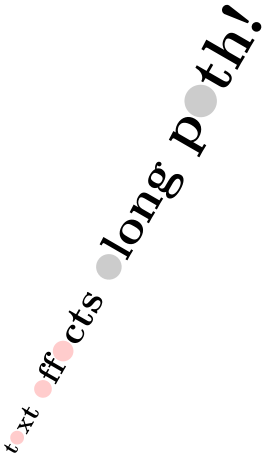
-
Decoration Koch curve type 2
This decoration replaces a straight line by a “rectangular sine”. Its Hausdorff dimension is \(3/2\).
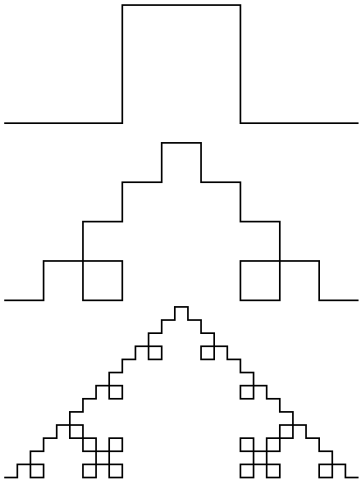
-
Decoration Koch snowflake
This decoration replaces a straight line by a “line with a spike”. The Hausdorff dimension of Koch’s snowflake’s is \(\log 4/\log 3\).
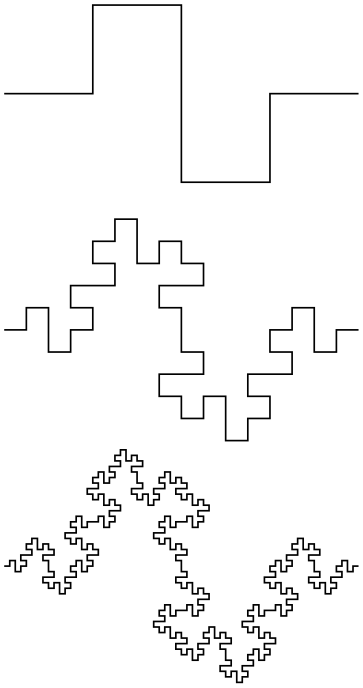
                    \usetikzlibrary {decorations.fractals}

                    \begin{tikzpicture}[decoration=Koch snowflake]

                      \draw decorate{ (0,0) --
                    (3,0) };

                      \draw decorate{ decorate{ (0,-1) --
                    (3,-1) }};

                      \draw decorate{ decorate{ decorate{ (0,-2) --
                    (3,-2) }}};

                      \draw decorate{ decorate{ decorate{ decorate{ (0,-3) --
                    (3,-3) }}}};

                    \end{tikzpicture}
-
Decoration Cantor set
This decoration replaces a straight line by a “line with a gap in the middle”. The Hausdorff dimension of the Cantor set is \(\log 2/\log 3\).
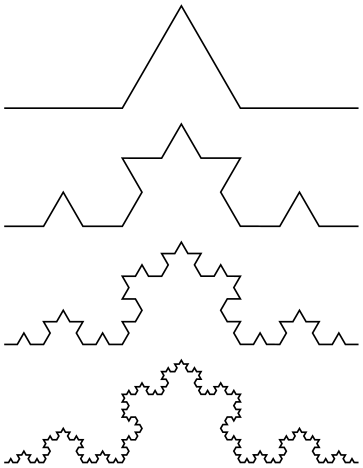
                    \usetikzlibrary {decorations.fractals}

                    \begin{tikzpicture}[decoration=Cantor set,very thick]

                      \draw decorate{ (0,0) --
                    (3,0) };

                      \draw decorate{ decorate{ (0,-.5) --
                    (3,-.5) }};

                      \draw decorate{ decorate{ decorate{ (0,-1) --
                    (3,-1) }}};

                      \draw decorate{ decorate{ decorate{ decorate{ (0,-1.5) --
                    (3,-1.5) }}}};

                    \end{tikzpicture}