TikZ and PGF Manual
Libraries
76 Tree Library
-
TikZ Library trees
\usetikzlibrary{trees} %
LaTeX
and plain
TeX
\usetikzlibrary[trees] % ConTeXt
This packages defines styles to be used when drawing trees.
76.1 Growth Functions
The package trees defines two new growth functions. They are installed using the following options:
-
/tikz/grow via three points=one child at (⟨x⟩ ) and two children at (⟨y⟩) and (⟨z⟩)(no default) 
This option installs a growth function that works as follows: If a parent node has just one child, this child is placed at ⟨x⟩. If the parent node has two children, these are placed at ⟨y⟩ and ⟨z⟩. If the parent node has more than two children, the children are placed at points that are linearly extrapolated from the three points ⟨x⟩, ⟨y⟩, and ⟨z⟩. In detail, the position is \(x + \frac {n-1}{2}(y-x) + (c-1)(z-y)\), where \(n\) is the number of children and \(c\) is the number of the current child (starting with \(1\)).
The net effect of all this is that if you have a certain “linear arrangement” in mind and use this option to specify the placement of a single child and of two children, then any number of children will be placed correctly.
Here are some arrangements based on this growth function. We start with a simple “above” arrangement:
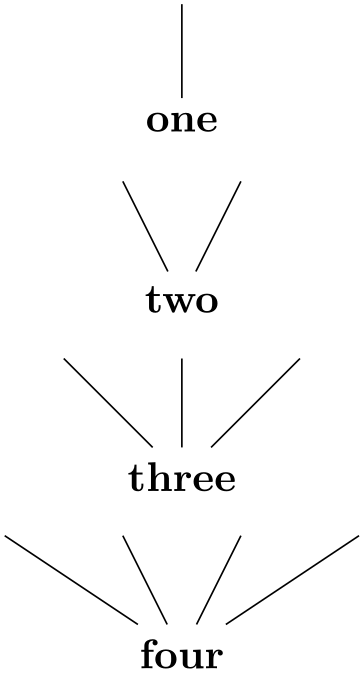
                    \usetikzlibrary {trees}

                    \begin{tikzpicture}[grow via three points={%

                          one child at
                      (0,1) and two children
                      at (-.5,1) and
                      (.5,1)}]

                      \node at
                    (0,0) {one} child;

                      \node at
                    (0,-1.5) {two} child
                    child;

                      \node at
                    (0,-3) {three} child
                    child
                    child;

                      \node at
                    (0,-4.5) {four} child
                    child
                    child
                    child;

                    \end{tikzpicture}
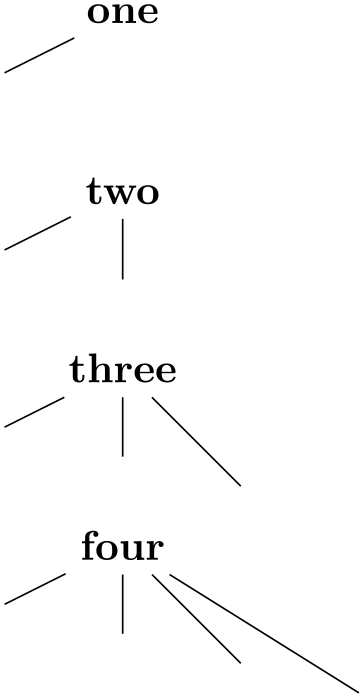
The next arrangement places children above, but “grows only to the right”.

                    \usetikzlibrary {trees}

                    \begin{tikzpicture}[grow via three points={%

                          one child at
                      (0,1) and two children
                      at (0,1) and
                      (1,1)}]

                      \node at
                    (0,0) {one} child;

                      \node at
                    (0,-1.5) {two} child
                    child;

                      \node at
                    (0,-3) {three} child
                    child
                    child;

                      \node at
                    (0,-4.5) {four} child
                    child
                    child
                    child;

                    \end{tikzpicture}
In the final arrangement, the children are placed along a line going down and right.
                    \usetikzlibrary {trees}

                    \begin{tikzpicture}[grow via three points={%

                          one child at
                      (-1,-.5) and two children
                      at (-1,-.5) and
                      (0,-.75)}]

                      \node at
                    (0,0) {one} child;

                      \node at
                    (0,-1.5) {two} child
                    child;

                      \node at
                    (0,-3) {three} child
                    child
                    child;

                      \node at
                    (0,-4.5) {four} child
                    child
                    child
                    child;

                    \end{tikzpicture}
These examples should make it clear how you can create new styles to arrange your children along a line.
-
/tikz/grow cyclic(no value) 
-
/tikz/sibling angle=⟨angle⟩(no default) 
This style causes the children to be arranged “on a circle”. For this, the children are placed at distance \tikzleveldistance from the parent node, but not on a straight line, but on points on a circle. Instead of a sibling distance, there is a sibling angle that denotes the angle between two given children.
Sets the angle between siblings in the grow cyclic style.
Note that this function will rotate the coordinate system of the children to ensure that the grandchildren will grow in the right direction.
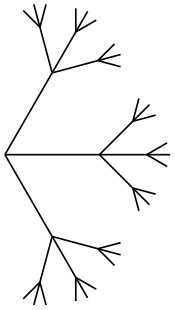
                    \usetikzlibrary {trees}

                    \begin{tikzpicture}

                      [grow cyclic,

                       level 1/.style={level distance=8mm,sibling angle=60},

                       level 2/.style={level distance=4mm,sibling angle=45},

                       level 3/.style={level distance=2mm,sibling angle=30}]

                      \coordinate [rotate=-90] % going down

                        child
                    foreach
                    \x in {1,2,3}

                          {child
                    foreach
                    \x in {1,2,3}

                            {child
                    foreach
                    \x in {1,2,3}}};

                    \end{tikzpicture}
-
/tikz/clockwise from=⟨angle⟩(no default) 
This option also causes children to be arranged on a circle. However, the rule for placing children is simpler than with the grow cyclic style: The first child is placed at ⟨angle⟩ at a distance of \tikzleveldistance. The second child is placed at the same distance from the parent, but at angle ⟨angle⟩\({}-{}\)\tikzsiblingangle. The third child is displaced by another \tikzsiblingangle in a clockwise fashion, and so on.
Note that this function will not rotate the coordinate system.
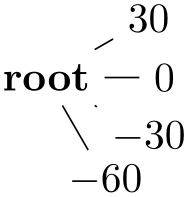
                    \usetikzlibrary {trees}

                    \begin{tikzpicture}

                      \node {root}

                      [clockwise from=30,sibling angle=30]

                      child {node
                    {$30$}}

                      child {node
                    {$0$}}

                      child {node
                    {$-30$}}

                      child {node
                    {$-60$}};

                    \end{tikzpicture}
-
/tikz/counterclockwise from=⟨angle⟩(no default) 
Works the same way as clockwise from, but sibling angles are added instead of subtracted.
76.2 Edges From Parent
The following styles can be used to modify how the edges from parents are drawn:
-
/tikz/edge from parent fork down(style, no value) 
This style will draw a line from the parent downwards (for half the level distance) and then on to the child using only horizontal and vertical lines.
                    \usetikzlibrary {trees}

                    \begin{tikzpicture}

                      \node {root}

                        [edge from parent fork down]

                        child
                    {node {left}}

                        child
                    {node {right}

                          child[child anchor=north east] {node
                    {child}}

                          child
                    {node {child}}

                        };

                    \end{tikzpicture}
-
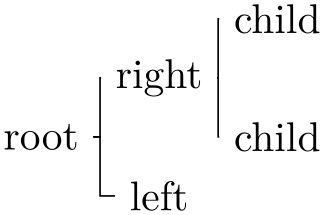
/tikz/edge from parent fork right(style, no value) 
This style behaves similarly, only it will first draw its edge to the right.

-
/tikz/edge from parent fork left(style, no value) 
Behaves similarly to the previous styles.
-
/tikz/edge from parent fork up(style, no value) 
Behaves similarly to the previous styles.